

If you really want that your website is successful and reaches the top positions in the search engines búsqueda (y quién no), obtener un tema de WordPress premium bien optimizado simplemente no es suficiente; también debes considerar repasar los conceptos básicos de SEO . Es un hecho ampliamente conocido que el SEO (Search Engine Optimization) es un factor instrumental en la construcción de un sitio Web. Si no puede optimize su sitio web, corre el riesgo de que los search engines no lo noten. Y eso puede ser un golpe fatal para cualquier sitio.
Si posee un sitio web con WordPress, hay muchas herramientas de SEO gratuitas para ayudarlo con su strategy de SEO. Pero cuando se trata de optimizar su contents, Yoast SEO es sin duda uno de los mejores complementos de WordPress para el trabajo. No solo tiene amplias opciones de SEO, sino que la mayoría de ellas también están disponibles de forma gratuita. Por lo tanto, hemos decidido crear una guía completa sobre cómo instalar y usar el complemento Yoast SEO en su sitio de WordPress.
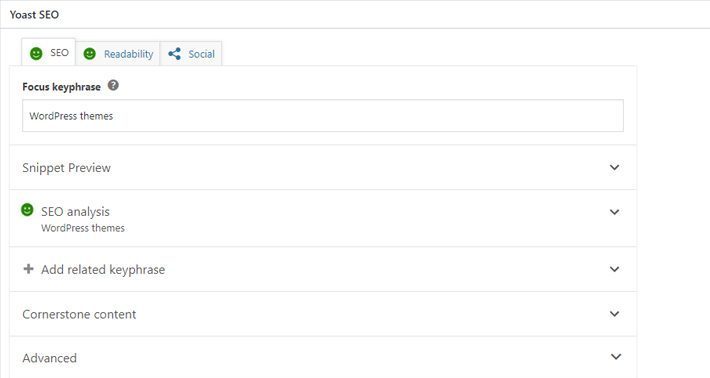
¿Qué hace el plugin Yoast SEO para su sitio web?
Yoast SEO te ayuda a optimizar adecuadamente tus páginas y publicaciones para motores de búsqueda. Esto incluye insertar keywords y frases clave en su publicación o cualquier otro type of content, así como cambiar sus títulos y meta descripciones en cualquier página o publicación, todo con el target de obtener la clasificación más alta posible en los motores de búsqueda.
En función de la duración de su publicación, así como de su frase/palabra clave de enfoque, Yoast calcula las mejores formas de optimizar la publicación en cuestión. Por ejemplo, determina cuántas veces debe agregar una keyword para satisfacer los estándares de SEO y garantizar la facilidad de búsqueda de su sitio. Esto debe tomarse como una guía no como una ciencia.
Sin embargo, no solo calcula si tiene suficientes palabras clave en su contenido, sino también si hay palabras clave en sus headers, meta description and in the Url de su publicación. Además, Yoast también le notifica si no hay imágenes en su página o publicación, si su meta descripción es demasiado corta o demasiado larga, si tiene suficientes enlaces internos y salientes, etc.
Otra gran cosa acerca de Yoast SEO es que mejora la legibilidad general de su contenido. Ya be que produzca contenido para obtener más ventas o simplemente para obtener credibilidad en su nicho, la legibilidad es extremadamente importante para su SEO en la página. Las reglas son bastante simples: si su contenido no es lo suficientemente limpio o legible, las persons no considerarán su sitio como una fuente confiable y, lo más probable, no se sentirán inclinados a comprarle. En consecuencia, sus posibilidades de obtener una clasificación más alta pueden disminuir.
Yoast increases your readability by offering suggestions on how to improve certain parts of your writing. This includes pointing out places where your sentences or paragraphs may be shorter and notifying you if you use too much passive voice, if you must use a greater variety of transition words, etc.
This plugin will help you on-page seo of your web, achieving improve organic positioning from your website
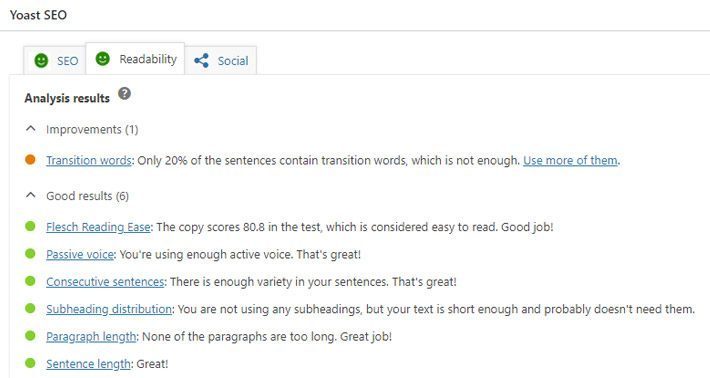
What is also characteristic of Yoast is that it works on the principle of traffic lights. That is, if the light for your readability or SEO score is red, that means you need more work. If it's orange, that means your optimization is acceptable, but there are still more than a few improvements you can make. For best results, your goal should be to turn the light green.
Además de estas características útiles que le permiten optimizar sus palabras clave y legibilidad, Yoast también le ofrece la opción de generar un mapa del sitio XML, así como indexar (o no indexar) segmentos específicos de su sitio. Por último, pero no menos importante, le permite importar todos sus datos y configuraciones de otros complementos de SEO.
How to install Yoast SEO plugin?

The Yoast SEO plugin can be easily installed from the WordPress plugin directory in your admin panel, or you can download the plugin from Yoast website.
If you choose the first option, all you need to do is click Plugins> Add new , and then write Yoast SEO in the search box. After it appears in the results, just hit the Install button. Once you have finished installing the plugin, click the button Activate .
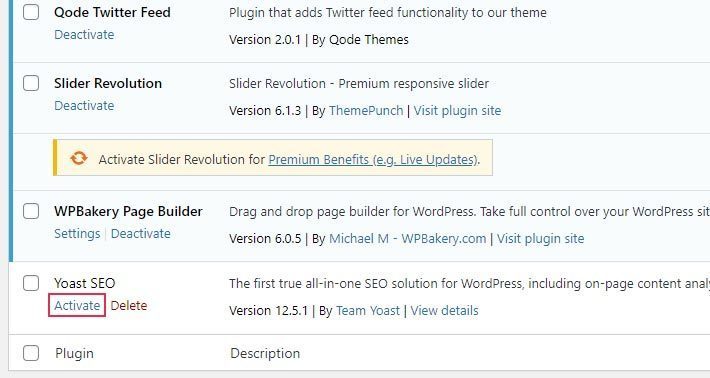
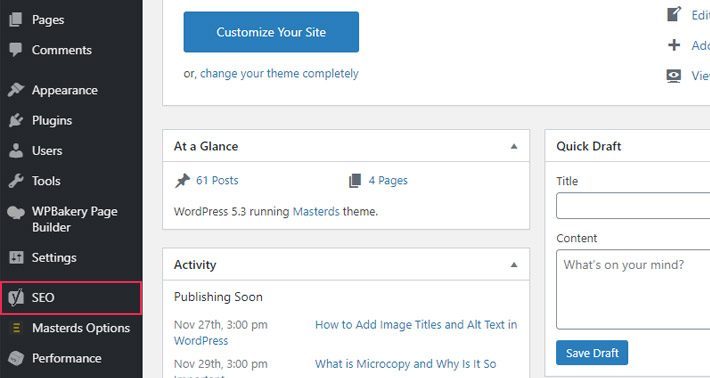
Now that Yoast has been installed and activated, a new option will appear called SEO in the sidebar of your Administrator.
How to configure Yoast SEO plugin
This plugin has many settings that may seem complicated to configure at first glance, but you will soon realize that it is not as difficult as it seems.
Yoast SEO settings contain multiple tabs. We will review them in more detail.
The general screen
When we go to SEO settings, the screen will open General - Yoast SEO .
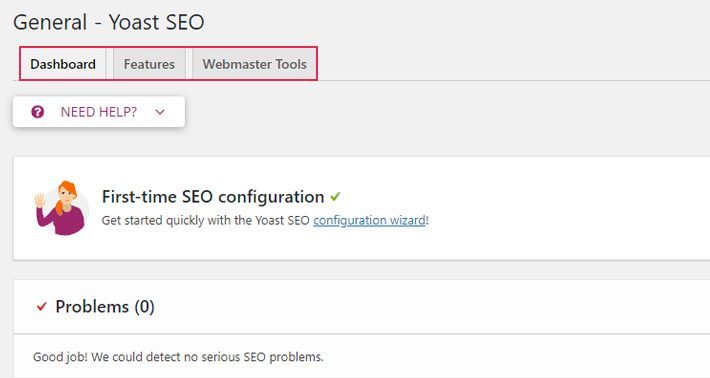
Control Panel : in this tab, we will see the assistant SEO setup for the first time . The wizard will guide us through some steps that will be presented to you in the form of questions and answers. These steps will help you get started with Yoast and adjust it to your website preferences.
characteristics - This tab contains many features that are enabled by default. We can enable or disable each of them according to your preferences.
- SEO analysis: this is the option that we mentioned at the beginning. By activating it, you will allow Yoast to analyze your posts and pages, display your overall SEO score, and help you optimize them for search engines.
- Readability Analysis - We've touched on this before, too. The readability analysis option shows the readability score of your page / post and offers you suggestions in case you need to improve its readability.
- Cornerstone Content - This is your most important content, that is, the pages or posts that you want to rank higher in search engines. This option allows you to bookmark and filter this type of content on your site.
- Text link counter: the option that improves the structure of your site by displaying the number of internal links in your publications .
- XML sitemaps - Enables the generation of XML sitemaps on your site. These are particularly important because they hierarchically list the pages on your site and help search engines crawl them faster.
- Ryte Integration: Ryte is a third-party service that monitors, analyzes and optimizes the most important elements of your website to improve its overall performance. In case you have Ryte installed on WordPress, it will integrate with Yoast. Ryte will check if your site is still indexable by search engines on a weekly basis. If your site is not indexed, Yoast SEO will inform you.
- Admin Bar Menu: The function that allows a menu item called "SEO" to appear (or not appear) in the admin bar. Since it contains some convenient SEO settings, as well as the ability to quickly research keywords, this feature may be useful to some, but others may prefer to hide it.
- Security - No Advanced Settings for Authors - This option ensures that advanced SEO settings are hidden from authors. Only editors and administrators can use advanced settings unless this option is disabled.
Webmaster tools : al usar esta pestaña, puede verificar su sitio web con diferentes herramientas para webmasters. Una vez que haga esto, su página de inicio recibirá una metaetiqueta de verificación por parte de diferentes motores de búsqueda. Puede obtener códigos de verificación para Google, Yandex, Bing and Baidu siguiendo los enlaces que se ofrecen en la pestaña, y luego agregarlos en los campos marcados para ese Search Engine in particular.
Search appearance
The screen Search aspect It has quite a few tabs with settings that let you define what your website will look like when it appears in search engine results.

general - This tab contains three different options: Separador de título, Página de inicio y Knowledge Graph & Schema.org .
- Title Separator - You can separate your site title and your post name with a symbol. There are several symbols that you can use as a title separator, with the hyphen being the default.
- Página de inicio : aquí es donde puede establecer el meta título y la meta descripción para la página de inicio de su sitio web.
- Knowledge Graph & Schema.org : Yoast genera automáticamente datos estructurados sobre su sitio web. Para garantizar que los datos estructurados sean correctos, debe definir si su sitio representa una organización o un individuo. También puede ingresar el nombre de su organización y el avatar / Logo here.
Types of content - The options you can find on this tab will allow you to configure the search appearance for different types of content. You can choose whether your posts and pages will appear in search results and whether to show or hide the publication date in the snippet preview and / or Yoast SEO Meta Box. Of course, you can also edit the SEO title and meta description variables for each of these categories, but we suggest that you always write custom meta titles and meta descriptions for each individual page or post.
Media - Media upload to WordPress is that it not only saves your media, but also creates an attached URL for the media in question. However, these attachment pages are often empty and can be detrimental to your page's SEO. Therefore, we recommend that you disable attached URLs if you do not plan to use them. The default option is recommended (that is, redirect the URLs of the attachments to the attachment itself).
Taxonomies : aquí puede configurar si desea que aparezcan etiquetas, categorías y formatos en los resultados de búsqueda (si no aparecen, significa que no formarán parte de los mapas de sitio XML). También puede definir las variables de meta título y meta descripción para cada taxonomía. Además, también puede optar por eliminar (o mantener) el prefijo de categorías de la URL de la categoría (generalmente visible en la URL como / category /).
Records : aquí, puede modificar la apariencia de búsqueda para diferentes páginas de archivo en su sitio, como las que enumeran todas las publicaciones con una fecha o autor específicos, así como el resultado de la búsqueda y 404 páginas. Le recomendamos que deshabilite los archivos de autor en los resultados de búsqueda si su Blog solo tiene un autor.
Crumbs of bread: crumbs pan muestran el camino preciso a una página específica en su sitio. Como tal, también tienen el papel de un hito, a su vez mejoran la experiencia del Username y ayudan con la navegación general del sitio. Lo que también es bueno de ellos es que también aparecen en los resultados de búsqueda, lo que automáticamente le da un impulso a su sitio web en lo que respecta a las clasificaciones de los motores de búsqueda. Debería tener habilitadas las migas de pan ya que esto le permitirá tener acceso a la configuración de migas de pan adicionales.
- Breadcrumb Separator - This option is self explanatory. You can choose to put (or not put) a separator between the breadcrumbs. The separator is usually some kind of symbol, like the two arrows (>>) that are already placed by default.
- Anchor text for the home page: You can change the name of the anchor text for the home page here, although we recommend that you leave it as the default (Home).
- Breadcrumb prefix: This is the name of your prefix that comes before the breadcrumb. Once again, we recommend that you leave this field blank.
- Prefix for Archive Breadcrumbs: This option allows you to define a prefix for archive breadcrumbs.
- Search page breadcrumbs prefix: You can add a prefix to search page breadcrumbs.
- Navigation path for 404 page - You can determine what will be displayed in the path when users come across a 404 page.
- Show blog page (optional) - This setting will appear if you have set a custom blog and home page. In that case, we recommend enabling this setting.
- Bold Last Page: Choose whether to make the last page bold or not. We recommend that you choose Regular here.
- Taxonomy to display in breadcrumbs for post types - Unless you are an advanced user, we suggest that you select Category for the taxonomy.
- Content type file to display in breadcrumbs for taxonomies - Here you can enter Category, Label and Format.
RSS : la configuración de la fuente RSS le permite definir cómo se mostrarán las publicaciones de su blog en las fuentes RSS. Puede agregar un link al archivo del autor, a la publicación, a su sitio con el nombre de su sitio como un ancla, y un enlace con el nombre y la descripción de su sitio.


![SEO Guide for WordPress + SEO Tutorial for Ecommerce [SEO On Page Video Tutorial]](https://rmarketingdigital.com/wp-content/uploads/2020/11/guia-seo-para-wordpress-4887479-e1620380188678-600x294.png)


