We are going to see the different steps in the process to Create a Page Web profesional con WordPress, the CMS más utilizado a nivel mundial.
Some steps when creating a web page with WordPress will be more general and others specific to this Content Manager.
1.- The domain
Una de las primeras cosas que debemos pensar, antes de ponernos a crear una página web WordPress, es el nombre de domain que vamos a elegir para el sitio web.
The domain will be the name through which we will access the website. This is registered and we have to renew it when the contracted period expires. That is, it is not something that is bought at once and we can have it for life.
We must also decide its extension: ".es", ".com", ".org", etc.
If the web page that you are going to create is designed for the Spanish national market, you can use a “.es” or “.com”. Conversely, If the website is designed for Spain and Spanish-speaking countries, I recommend the ".com".
Lo más habitual es registrar el dominio con la misma empresa que contratemos el hosting, aunque podemos contratar el hosting y el dominio con diferentes empresas y luego apuntar las DNS hacia los servidores de la empresa donde tengamos alojada la web.
2.- The hosting
The second step of our cumin to learn how to make a web page step by step will be the choice of web hosting or hosting. A web hosting that we can recommend is Ionos.


Hiring a hosting or web hosting is essential to make a website with WordPress since we need a place to host said website.
Lets start by the beginning. A server web es una aplicación que se instala en un ordenador para que permita servir páginas web a los clientes que se lo soliciten.
A hosting or web hosting is a service offered to us by a company that has web servers. The companies will offer us different plans according to the characteristics of the service.
The usual thing is to hire a shared hosting. This is a hosting service in which a web server is "divided" into many parts and those parts are rented to different clients. Obviously this makes this type of plan the cheapest.
In any case, it is very important to choose a good hosting and that it is optimized for WordPress.
3.- Install WordPress
To create a website with WordPress we must first proceed to install the application on the hosting under the domain name that we have decided.
Today, most hosting companies have one-click installers. One-click installers are applications that allow you to install WordPress and other CMS in a very simple and intuitive way.
Tradicionalmente para crear una página web con WordPress había que descargar WordPress, subirlo vía FTP al hosting, crear una base de datos y proceder a la instalación. Hoy en día como digo todo esto no es necesario ya que la mayoría de hosting dispone de este tipo de instaladores en 1 clic.
4.- Access to the WordPress administration panel
We already have the first big step taken when creating a WordPress website. Now we must try access the private part of the web, called as Back Office or administration panel.
Para acceder al panel de administración de WordPress deberás introducir la siguiente Url:
www.nombredemiweb.es/wp-admin
Now you should see the access panel to the Back Office of the WordPress application that you just installed.
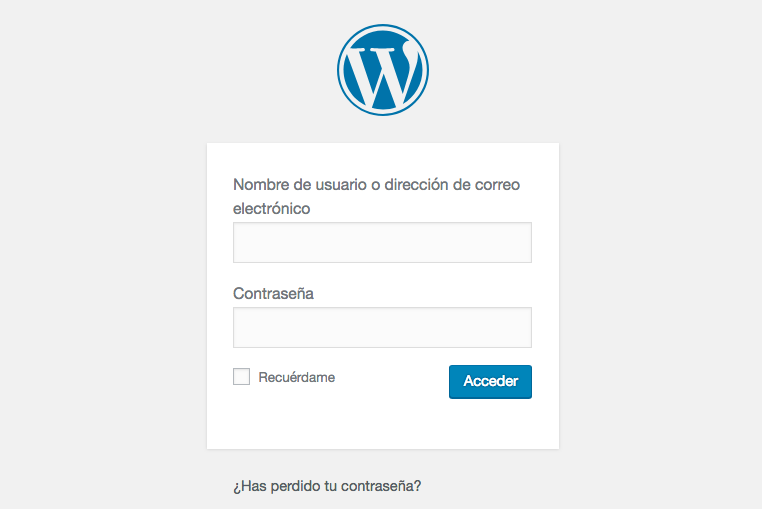
Name of Username: Now you must enter the name of the administrator user that you included in section d.- ii.- of the WordPress installation.
- Password: Here you must enter the administrator password that you provided in point d.- iii of the WordPress installation.
- Remember password: A little further down you have a check box so that the application remembers the password entered
- Recover password: algo más abajo tenemos un link para recuperar la contraseña en caso de que no la recordemos (la recuperaremos a través de un correo electrónico que se enviará al correo que introducimos en el apartado d.- iv.- de la instalación)
5.- Initial settings when creating WordPress website
Be very careful about some of the initial settings when making a wordpress web page. Especially on the subject of configuración de URL amigables y la posibilidad de no permitir la indexing por parte de Google.
Once WordPress is installed we will perform a series of initial settings:
a.- General Settings: We will go to "administration panel> Settings> General" and the Time zone section we will select: "Madrid"
b.- Do not allow Google indexing: It is important that until we have the web with the urls of each page defined and the contents más o menos terminado no permitamos a Google ni a ningún otro buscador que indexe nuestra web. Para ello iremos a: “panel de administración > Ajustes > Lectura” y veremos que al final de la página hay una etiqueta titulada: “Visibilidad para los buscadores”.
Marca el check box con el texto: “Disuade a los search engines de indexar este sitio” y pulsa el botón de guardar.
NOTE: Remember that when you have more or less finished your website and you want Google to index your site, you must unmark this check box and press the save button.
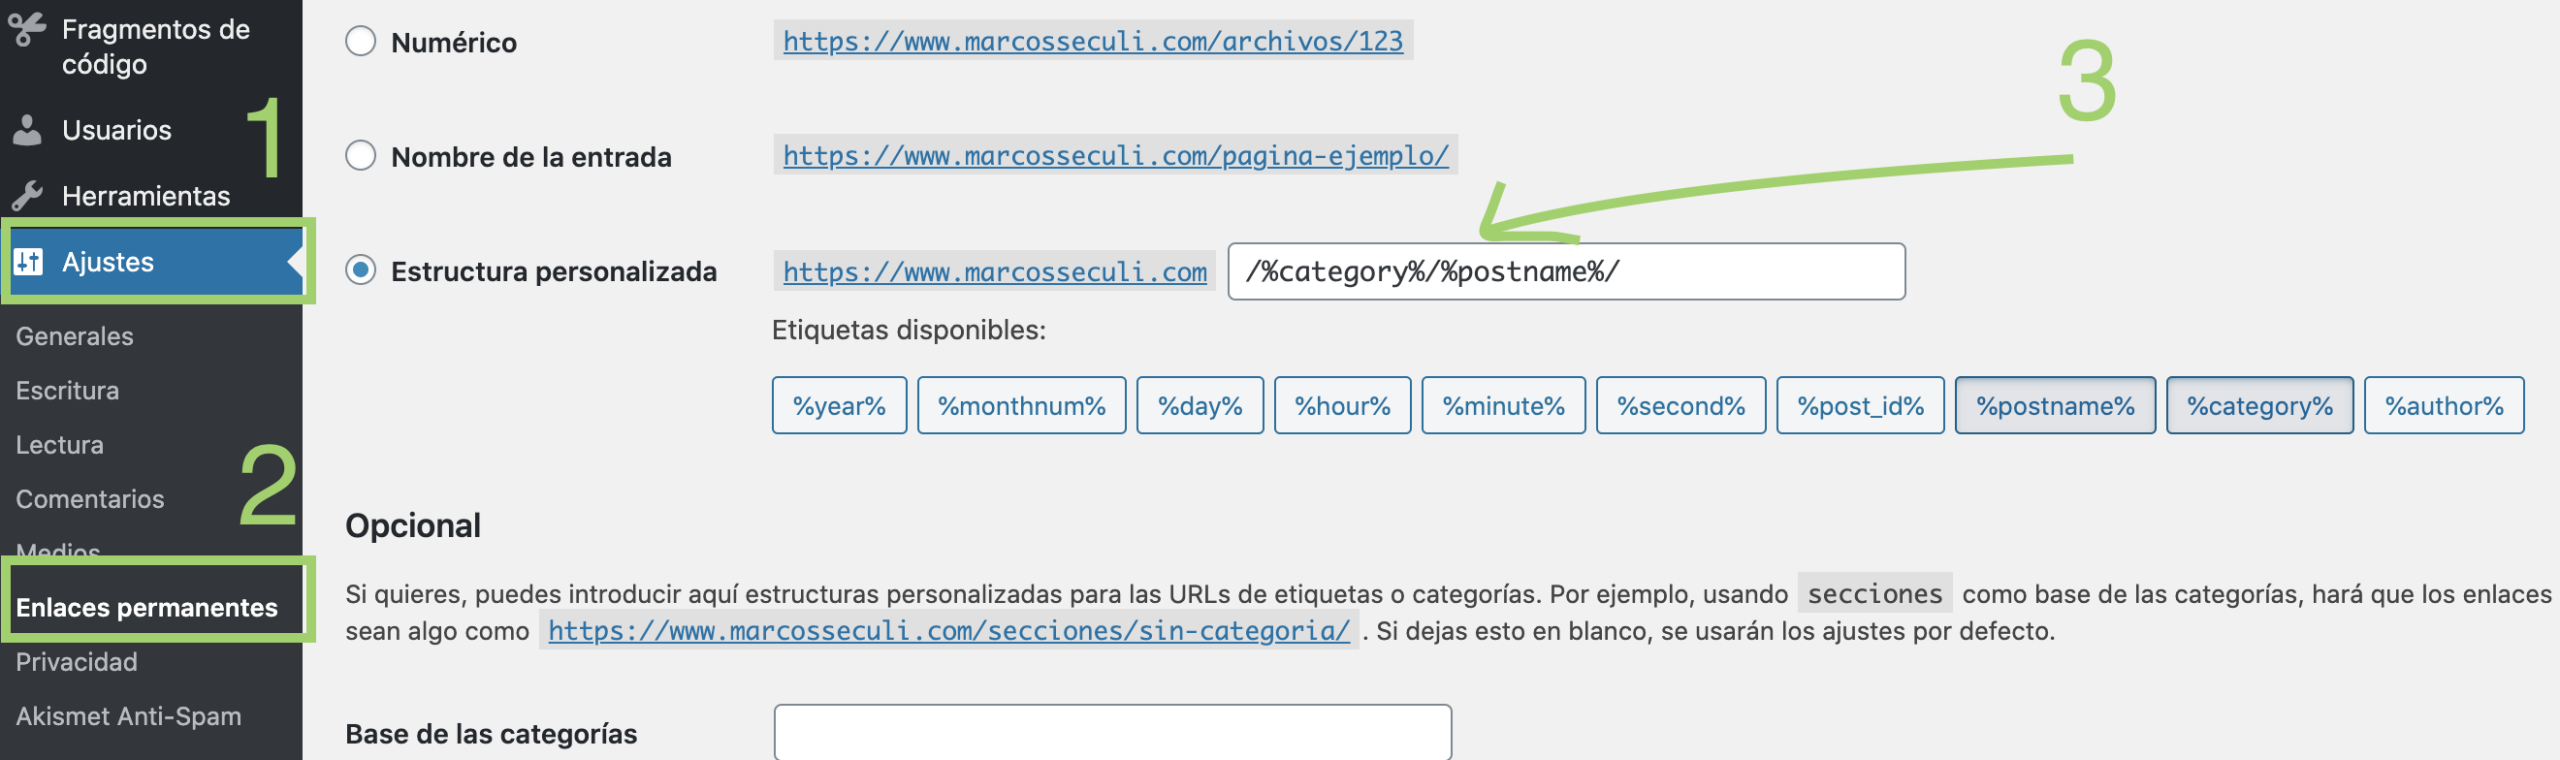
c.- Friendly URLs: es fundamental para el SEO utilizar URLS amigables. Para ello vamos a: “panel de administración > Ajustes > Enlaces permanentes”
In the Common Settings section, we will mark the following radio button: "Entry name" and we will press the save changes button located at the bottom of the web.
d.- Website under maintenance: It is interesting that throughout the process of creating a web page with WordPress the site publicly displays a maintenance page.
En el apartado b) hemos configurado la web para que no pueda ser indexada por Google, pero eso no significa que los usuarios de internet no puedan ver nuestro sitio. Para poner la web en modo mantenimiento y que los posibles visitantes vean una página de presentación debemos utilizar un plugin.
I usually use the free plugin Maintenance.
6.- Structure and design of the web
At this point it is time to get down to work on creating the structure and design of the web.
Define the structure of the web
We must decide what inner pages will the web have. This structure will be reflected in the top menu of the web.
Usually a corporate website will consist of at least the following pages:
- Start : home or home page of the web
- who we are or us or the company: Corporate information page
- services and / or products: commercial page where the services and / or products of the company are displayed.
- Contact: page with location and contact information
Some corporate websites also include:
- Portfolio: this page shows the work carried out by the company
- Blog: muchos sitios web incoroporan un blog para mejorar el positioning y crear una comunidad entorno a la empresa.
The page of services or products can gather all of them in a single page or we can create specific pages for each service or product that are displayed from the menu item services or products (fig. 1)
My recommendation is that you include a page for each service and / or product to try to position them separately in Google.
For this I strongly recommend that search with him keyword planner the services you are going to offer, con el fin de saber que palabras utiliza la gente al buscar en Google cuando busca servicios como los que vas a ofrecer en tu web. Ten en cuenta los filters of keyword planner por provincias y ciudades
Web design
The colors to be used on the page will normally be those that make up the logo. If you don't have a logo, it's still time to have one designed for you.
Here I leave you this very interesting post by Arturo García about the colors to use in a web. It can also be used to choose the colors for the logo
Otra cosa que debes hacer es cogerte varios folios y dibujarte un sketch de la composición que quieres hacer en cada una de las páginas de la web, sobre todo de la página de inicio o home. Dibuja las diferentes zonas o bloques en la que se dividirá cada una de las páginas.
7.- The WordPress template
An essential point when creating a wordpress website is to choose the template or theme.
Templates (we should really say themes or themes) give us the aesthetic part of the web.
There are free and paid templates. Free templates are much more limited, while paid templates have a lot more customization options. So I recommend that to create a professional website you go directly to a paid WordPress template.
Dentro de las plantillas de pago, existen empresas que nos ofrecen paquetes con muchas plantillas desarrolladas bajo un framework al precio de lo que cuesta una plantilla.
Some companies even include interesting plugins in the price of the template packs. Of course, we can also buy individual templates.
A little further down I'm going to leave you a link to a mega guide in which the main options for WordPress templates on the market are analyzed.
In any case, before purchasing a template you must take into account the following points:
a.- Single payment or annual payment: There are templates that are paid only once, as is the case with the ones you can buy in the Theme Forest market.
There are other templates or template packs in which the payment entitles you to use the templates for life, but you must pay again annually to enjoy updates.
b.- License for how many websites ?: You should look at the license that comes with the template. There are templates licensed to be used on a single website and other templates licensed to be used on all the websites you want.
c.- Do I need to have technical knowledge to use the template ?: existen plantillas como es el caso de las construidas bajo el framework Genesis, a las cuales para sacarle partido deberás conocer HTML, CSS, incluso algo de PHP. Por el contrario hay otras plantillas en las cuales no tendrás que tener ningún tipo de conocimiento de programming para sacarle partido.
d.- Does it include page builder? With updates ?: A page builder is a complement that will allow us to create complex structures on the pages, and include elements or modules within them in a very simple and visual way known as "drag and drop", providing the pages of our site from a professional look, which would be impossible to do using the page editor that comes by default in WordPress.
There are some templates that include a page builder as a plugin or in the core of the template. We must take into account if when buying a template that includes a page builder, it includes, in addition to future updates to the template, future updates to the page builder.
f.- Does it include updates and support? For how long?: It is important to be clear if when buying a template, it includes updates and support. And also for how long does it include these services.
8.- WordPress web design, The page builder
The choice of the page builder is another key action when creating a website with WordPress.
As I have told you before a page builder is an element that will allow us to create complex structures on the pages through sections, rows and columns. Rows may have specific column layouts such as:
1/ 1
1/2+ 1/2
1/2 + 1/4 + 1/4
1/ 3 + 1/3 + 1/3
1/4+1/4+1/4+1/4
etc.
Page builders include a wide repertoire of modules with specific functionalities such as: form module, image module, text module, icon module, dropdown button module, accordion module, slider module, etc. Within the columns, any of the aforementioned modules can be inserted in a very simple and visual way known as "drag and drop", thus giving the pages of our site a professional appearance, which would be impossible. to achieve using the page editor that comes by default in WordPress.
Some templates include a page builder. Some include it through a plugin and others in the very core of the template.
But there are also paid templates that do not include a page builder, in these cases you can install one through a plugin. Among the free templates, practically none include a page builder.
Features to look for in a page builder:
- High usability: it is important that the page builder has a high usability to be able to work with it in an easy and fast way. There are page builders where it is difficult to specify where to drop the module so that it is placed in the place we have in mind, on the contrary there are others where this operation is much more precise. Some page builders include tools to duplicate modules, sections, rows or columns, considerably reducing page creation time.
- Simple and intuitive: es fundamental que el page builder be sencillo e intuitivo. La principal demostración de esta característica es coger el page builder, probarlo y en un rato conseguir averiguar cómo funciona de manera general sin tener que leer ningún tipo de tutorial.
- Loading time: It is important that the page builder is not heavy since we want the web to have a low load time when it is visited by a user. In addition, a heavy page builder will slow down the loading process of the page under construction of the back office and ultimately our creation work.
9.- WordPress plugins
When making a website with WordPress we will need some plugins to provide the CMS with some functionalities that it does not have by default.
Plugins for WordPress are elements that extend the functionalities of the application. Existen plugins de todo tipo: El plugin Woocommerce para dotar a WordPress de las funcionalidades de una tienda online, el plugin maintenance para crear una página de mantenimiento, el plugin WP Super Cache para crear una caché y acelerar la velocidad de carga de WordPress, etc.
Nor is it convenient to overload the page with an infinity of pluigns. Use only those that are necessary to create your website.
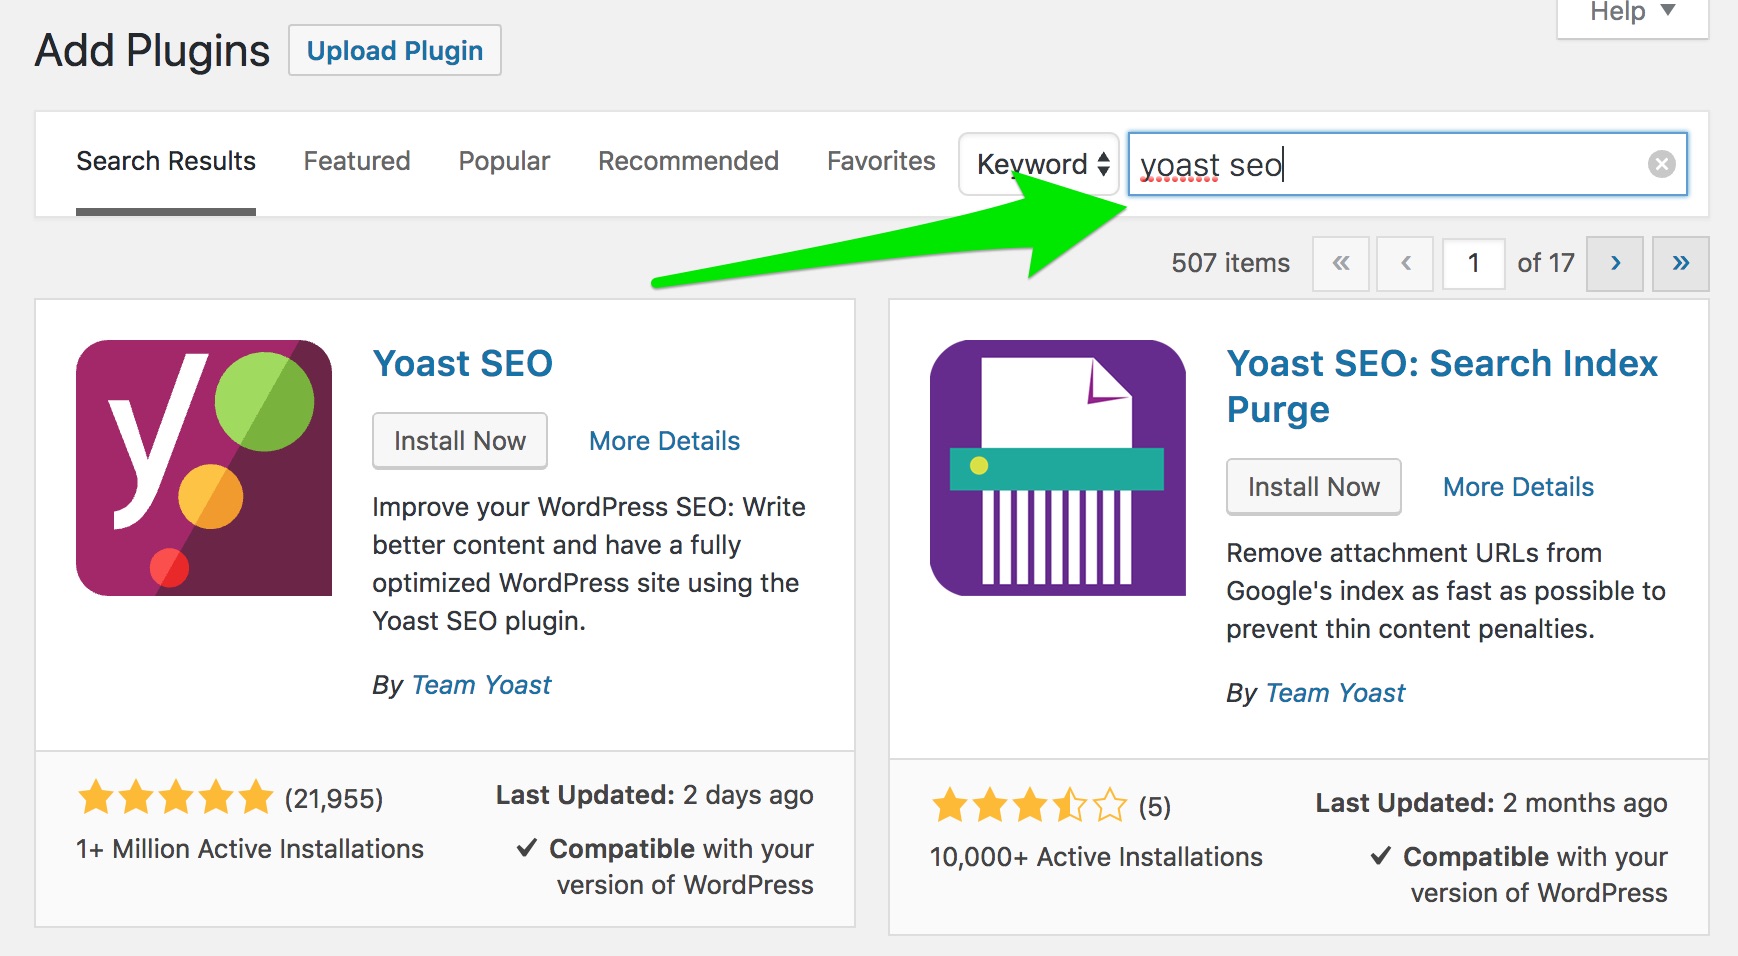
For me there are a series of essential plugins to create a professional website, all of them free:
- Yoast SEO: This plugin is mainly used so that we can edit the HTML tags for the SEO on Page of each of the web pages. Yoast SEO También nos aportará una serie de consejos relacionados con el SEO on Page de cada una de las páginas, además de crear el sitemap de la web y otros.
- W3 Total Cache: This plugin is essential to create a cache and reduce the loading time of the web. There is also the option of WP Suepr Caché.
- Contact form 7: this plugin that allows us to create a totally personalized contact form. It is also true that there are already some page builders that include a simple form module, even some already include a module to create a form with custom fields.
- Maintenance: plugin which is used to put the web in maintenance mode, and that it cannot be visited by anyone, while we are in the process of creating it.
- Google Analyticator: I use this plugin to connect WordPress with Google Analytics. In addition, this plugin incorporates a statistics summary panel in the WordPress administration panel.
- Black Studio TinyMCE Widget: plugin que sirve para crear un tipo de Widget que incorpora un editor de texto y así no tener que saber HTML y CSS para trabajar con los Widgets de Texto.
Es hora de diseñar el header o encabezamiento de la web. El header se repetirá en cada una de las páginas del sitio web. WordPress templates usually have a specific section to configure the design of this area so important.
In many templates you will have the option of placing social media icons in this area, along with your contact telephone number and email.
The template you use will surely let you choose between various header options. I give you an example of a well-known template:
- Logo on the left items on the right: This is the most typical header with the logo on the left and the menu items on the right.
- Slide in Header: With this heading the logo appears on the left and on the right a hamburger-type icon, which is the icon that appears on mobile phones to display the menu. By activating the icon a sidebar with the menu items is displayed
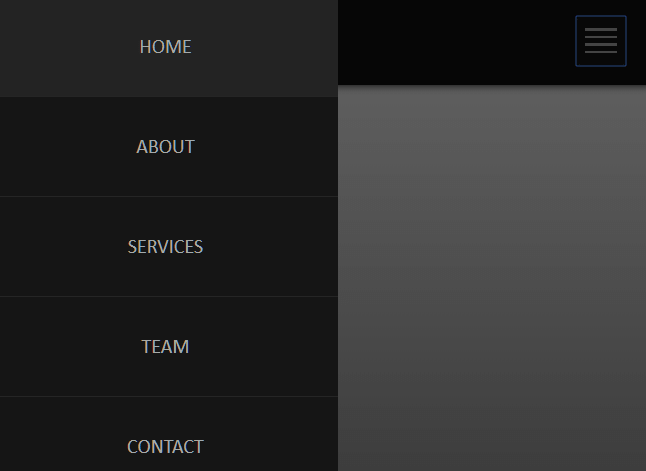
- Full Screen Header: With this header the logo will also appear on the left and a hamburger-like icon on the right. By activating the icon, the menu items will appear occupying the entire screen.
These are some examples of headers, as I told you, the template you choose must have different design options for the header. This circumstance should appear in the template demo.
Otra parte muy importante a la hora de hacer una web con WordPress es el footer o parte inferior de la web. WordPress will provide us with elements called Widgets that will help us build this area of the web.
As with the header, the footer will be repeated on each of the pages that make up the website.
In many templates you will have to modify the code in the footer.php file of said template to be able to customize the text that appears in the lower part of the footer.
Usually in WordPress templates you will have the option to place social media icons in this area.
Footer Widgets
A widgets is a kind of module that has a specific appearance and function and that in general we can place in the sidebar or sidebar of the web and in the footer.
WordPress incluye por defecto muchos y variados Widgets: Widget de texto (HTML), Widget de últimos post, Widget de categorías, etc.
Before I have recommended you install the plugin "Black Studio TinyMCE Widget" that will create a Widget with a text editor (with it it will not be necessary to know HTML). This will surely be the Widget that you will use the most in your footer.
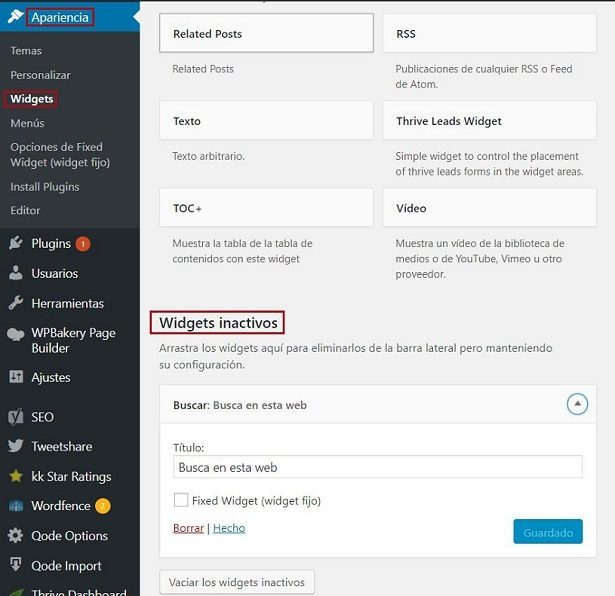
Design the different blocks of Footer Widgets on a piece of paper and get to work by accessing: "administration panel> Appearance> Widgets". Here you can select them, drag them to each area of the footer and finally customize them.
12.- The home page
The home page is the most important page on our website. The ideal is to make a preliminary design on a sheet and then build it with the page builder.
If you put a slider, do not put too many images and take care of their weight to avoid making a heavy home that takes a long time to load. My recommendation that you do not put more than three and that the images in the slider do not exceed 130 KB approx.
On the home page, visual elements such as images and icons should predominate, but we must not forget the text, mainly for SEO issues.
A little trick to enter text without overloading the page is to use resources such as drop-down buttons.
With the drop-down buttons, visitors will not see the text unless they press the button to display it, so the design will be very clean. On the contrary, Google will "read" the text as if the button were displayed.
Create home
To create a page in WordPress you must go to: "administration panel> Pages> Add new".
We will establish the name of the page, create the content of the same and save.
In the next section dedicated to the creation of inner pages I explain the creation process in detail.
Set home
Once the home page is created, we must "tell WordPress" that it is the home page. To do this we will go to: "administration panel> Settings> Reading"
Where it says: "Front page shows" check the option "A static page (select below)"
In the label "Home page" we will select the home page that we must have previously created.
Then press the save changes button.
13.-The inner pages
Once the home page has been created, we will enter the internal pages of the web, following the structure that we established in section 6.
To create a page we will go to: "administration panel> Pages> Add new".
a.- Title: just below the label "Add new page" located at the top we have a text field where we must enter the title of the page.
b.- Screen options: In the upper right part of the interface you have a drop-down called "screen options".
The marked elements will be the blocks that will appear in the interface. Unchecked items will remain hidden.
c.- Page builder or text editor: To create the content of the page we can choose the editor that comes by default in WordPress or use a page builder and be able to create more elaborate designs (note: the page builder does not come by default, we must choose one and install it).
d.- Publish: on the right side we have a block called "publish". If we press the "save only" button we will save the page as a draft. That is, it will not be visible and it will not be possible to add it to menus.
If we press the blue "publish" button located a little further down, the page will be visible and will be available to add to menus.
Once a page has been published, the option that will appear will be to "update".
It is possible to go from published to draft. We will only have to edit the status, modify it to "draft" and save.
f.- Yoast SEO: si instalaste el plugin de Yoast SEO tendrás un bloque en la página en el cual podrás establecer la etiqueta “title” y “meta description” de cada una de las páginas interiores.
g.- Slug: With the slug block you will be able to modify the friendly URL of the web, which together with the tag "title" and "meta description" are fundamental elements in on page SEO.
Once the home page and the interior pages have been created, we can add them to the menu of our WordPress.
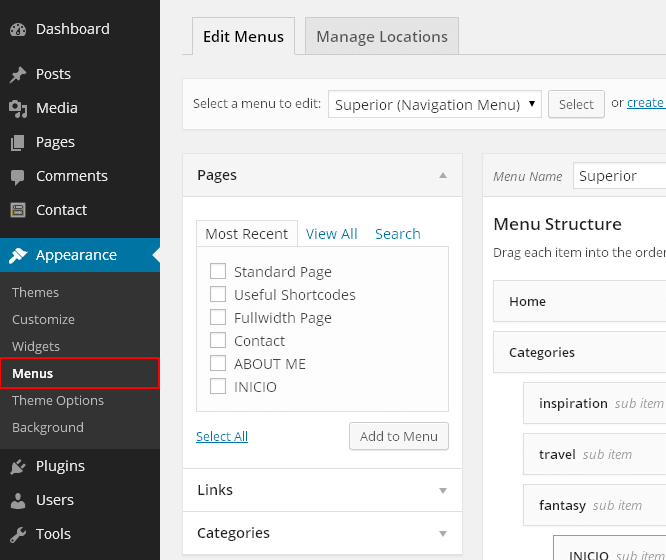
To manage the menu we will go to: "administration panel> Appearance> Menus".
Note that the locations available to place a menu depend on the template you are using. There are templates that have a single location to put the menu and there are others that have multiple locations.
Create a new menu
Once you access the WordPress menu management page you will see a text field labeled: "Menu name". Enter the name you want to give the menu you are going to create and press the "Create menu" button.
This name serves to differentiate it from other menus that you may create in the future. In WordPress we can create several menus and place them in different locations (depends on the template).
Add pages to menu
On the left side you will see a block with several sections: Pages, posts, Custom links and Categories.
Displays the "Pages" option if it is not displayed.
To find a page that you have previously created and to be able to add it to the menu, you have 3 tabs:
- More recent: the last pages created are displayed
- See everything: shows all pages created
- Search: you can search a page by its name
Note: remember that the page must be published for it to appear and can therefore be added to the menu.
Mark each of the pages you want to add to the menu and press the "Add to menu" button (you can do it one by one or by grouping several).
Organize menu
The topmost menu item will be the one that appears to the left of the menu. To change the position of the menu items, hover over the item you want to move, click the left mouse button and drag the block to the desired position.
Menu locations
A little further down you have a section called: "Menu options". In the section "Location of the theme" you will have the different location options available to the template to locate the menu.
In the example template in the image we have the locations: Main menu (usual menu position), Secondary menu (area above the main menu) and Bottom menu (area in the footer).
Mark the location or locations for the menu and hit the "Save Menu" button.
Crear items de menú con enlaces nofollow
It is possible that there are menu items that interest you that are of the nofollow type, so as not to convey authority, such as a link to the legal notice, privacy policy or cookie policy.
To add this type of links to the menu, we must go to: «admin panel> Appearance> Menus»
Click the button "Screen Options" located at the top of the interface.
In the drop-down menu check the option: "Relationship with the link (XFN)" and press the "Screen Options" button again in order to collapse the menu again.
Having activated this option, when we display a menu item, the field will appear: «Relationship with the link (XFN)».
To make a menu item have a nofollow link we will simply have to write «nofollow» in the field «Relationship with the link (XFN)».
15.- A blog
Adding a blog to a corporate website is very interesting to improve your web positioning and to create a community around your website.
Add the blog if you are willing to use it. It is not good to enter the blog of a corporate website and find only the WordPress example post.
To create blog entries you must go to "administration panel> Entries> Add new"
To add the blog to the menu:
- Create a new page titled blog
- Tell wordpress. Go to "administration panel> Settings> Reading" and in the drop-down: "Posts page" select the page you just created for the blog and press the save changes button.
- Add the page to the menu: Go to “admin panel> Appearance> Menus” and add the blog page to the menu.
Aquí tienes un muy interesante post de R Digital marketing en el cual podrás encontrar muchos aspectos fundamentales a la hora de crear un blog
Create blog categories
It is important to create a coherent and consistent structure. I recommend that you have the least possible categories.
When we start a blog it would not be common sense to create many categories and have little content. You can start with 4 or 5 categories or you can even start with a single general category.
Using blog tags
Unless it is a very specific case or you know in depth how it works I do not recommend using tags on your blog since you can get more disadvantages than advantages.
El principal inconveniente de hacer un mal uso de las etiquetas es el de generar duplicate content.
16.- SEO Onpage and Offpage
For your page to be positioned properly it is important that you take care of SEO.
Optimiza las páginas de tu web para posicionarse por las keywords que te interesen (SEO on Page) y trabaja fuera de tu web para conseguir enlace de calidad (SEO off Page).
Here is a very interesting post from Rubén Alonso's blog that will help you to enter the world of web positioning.
17.- Tips and tricks
I.- Subscribers: Intenta captar y crear una lista de suscriptores desde el primer día. Pon un reclamo, ponte en marcha con una plataforma de email marketing y un plugin como Sumo Me.
II.- Backup copies: learn how to make backup copies of your WordPress and make regular copies. Even if your hosting makes copies every so often. The control and responsibility of your project correspond to you.
III.- Protect the content of your blog: Make your feed show only the summaries of blog entries to avoid using tools to copy the content of our posts in others.
To do this you must go to: «administration panel> Settings> Reading». Once there where it says: "Show, for each entry in the feed" mark the option: "Summary" and press the save button.
IV.- Add an authorship link in the feed: I recommend adding an authorship link in the feed to make it easier for search engines to verify the authorship of our post.
We are going to use the Yoast SEO plugin.
For this we go to: «Administration panel> SEO> Advanced». Now check the "RSS" tab.
Where it says: «Content that will be put after each post in the feed:» write something like this:
<p>Este artículo es un contenido original del Blog de <a rel="nofollow" href="http://www.horizonweb.es">Horizonweb</a></p>
Note: replace "www.horizonweb.es" with the domain name of your website and the text "Horizonweb" with the Name of your website.
V.- Alta en Google Search Console, antiguo Webmaster tools: Crea una cuenta en Google Search Console y analiza las impressions y clics de las páginas de tu web. A través de esta herramienta también podrás añadir un sitemap, indexar páginas rápidamente, etc. Solo necesitas una cuenta de gmail.
VI.- Alta en Google analytics
Create an account in Google Analytics and analyze the statistics of your website. The amount of data that you can analyze with this tool is incredible.
To connect the Analytics account with your WordPress I use the Google Analyticator plugin
VII.- Modify the link in the footer:
You will see that many WordPress templates include a link in the footer to the official template page. In many cases this link cannot be modified from the WordPress administration panel.
If this is your case and you want to modify it, look for the footer.php file located in the path wp-content / themes / templatename
Be very careful when modifying this file and keep a backup copy of it
I hope this comprehensive guide helps you create a professional website for your business step by step.