Cómo crear un Blog paso a paso y sin conocimientos previos
Start the adventure of create a blog It is a path not exempt from some difficulties and above all decisions that you have to make, and that to a great extent will influence its success or failure. If you think that creating a blog is a guarantee of success with little effort, I will tell you that you are completely wrong, since a blog is almost like a philosophy of life where we are going to write content to create a reading community, a task that will not be easy and that You must put "all the meat on the grill" and put a lot of passion so that you can connect with your followers.
If you target es crear un blog para publicar contenidos pocos profesionales o con falta de pasión, te recomiendo encarecidamente que no lo crees, there are always bad blogs left over and good blogs are needed, así que de ti depende estar en uno u en otro, aunque yo te recomendaría, que si estás pensando en crear tu primer blog, no solamente intentes que be un buen blog sino que te esfuerces para que sea el mejor. Para conseguir este objetivo sigue esta guía y podrás crear un blog paso a paso, y sobre todo de forma muy sencilla.
Step-by-step guide to creating a blog
1.- The first choice.
 <
<When we are going to create a blog we must make some decisions, surely this is one of the most important decisions but the one that is less important, since you must choose to create a free blog through Blogger or WordPress, or create your own blog without third-party dependencies.
When should we choose a free blog?
Si quieres crear un blog por hobbie y no tienes ningún interés económico en ello, crear un blog gratuito puede ser una buena solución para ti. Por descontado, si no queremos ganar dinero en un domain y un hosting todos los años, es decir, si nos queremos ahorrar unos 70 u 80 euros al año, también en este caso es una buena elección el crear un blog gratuito, pero nunca debemos hacerlo con un fin profesional.
What is the difference from creating a free blog to your own?
We must know that if we are going to create a free blog we will be with a corset y no podremos instalar plugins. Los plugins en WordPress son una herramienta muy importante para la optimización del mismo, ya sea para mejorar su positioning en buscadores o SEO, o para mejorar su accessibility y usabilidad.
Another aspect to take into account is that we will not have a professional theme for our blog, but a standard and free one, therefore the base code of the blog will not be sufficiently optimized.
In conclusion, at create a free blog we will have a limited tool to make ourselves known, while a blog with its own domain and hosting is a very versatile and efficient tool to achieve a reading community.
2.- Choose a good domain name
 For the choice of the domain of our blog we have two options:
- Fomentar nuestra marca personal o Personal Branding, for example www.miguelflorido.com. In this way, you will get your name and personal brand to acquire great popularity in the sector, but it will take you more time to find a place in the best search engine results.
- Orient the name to the most important keywords, for example, www.turismoencadiz.com. De esta forma conseguiremos posicionar antes con nuestros dos términos más relevantes, en este caso con “turismo” y “Cádiz”, aunque Google nos ha dicho hasta la saciedad que ya no lo tiene en cuenta, lo cierto es que aún sigue dando buenos resultados.
It's up to you to choose between receiving more visits or improving your personal brand. Which do you prefer?.
Do we choose a .com or .es domain?
Another question that I am asked a lot when creating a blog is the typical question that arises when choosing a domain, that is, What do I choose a domain .com or a .is?. Se trata de una duda habitual cuando se tiene poca experiencia, pero no debemos caer en el error de elegirla en función de si suena mejor o porque me gusta más como queda, la elección debe realizarse en función de donde se encuentre nuestro target de lectores, si está en España elegiremos .es, si en cambio queremos darle un carácter internacional elegiremos el .com.
3.- Contract your domain and hosting
Cuando vamos elegir la empresa donde contratar el dominio y hosting podemos cometer el error de elegir la más barata, algo así como 1&1, pero verás cómo os arrepentiréis de la decisión, pero ¿por qué ocurre esto?, la respuesta es muy sencilla, ya que no todos los hosting están igual de optimizados para sacar el máximo partido de un blog en WordPress, y algunos de ellos pueden tener limitaciones que puedan reducir la eficacia del mismo. Un ejemplo de ello es la memoria que dedican de base que es de 64 mb, cuando lo recomendable son 256 mb.
Low memory problems?
- Choose plugins very well because memory won't let you install many.
- Does the white screen in WordPress sound like something to you? Well, you have to know that one of the reasons why it happens is due to the overflow of the existing memory.
- Slow speed. Very bad for SEO.
Si vas a contratar un hosting Web revisa muy bien los requisitos óptimos para WordPress que son:
- PHP 5.2.4 or higher.
- MySQL 5.0.15 or higher.
- Apache mod_rewrite module. Although this module is optional, it is highly recommended to have it.
- Memory 256 mb.
- 1GB minimum storage.
- (Optional) CDN. There are hosting that offer it to us as a service of the hosting itself and at no cost, which is highly recommended to help us improve the loading speed of our blog.
Another aspect that we must value very and much when choosing the hosting is the support, since if we have a problem with our blog it is very important that they solve it properly and in the shortest possible time. For that reason, I recommend that you hire a hosting that you can chat directly with the technicians and that they look at your problem at the same moment, I do not care if it is a Spanish or American hosting, and flee from all those that the only way to register a ticket is calling, that is, paying or sending an email, we do not know for sure when they will review it.
Right now I just remembered an anecdote that happened to me when I created my blog and hired the hosting, which I will tell you below; 3 years ago I chose a bad Spanish hosting that begins with A ..., surely you know what it is and I began to have many problems with its availability and I opened a ticket via the form, and I really am not deceiving you, I received the answer the same 7 days later, saying that it was my fault because the blog was wrongly programmed, then I made a backup copy of it and migrated it as it was to an American hosting, and the problem was magically solved, so I understand that it is typical to throw the blame someone else, but this is inadmissible for a hosting company, that is, we cannot reduce the fact that we cannot find a solution to the problem, to that it is not our problem. I hope the anecdote helps you not to fall into its clutches….
4.- Choose the theme or template
Nowadays buying a professional template is super cheap and highly recommended, instead of starting from a basic and free template. Buying this template will cost us from 30 to 40 euros and in this way we can access a super optimized template, and that without a doubt, will position in less time than a basic one.
Where do we choose the template?
I recommend that you go to the largest WordPress template bazaar called Themeforest, although you can buy templates in any professional company, the objective is to find a template that best suits our needs and that is always a professional theme.
If you do not know which template you can use, I recommend that you look at those blogs that you like the most and find out the template they use, in order to do so we are going to use the free online tool What Wordpres is theme that?. It has a daily limit of searches but the amount it allows is high and it is difficult to reach that limit.
5.- WordPress installation
If you are totally convinced and you are going to create a blog in WordPress hiring your own domain and hosting, the first thing you should know is that technical knowledge is not required for its installation and start-up, do not be fooled with installation costs since installing a WordPress is reduced to a mouse click.
For this we only have to log into our hosting and look for the section to install WordPress and decide in which folder we are going to install it, we must be careful with this because it is normal that we install it in the root, although by default the installation in a folder .
There are three possible places to install a blog in WordPress:
- At the root, it is the most used and the one that I recommend.
- In a folder, it is used when you have a website or store with another web tool.
- In a subdomain. Es la menos habitual pero también es una solución factible, aunque debemos tener en cuenta que la autoridad del subdominio partirá desde cero, en cambio a la instalación en una carpeta que heredad la propia autoridad del dominio.
If you have any questions about the installation, leave me a comment below and I will solve it for you.
6.- Install and configure the WordPress theme.
There are three ways to install a theme:
1.- Through the WordPress backend, we click on Appearance> Themes and click on the tab install themes and then upload, as shown in the image.
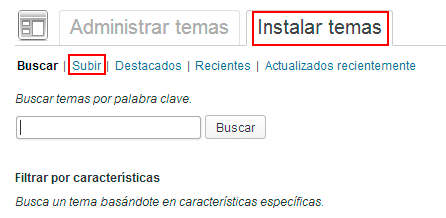
In order to upload a template we must have the theme compressed in a zip, that is, the template folder must be compressed in a zip and not in a rar. Once it is installed we must go back to Appearance> Themes and activate it.
2.- A través de un ftp. Para ello debemos crear una cuenta ftp a través del hosting y configurarla con un client ftp gratuito como Filezilla. Once we are connected to our domain, we will have to go to the installation folder that we will find in wp-content / themes and there we will upload the unzipped folder, it is just a matter of dragging the folder and that's it. The process will take about 15 or 30 minutes, therefore it is much slower than the first option, which is practically immediate.
3.- Through the hosting's own ftp. In this case, what we will do is look for the installation folder, that is, wp-contect / themes and there we will upload the template in zip format, the process will only cost a few seconds, then we will click on the uploaded file with the second button mouse and we will unzip or extract. To do this method you must have certain knowledge of using an ftp tool and in my opinion it is the most professional and recommended, why? It is very simple, method one can give us problems if the file size is very large , and method 2 can leave a file making the copy, especially if we are dealing with a template with many files. The only one that never fails, rain or shine, is the third method.
7.- Correctly configure WordPress
A very common mistake when creating a blog in WordPress for the first time it is to think that it is already configured by default and that we can start writing articles like crazy, but it is a monumental error because it is a super basic and important aspect to configure our WordPress correctly.
Where do we start?
We will start with the settings section and we will see each of its sections:
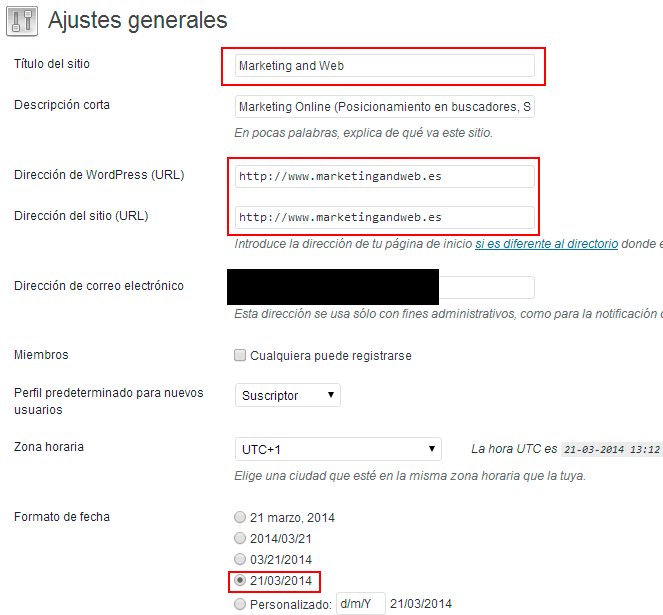
A.-Generals. Aquí nos interesa decidir 3 aspectos importantes; el título de nuestro blog, la url con o sin www y la fecha. Por defecto WordPress instala la web sin www, a mi particularmente me gusta más con las 3 w, pero esto es sólo es una cuestión de aspecto visual ya que ambas opciones son igual de válidas.
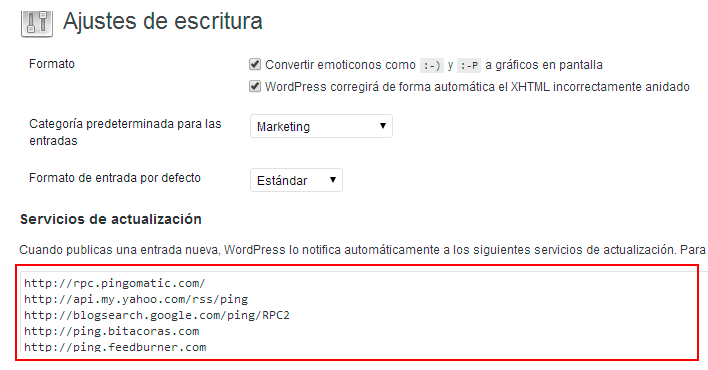
B.- Writing. In this section it is interesting to add a service to which WordPress will notify each time a new post is published.
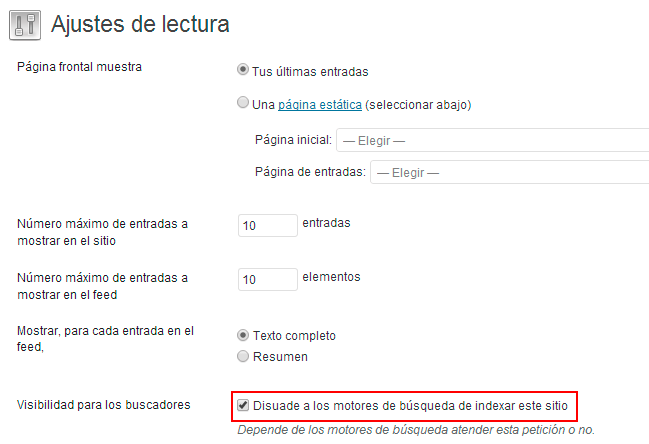
C.- Reading. Activa la opción de “Disuade a los search engines de indexar este sitio”, ya que no queremos que Google lo indexe hasta que tengamos totalmente acabado el blog y con un buen número de entradas para publicar.
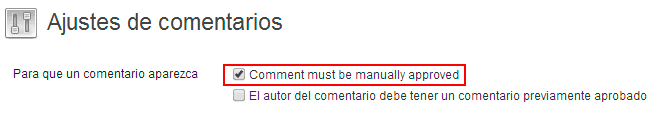
D.- Comments. By default the moderation of comments is not activated and it is important that we check the box that appears in the following image.
E.- Media. In this section we will configure the different sizes of the images, although in many cases the default values can be used to start our blog.
F.- Permanent links. In this section we are going to define the structure that the urls of our blog entries will have. It is therefore a vitally important aspect, since a bad construction of the url can be a bad start and a heavy burden in the future if we want to change it.
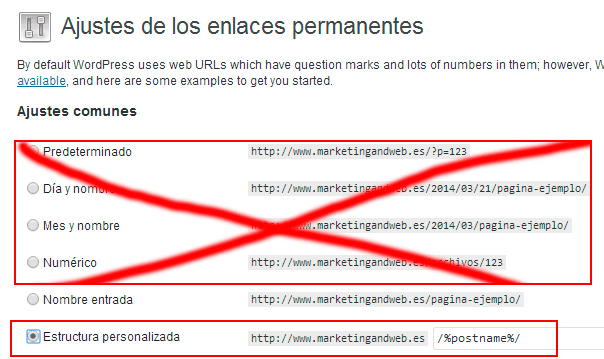
In the image you can see how I have literally crossed out the first 4 options that WordPress offers us, the most recommended options are "Entry name" or "Custom structure", and in this case that shows the image in both they will obtain the same result as url.
8.- Install and configure the most essential plugins
WordPress es sin lugar a dudas la mejor herramienta para crear un blog. Son muchas las ventajas que nos aporta este CMS, pero quizás una de las más importantes son todos los beneficios que nos aportan sus plugins a la hora de optimize el blog.
Next I will briefly explain the 10 essential plugins to create a blog in WordPress:
East plugin no puede faltar en ningún WordPress y podríamos decir que son varios plugins en uno sólo, por sus grandes y variadas virtudes, tanto a nivel de SEO, como sitemap, utilizando el las migas de pan o también conocidas como breadcrumb, y un largo etc.
I leave you a fantastic video of the great Iván García, where you can surely answer any questions about the configuration of WordPress SEO by Yoast.
2.- WP Super Cache and W3 Total Cache
2 Fantastic plugins for cache management and that our blog loads much faster. The first is the easiest to configure and start up, but the second is much more complete, but requires some technical knowledge when setting it up.
Olvídate de poner el “alt text” o texto alternativo y deja que este plugin lo haga por ti.
You will not be able to live without it, since it will send us an email every time it detects broken links on our blog, and in this way it makes it much easier for us to locate and eliminate it.
5.- BJ Lazy load
Si no dispones de un CDN es importante que configurar tu blog para que descargue sólo las imágenes que está visualizando el Username y de esta forma hacer que el blog vaya mucho más rápido (rapidez es igual a mejor posicionamiento en buscadores).
6.- Digg Digg
It adds a floating bar with the bookmarks of the social networks that we choose, thus allowing our articles to circulate more easily through social networks.
It is highly recommended to add a box with author information and links to social networks at the bottom of each blog entry for them to follow.
8.- Cookie Law Info
One of many cookie plugins so that we can comply with the change in the law regarding the use we make of the famous cookies on our website.
9.- Contact Form 7
It allows us to add contact forms to our blog very easily.
Replace the basic WordPress comment system with this much more attractive and integrated with social networks.
9.- Customize your blog
Para personalizar tu blog lo primero que debes definir es el número de apartados que confeccionará el menú, así como el contents de cada uno de ellos.
On the home page we must decide the structure and content that we want to appear.
You must know how to differentiate between the pages of the posts; We use the pages to upload static content, and where we do not want to interact with users, such as (who we are, services, contact, etc.), and the entries are the articles that we are going to upload to the blog.
You should also take into account when deciding what information you want to appear in each widget or sidebar. Depending on the template, we can customize this bar uniquely for each page, giving the blog a sensational look.
It is important to have your own image (logo and style manual) to publicize our brand through that image.
In this regard, I always recommend that you hire the services of a good designer so that the image of our blog is unique and very attractive.
If you do not have the budget to find a designer, try to customize the theme you have chosen as much as possible, so that you make it yours.
10.- Define the category structure
Google has repeated ad nauseam of the importance of generating a good tree structure for a blog.
How do we do this? Should my blog be more specific or more diverse?
We must think carefully and calmly about a structure of categories and subcategories (if necessary) so that we send a clear message to Google, and it is easy to distinguish in which subject or classification it should include us. It is not highly recommended to diversify a lot, it is preferable to take 2 or 3 topics and go deeply into them, as my grandmother used to say "Jack of all trades, master of none".
Creating the category structure is a preliminary step before starting to write and publish articles.
Normally in this section there are usually many doubts about it, if this is your case, leave me a comment and I will answer you as soon as possible.
11.- Crea una cuenta de Google Webmaster and Google analytics
Once we have created our blog and we want to present it in society, before starting to show it to acquaintances or friends we must present it to Mr. Google. For this we will create an account of Google Webmaster and we will define if the objective of our blog is a national audience or not, as well as we will add our sitemap so that Google indexes our contents before.
If I don't create the Webmaster account, won't Google index my content?
As long as we allow it from our website's own configuration, Google indexes practically everything, but the time it takes to do so is far away when we do not inform you of where you should read our website map.
We must verify that we are the owner of the website before starting to work with it, for this we will upload a file to the root and click on verify.
Create an account Google analytics It will help us measure the results our blog is getting.
It is also interesting because it will help us when it comes to seeing which content is having the most success on the blog.
12.- Integrate your blog with social networks.
Si vas a crear un blog e imprescindible la integración con las redes sociales no se trata de poner los enlaces a los diferentes cuentas de redes sociales del blog o del autor, ni mucho menos, el objetivo de integrar es que añadamos cajetines en nuestro blog con los últimos tweets de Twitter o los últimos post Facebook o Google+, para que de esta forma un lector de nuestro blog puede acceder a los contenidos que estamos publicando en cualquier de nuestros perfiles de redes sociales.
Las redes sociales son una ventana fantástica para crear y fidelizar una comunidad de usuarios, y un elemento que debemos utilizar si o si, si queremos que nuestros contenidos alcancen cierta virality. Las redes sociales también son uno de los principales factores del SEO, por lo que si nos ayudan a mejorar nuestra visibilidad en Google esto permitirá recibir un mayor número de visitas.
Don't just limit yourself to creating social media profiles and starting to publish tweets and posts, since the ideal is that we carry out a Social Media strategy.
13.- Create your author's brand. The copyright mark is the way in which we communicate the authorship of our content to the Google search engine. Because it is important?
Mainly it is important for 2 reasons:
A) It gives us a more attractive result and with different links that can increase clicks on the search result.

B) Minimiza la posibilidad de que otro usuario se apropie de tu contenido o de generar duplicate content.
How do we do it?
1.- Crear una cuenta de Google+. Para ello necesitaremos disponer de una cuenta gmail, en el caso de que no tengáis una cuenta de gmail, debéis acceder a www.gmail.com y crearla.
2.- Once the gmail account is created, you can click on our name in the upper right corner to access Googe + or click on https://plus.google.com/?hl=es
3.- Upload our photo to the Google+ profile. We click on the gray circle and attach our photo.
4.- In the next step we are going to tell Google that we are a contributor to our blog, for this we click on http://plus.google.com/me/about/edit and then we click again at the top on links, until we reach this image.
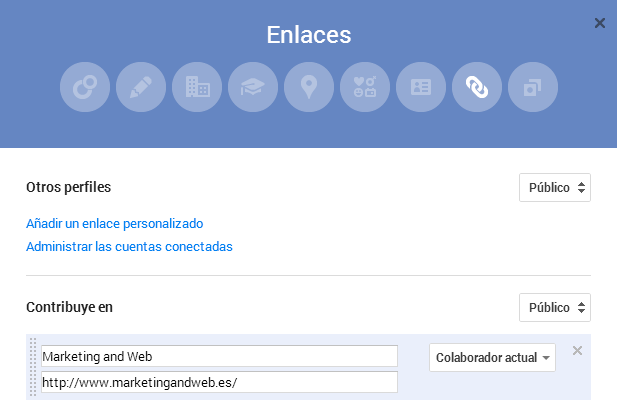
Debéis hace clic en añadir un link personalizado en el apartado Contribuye en, escribiendo los datos tal y como aparecen en la imagen anterior. Finalmente hacemos clic en guardar.
6.- Once all the changes have been made, you can verify if the Google+ profile has been linked well with the blog content, for this it is as simple as clicking on https://www.google.com/webmasters/tools/richsnippets, and add the url of any of your entries, to see if our Google+ image appears.
14.- What and how to write articles on your blog.
Are you ready to start your journey on the blog?
Before I start writing I would like to give you some advice:
1.- Analyze your target
Lo primero que debes pensar y analizar es al público al que te quieres dirigir, o dicho de otra forma, pensar en que grupo de persons te gustaría que fuesen los lectores de tus artículos.
2.- The search for your own style
There are many people who talk about the search for a style and a personality when writing, but that style surely underlies each one of us, so be yourself and do not imitate anyone, and in this way you will create your own style .
3.- Write for your users or for Mr. Google?
Siempre es recomendable escribir para personas, aunque no esté demás conocer algunos consejos de cómo optimizar el SEO del contenido para que nuestro artículo scope una buena posición en el buscador, y nuestro trabajo sea premiado con miles de visitas.
4.- Is it enough to write articles of 300 to 400 words?
In my opinion it is a mistake to reduce or limit the size of the articles so much. The best thing you can do is not to set limits and not even a specific size, write the article, whatever its length, although I can tell you that Google rewards a content above 1000 words more than one of 400 words, so you decide what extension you are going to give it. An example, this post began with the idea of being an article and has ended more with a guide format and with more than 4,500 words, which I believe to date is the longest article I write on this blog.
In short, I recommend that you dig deeper and provide a lot of useful information in your articles, it is difficult to delve into an article if we are always limited to a specific extension.
5.- The image and the title
Pay close attention when choosing the title of the article and the main image of the article, since both are two key aspects for virality and attracting many visits through social networks. Choose a title that captures attention and / or curiosity to attract their reading.
6.- Efecto Viral
Share your article through social networks, for which it is important that you have a community of followers large enough to have a viral impact in a few hours.
No es lo mismo que tengas 60 seguidores en twitter a tener 6.000, aunque debemos tener en cuenta que la calidad del follower siempre va muy por delante de la cantidad de seguidores, así que te recomiendo que tengas seguidores afines a las temáticas que vas a compartir y de esta forma sea más fácil que se propague los contenidos del blog.
7.- Loyalty de usuarios
You must place the users who read your blog as the most important element of it, since without your followers the blog would have no meaning;
- Do not believe yourself the king of the mambo and reply to your readers, either through comments or email.
- Contribute something that is useful to your followers.
- Create a list of subscribers to del Mailchimp and you can have up to 12,000 subscribers for free.
- Encourage interaction with your readers by being very close and accessible.
15.- Planning
After many hours of work and effort, we will have already created our blog, and we will be able to create or plan our work in the same 3 months ahead.
Why is it important to work in an organized way?
Because we will generate confidence in our readers and we will accustom them to visit us with a certain frequency. To this end, we must establish a number of weekly articles that should be a minimum of 2 weekly up to 5, this last figure could be said to be the most optimal value. Logically, not everyone has the opportunity or the time to write so many articles a week, so very few people allow themselves to publish an article almost every day.
What time is it more convenient to publish my articles?
To answer this question you have to know your readers well and know what are the hours of the day that they are most active on the Internet, and in this way associate this time of publication with the time that more followers are connected to the network.
16.- Conclusions
Like any project that starts, the first months of working with a blog are the bittersweet, because the feedback that we will have from our readers will be very low or practically none, but we must not get discouraged, and continue working day by day, and week after week, until suddenly a week it seems that the blog wakes up, as if it were an erupting volcano and you start to receive thousands of views per month.
It is essential when we are going to create a blog that it is very well built and optimized.
Be yourself when writing your articles and put a lot of passion into it, your readers will appreciate it.
If you have any questions or want me to expand a specific section further, do not hesitate to contact me, it will be a pleasure to help you.
I wish you the best of luck with your blogs.
Infographics: jpccomunicacion.wordpress.com | startingdecero.com
If you are thinking of creating a blog step by step and have any questions, you can leave me a comment
If you liked this guide on how to create a blog step by step, you can share it with a friend.