
La seguridad de WordPress es uno de los factores más debilitados entre los blogueros novatos. En una instalación de WordPress sin supervisión, hay bastantes vulnerabilidades potenciales que se dejan desatendidas. La mayoría de los tutoriales de instalación de WordPress explican una forma rápida y fácil de llevar a la práctica WordPress en minutos. Pero se pierden algunos factores de seguridad importantes. A modo de ejemplo, la exploración de directorios y el uso del nombre de Username ‘admin’ se consideran lagunas de seguridad graves. Hoy vamos a echar un vistazo a 10 fragmentos de código .htaccess que ayudarán a mejorar la seguridad de su Blog de WordPress. Antes de comenzar, echemos un vistazo rápido a qué es el archivo htaccess.
What is the .htaccess file?
Un archivo htaccess es un archivo de configuración opcional para que lo interprete el server Web Apache, para cada directorio. Puede almacenar varias configuraciones en ese archivo, como: proteger con contraseña un directorio, bloquear IP, bloquear un archivo o carpeta del acceso público, etc. Tradicionalmente, el archivo .htaccess está presente en el directorio de instalación base de WordPress. Almacena la estructura del enlace permanente de forma predeterminada.
TIP: Before starting the guide, make sure to backup the current .htaccess file (if present) to a cloud storage service like Dropbox. This is to get back to the last known working .htaccess file, if a certain piece of code breaks your site. Let's start.
1. Block bad bots

One of the best uses of the .htaccess file is its ability to deny multiple IP addresses from accessing your site. This is useful for blocking known spammers and other sources of suspicious or malicious access. The code is:
# Block one or more IP address. # Replace IP_ADDRESS_ * with the IP you want to block order allow, deny deny from IP_ADDRESS_1 deny from IP_ADDRESS_2 allow from allDonde IP_ADDRESS_1 es la primera IP que desea evitar que acceda a su sitio. Puede agregar tantas direcciones IP como desee. No importa qué agentes de usuario (browsers) utilicen estas direcciones IP, no podrán entrar a un solo archivo desde su servidor. El servidor web denegará de forma automática todo acceso.
2. Disable directory browsing
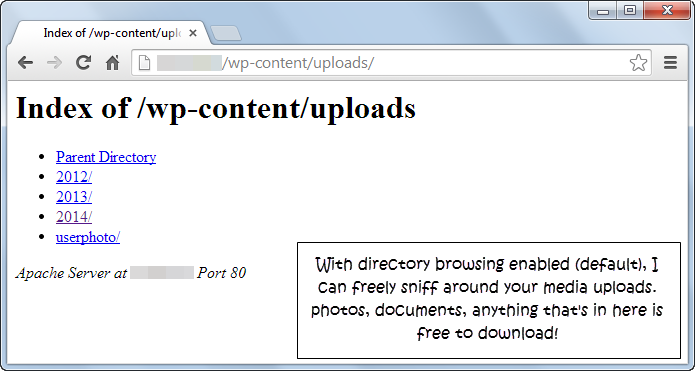
Esta es una de las fallas de seguridad más socavadas en un sitio de WordPress. De forma predeterminada, el servidor web Apache habilita la exploración de directorios. Esto significa que todos los archivos y carpetas dentro del root directory (a veces llamado directorio de inicio) del servidor web pueden alistarse y ser accesibles por un visitante. No quiere eso porque no quiere que las persons naveguen a través de de sus cargas de medios o su tema o archivos de complemento.
If I randomly pick 10 personal or business websites running WordPress, 6-8 of them will not have directory browsing disabled. This enables nobody to easily smell around the wp-content / uploads folder or any other directory other than the default index.php expediente. De hecho, la captura de pantalla que ves es de uno de los sitios de mi client, antes de que recomendara la solución. Fragmento de código para deshabilitar la exploración de directorios:
# Disable directory browsing Options All -Indexes3. Allow only selected files from wp-content

As you already know the contents de wp La carpeta contiene la mayoría de sus temas, complementos y todas las cargas de medios. Posiblemente, no desea que la gente acceda a él sin restricciones. A la vez de deshabilitar la exploración de directorios, al mismo tiempo puede denegar el acceso a todos los tipos de archivos, excepto algunos. En esencia, puede desbloquear de forma selectiva archivos como JPG, PDF, DOCX, CSS, JS, etc. y rechazar el resto. Para hacer esto, pegue este fragmento de código en su archivo .htaccess:
# Disable access to all file types except the following Order deny, allow Deny from all Allow from allYou need to create a new .htaccess file with the code and paste it into the wp content carpeta. No coloque esto en el directorio de instalación base, de lo contrario no funcionará. Al mismo tiempo puede agregar cualquier tipo de archivo a la lista agregando un ‘|’ posteriormente de ‘rar’. La lista anterior contiene los archivos necesarios: XML, CSS y JavaScript, formatos de documentos e imágenes comunes y, para terminar, los formatos de archivo más utilizados.
4. Restrict full access to wp-includes

the wp-includes folder It contains only the files that are strictly necessary to run the major version of WordPress, one without plugins or themes. Remember, the default theme still resides in the wp-content / theme directory. Therefore, no visitor (including you) should require access to the content of the wp-include binder. You can disable access using this following code snippet:
# Block wp-includes folder and files RewriteEngine On RewriteBase / RewriteRule ^ wp-admin / includes / - [F, L] RewriteRule! ^ Wp-includes / - [S = 3] RewriteRule ^ wp-includes / [^ /] +. Php$ - [F, L] RewriteRule ^ wp-includes / js / tinymce / langs /.+. Php - [F, L] RewriteRule ^ wp-includes / theme-compat / - [F, L]5. Allow only selected IP addresses to access wp-admin
the wp-admin The folder contains the files needed to run the WordPress dashboard. In most cases, your visitors don't need access to the WordPress dashboard, unless they want to register an account. A good security measure is to allow only a few selected IP addresses to access the wp-admin binder. You can allow the IP addresses of the people who need access to the WordPress dashboard: editors, contributors, and other administrators. This code snippet makes it possible for only fixed IP addresses to access the wp-admin folder and deny access to the rest of the world.
# Limit logins and admin by IP
<Limit GET POST PUT>
order deny,allow
deny from all
allow from 302.143.54.102
allow from IP_ADDRESS_2
</Limit>
Asegúrese de crear un nuevo archivo .htaccess y péguelo en la carpeta wp-admin y no en el directorio de instalación base. Si es lo último, nadie excepto usted podrá navegar por su sitio, ¡ni siquiera los search engines! Posiblemente no quieres eso. Un par de inconvenientes de esta medida son los siguientes:
- If your site enables or promotes New user registration, sería casi imposible realizar un seguimiento del número de usuarios. A modo de ejemplo, en R Digital marketing, si desea descargar nuestros increíbles temas gratuitos, debe registrarse.
- People with dynamic IP addresses (mostly ADSL broadband users using PPP or PPPoE protocols) change their IP's every time they log out and log into their ISP. Possibly it would not be practical to keep track of all these IPs and add them to the htaccess file.
- Mobile device broadband: Ya be que esté en 3G o 4G, su IP adress depende de la torre celular actual a la que esté conectado. Supongamos que está viajando: su IP cambiará constantemente con cada par de millas que se mueva desde el origen. Nuevamente, hacer un seguimiento del archivo htaccess es casi imposible.
- Public Wi-Fi access points: Usar credenciales cuando está conectado a Internet usando un punto de acceso Wi-Fi público es un gran no-no, ya que un niño con un software pequeño puede extraer cada carácter que escriba. Sin mencionar que cada punto de acceso Wi-Fi tendrá una dirección IP única.
Fortunately, all these disadvantages (except the first one) can be corrected through the use of a VPN. If you configure your VPN to connect using a single IP address, you can add it to your htaccess file and all your problems will be solved.
6. Protect wp-config.php and .htaccess from everyone
the wp-config.php The file contains the most confidential login credentials for your WordPress site. It contains the database name and access credentials and various other critical data, among other settings. Under no circumstances do you want other people to examine this file. And anyway, you want to disable public access to the source of all this security: the .htaccess file itself. You can disable access to wp-config.php with this following code:
# Deny access to wp-config.php file order allow, deny deny from allTo deny access to all htaccess files (remember some may reside in wp-admin and other folders), use this code snippet:
# Deny access to all .htaccess files order allow, deny deny from all satisfy all7. Denegar el link directo de imágenes
One of the best .htaccess file hacks, this one sends content scrapers running with their tails between their legs. When someone uses your site image, their bandwidth is being consumed and most of the time, they are not even credited for it. This code snippet eliminates that problem and sends this image when a hot link is detected.
# Prevent image hotlinking script. Replace last Url with any image link you want.
RewriteEngine on
RewriteCond %{HTTP_REFERER} !^$
RewriteCond %{HTTP_REFERER} !^http(s)?://(www.)?yourwebsite.com [NC]
RewriteCond %{HTTP_REFERER} !^http(s)?://(www.)?yourotherwebsite.com [NC]
RewriteRule .(jpg|jpeg|png|gif)$ http://i.imgur.com/MlQAH71.jpg [NC,R,L]
8. Habilite el almacenamiento en cache of browser

Al mismo tiempo conocido como almacenamiento en caché del lado del cliente, este truco .htaccess habilita las opciones recomendadas de almacenamiento en caché del navegador para su sitio de WordPress. Al mismo tiempo puede usarlo en otros proyectos: sitios HTML, etc.
# Setup browser caching ExpiresActive On ExpiresByType image / jpg "access 1 year" ExpiresByType image / jpeg "access 1 year" ExpiresByType image / gif "access 1 year" ExpiresByType image / png "access 1 year" ExpiresByType text / css "access 1 month" ExpiresByType application / pdf "access 1 month" ExpiresByType text / x-javascript "access 1 month" ExpiresByType application / x-shockwave-flash "access 1 month" ExpiresByType image / x-icon "access 1 year" ExpiresDefault "access 2 days"9. Redirect to a maintenance page
When you are migrating webhosts or performing maintenance, it is always recommended to create a static "down for maintenance" HTML file to inform your visitors that the website is undergoing an update or maintenance. Just create a maintenance.html file (or any other file name) and upload it to your WordPress base installation directory. Paste the following snippet into your .htaccess file. After the operation is complete, be sure to delete or comment out these lines to return to the general operation. You can comment by adding a '#' to the beginning of each line.
# Redirect all traffic to maintenance.html file RewriteEngine on RewriteCond % {REQUEST_URI}! /Maintenance.html $ RewriteCond % {REMOTE_ADDR}! ^ 123.123.123.123 RewriteRule $ /maintenance.html [R = 302] [R = 302] 10. Custom error pages
At the same time you can use the .htaccess file to set up user friendly custom error pages for errors like 403, 404 and 500. Once you have prepared your error page, say error.html, upload it to your base installation directory of WordPress. Then add the following code snippet to your .htaccess file to enable the custom error page:
# Custom error page for error 403, 404 and 500 ErrorDocument 404 /error.html ErrorDocument 403 /error.html ErrorDocument 500 /error.htmlConclution:
Today we have learned some of the best htaccess tricks to strengthen your WordPress site. I suggest you test each module one by one while backing up the .htaccess file before and after testing each module. This is because the .htaccess file is very important. A missing '#' character or a ''misplaced could destroy the integrity of your site. If you access your WordPress dashboard regularly on the go, it is recommended not to enable selective IPs on your wp-admin binder.
It is up to you, what is your opinion on this post? Do you think it is worth the trouble to edit the htaccess file? Know a better safety tip? We would love to hear from you.


