
The ease of crear una tienda en WordPress with WooCommerce, together with the good evolution of the WordPress, that allows us to integrate an online store in a single computer click, has made the number of online stores that are created with WooCommerce, esto ocurre por las siguientes 4 razones; la primera es que será muy positivo en lo que se refiere a la visibilidad de nuestros productos y su positioning en buscadores, la segunda es que este target lo alcanzaremos en menos tiempo, y por lo tanto alcanzaremos antes el retorno de la inversión realizada para su creación, todo ello convertido en ventas, el tercero es que necesitaremos dedicarle menos horas tanto a la gestión como al posicionamiento, y el cuarto es que no se requieren conocimientos técnicos para su gestión dado que es la tienda online más sencilla de gestionar de todo el mercado.
Are you ready to create an online store in WordPress with WooCommerce?
I will explain to you how to create an online store with WooCommerce as well as advanced aspects of it so that you can squeeze its full potential. Also throughout this guide for creating an online store you can find the best and most professional video tutorials that I have found on the Internet.
Basic aspects to create an online store in WordPress with WooCommerce
1.-Elegir el domain y contratar un hosting.
To choose the domain we have different alternatives:
- Choice according to brand. Elegimos un dominio en función del nombre de la empresa o la marca, es decir elegimos un dominio corporativo. Esta elección no nos aporta ningún aspecto positivo al SEO
- Choice according to SEO. We build the domain with the 2 most relevant keywords in the store, in this way it will positively affect our SEO of all the combinations with these 2 words.
- Mixed Choice. Elegimos una palabra corporativa y una keyword. Es el llamado modelo híbrido y otorgamos importancia a un sola keyword o keyword e introducimos un cierto aspecto corporativo al mismo. Particularmente a mi es el que más me gusta utilizar.
Having the keyword in the root that makes up the domain allows start the SEO career with a head start, so think about it very well when choosing it and take the necessary time.
Do we choose a .com vs .es domain?
If we are going to sell in Spain we will use a .es and if we are going to sell worldwide we will use .com.
2.- WordPress installation and configuration
I would like to start with this fantastic video of Franck scipion how to install and configure WordPress, and later WooCommerce.
<>
There are 2 ways to install WordPress:
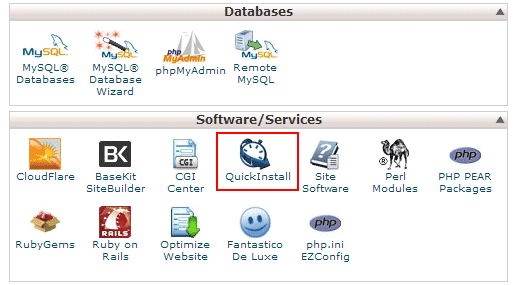
1.- Express. Es la más utilizada en la actualidad y nos permite instalar WordPress en poco más de 10 segundos. Para ello debemos acceder a nuestro hosting y buscar la herramienta para instalar herramientas webs en nuestro dominio, en este ejemplo os hablaré de cómo hacerlo con el hosting Hostgator, aunque esta herramienta de instalación rápida de CMS tendría que estar en cualquier hosting que se precie. Para iniciar la instalación hacemos clic en “QuickInstall” o instalación rápida.
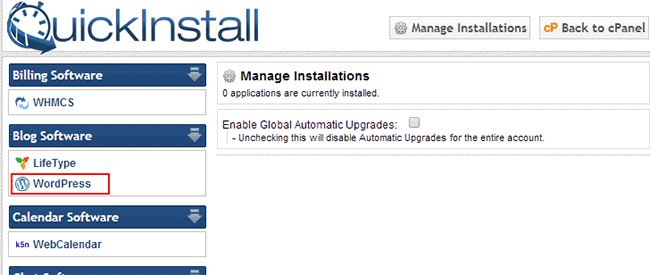
Next, on the left side, we will click to start the installation of the WordPress tool.
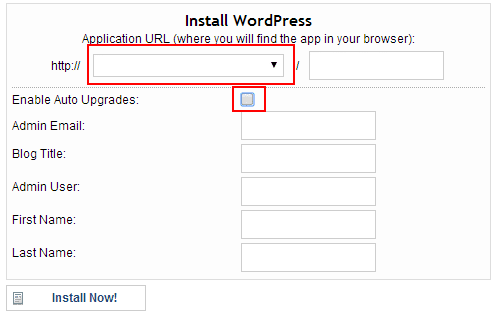
Ahora tendremos que decidir dónde voy a instalar WordPress que pueden ser en tres sitios; en la raíz del dominio, en una carpeta o en subdomain. Rellenaremos correctamente los datos del siguiente formulario de registro, pero es importante que tengamos en cuenta 2 aspectos importantes; el primero es desactivar las actualizaciones automáticas de WordPress, ya que las actualizaciones siempre deben realizarse de forma manual, siempre realizando una copia de seguridad completa (datos+ base de datos), para que podamos restaurar en caso de que la actualización nos ocasionen un malfunction with our online store in WordPress, la segunda es no elegir un Username administrador trivial, nunca el usuario debe ser “admin” o nuestro nombre o similar. No debemos facilitar que nos puedan to hack nuestra tienda online en WordPress.
2.- Classic.
To perform a manual and step-by-step installation of WordPress we will have to create a database from the hosting and upload the basic installation files of WordPress a nuestro dominio, para subir los archivos podemos hacerlo de 2 formas; la primera y más recomendada es subir el archivo en formato Zip desde la herramienta ftp del hosting, para luego descomprimir dicho archivo, este proceso sólo nos llevará unos minutos, y la segunda forma sería subiendo los archivos descomprimidos a través de herramienta externa de ftp como por ejemplo Filezilla. This second way can cost us from 30 minutes to an hour depending on the size and number of theme files chosen for our online store.
Un vez tengamos subidos los archivos de instalación básica de WordPress, lo que haremos será escribir nuestra página Web at browser, y seguir los pasos de instalación básica de WordPress. En este proceso nos pedirá los siguientes campos:
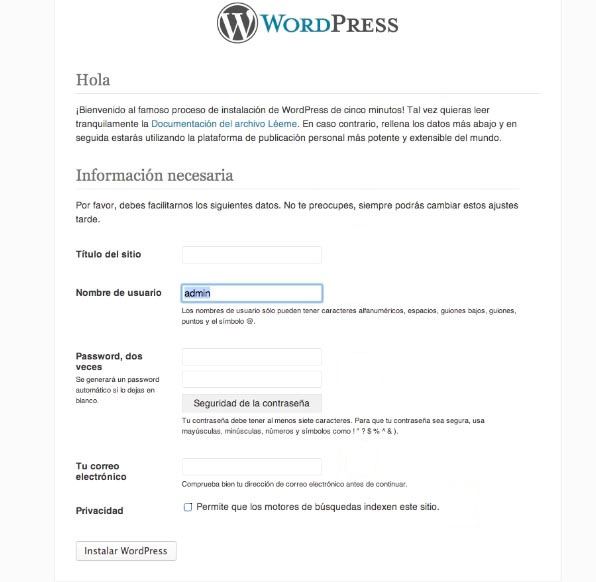
1.- Nombre del Blog y del Usuario. Os recomiendo siempre que establezcáis un nombre de usuario diferente al genérico “admin”.
2.- Administrator email.
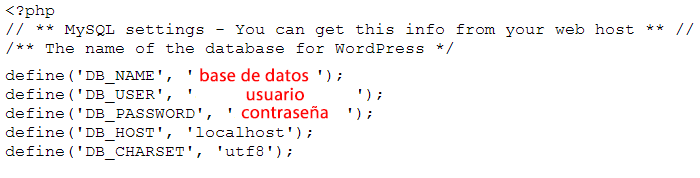
3.- Access data to the database; username and password, and database name. The connection data with our database can also be entered by directly modifying the file wp-config.php that we will find in the root of our WordPress installation.
Once we have installed WordPress, the next step is to configure the basic features of WordPress, although later I will go into advanced aspects of the configuration of both WordPress and WooCommerce.
WordPress setup basics:
In the settings section we can access the basic configuration of WordPress, here you can find a step-by-step WordPress configuration guide, in which we must configure; general settings, reading, writing, comments and permalinks.
Advanced aspects of WordPress configuration:
Un error muy frecuente cuando vamos a crear una tienda online en WordPress con WooCommerce, es no optimize he server php con la memoria adecuada. Os recomiendo que aumentéis la memoria php del servidor a un mínimo de 128mb, para ello tienes dos formas de hacerlo:
- Open a ticket with the hosting company and request the increase. If you do not dare to configure it yourself, it may be the most suitable way for you.
- Editing the file wp-settings.php, which you will find in the root folder of WordPress installation and adding define ('WP_MEMORY_LIMIT', '128M'); . You will add this line of code after the comment text where WP_MEMORY_LIMIT appears.
Disponer de más memoria permitirá que la tienda online funcione de forma más rápida tanto el frontend como el backend, y nos evitará un desbordamiento de memoria o también conocido como el pantallazo blanco, especialmente si vamos a utilizar un número importante de plugins.
To check that we have correctly increased the memory and we do not have any red warning, we will click on WooCommerce> System Status.
Es importante recordar que no debemos permitir la indexing de la tienda online en WordPress hasta que esté totalmente terminada, así que mientras la estamos confeccionando marcaremos la opción de “Disuade a los search engines de indexar este sitio”.
3.- Installation and configuration of the template that we are going to use to create our online store in WordPress.
La elección de la plantilla o theme es un aspecto muy importante a la hora de crear una tienda online en WordPress, pero en este caso al utilizar WooCommerce para su implementación, debemos asegurarnos que la plantilla elegida be compatible con ella. Es muy importante que comprobemos que la plantilla elegida es compatible con la última versión de WordPress.
Perhaps the most difficult thing now will be to choose between hundreds and thousands of WordPress templates for Wocommerce, to simplify this search I suggest you see which are the WordPress themes most used by your sector or by websites similar to yours, for this you can use the tool WhatWordpresisthemethat?, which will allow you to know the specific template used by any online store in WordPress.
Es importante que tengamos en cuenta que no todas las plantillas que encontraremos para crear una tienda online en WordPress son iguales, ni tienen las mismas funcionalidades, plugins y el mismo nivel de SEO optimization. Es por tanto necesario, hacer un alto en el camino y analizar con detenimiento los siguientes aspectos:
- Check if you meet the necessary requirements for the creation of the online store.
- It must be compatible with the latest version of WooCommerce and WordPress.
- It must have a version for mobile devices or also known as Responsive.
- Debemos valorar los plugins adicionales que nos aporta la plantilla, en especial el plugin revolution slider o similar, con el que podamos crear y enriquecer nuestra tienda online con vistosas e impactantes animaciones de imágenes y texto.
- We must value that it has a page creator with which we can create each of the sections of the web, without the need for technical knowledge. This aspect will be of great value if we do not have technical knowledge when creating a website in WordPress.
- Code optimization level for SEO. The more optimized the template code, the more the positioning of each and every one of our products will benefit.
Once we have chosen our template we install it in our WordPress, in order to install the template the easiest thing is that we do it from our WordPress backend in Appearance> Themes and let's click install template. Remember that the template must be in Zip format. Another way to install a template in WordPress is to upload the theme folder by ftp to the folder wp-content / themes.
Una vez instalada la activamos y configuramos correctamente. Nos aparecerá en el menú de la izquierda en WordPress un nuevo apartado a través del cual podremos acceder a la configuración de la plantilla y configurar aspectos como; logo, favicon, tipografía, colores, tamaño de las fuentes, etc. Un error común en algunas tiendas online en WordPress es no personalizar el favicon y dejar el predefinido por el theme que hayamos utilizado.
4.- Installation and configuration of WooCommerce.
The installation and configuration of WooCommerce in WordPress is a simple process and you will surely not have any difficulty in following it, but I am going to detail it step by step so that you can follow it comfortably.
I leave you this very complete course of Javier Garcia where he explains step by step the entire installation process of our online store with WooCommerce.
A.- Installation of WooCommerce in WordPress.
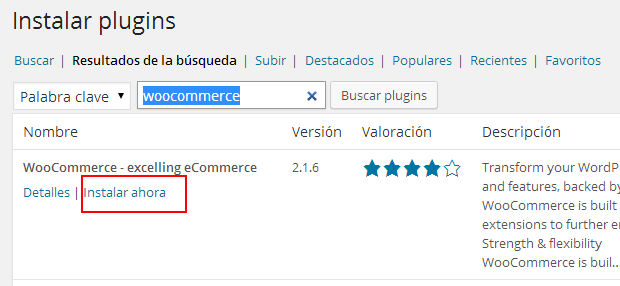
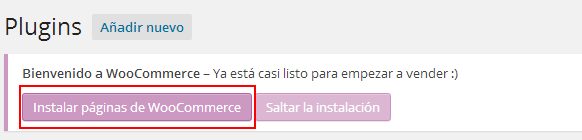
We install and activate the WooCommerce plugin, and then click on install WooCommerce pages.
We will see that 2 new sections appear in the left menu of WordPress; WooCommerce, which is where we will access to make the configuration and where we can also see the orders, and products, which is where at the end of the whole process we will add the catalog of products that we are going to put on sale in our online store in WordPress.
WooCommerce Settings
In the general WooCommerce options we have to configure the following fields:
- Main location, in this case in Spain in Valencia
- Places of sale, in this example the online store will only sell to Spain.
- Coin. We must change to euros and change the position of the currency to the right of the price.

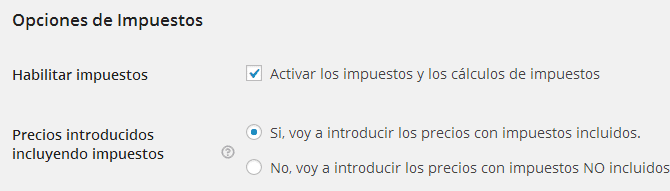
Tax options in WooCommerce
Tax rules can be more of a headache if we don't know how to configure them correctly.
The tax options are always deactivated by default, so we must activate them, and we must decide if the tax will be included in the total price of the product, or if instead we will enter the prices with taxes included, I always recommend that they be included with VAT.
To define new taxes, such as reduced taxes for certain products, it is as simple as adding them in the list of "Additional kinds of taxes", always adding one per line, and when we click on save changes we will see that new tabs appear with the new taxes that we have added.
How to configure VAT for the Canary Islands, Ceuta and Melilla in WooCommerce?
Until a few months ago, this was a big headache when we wanted to create an online store in WordPress with WooCommerce, since we had to modify the code or access a payment module to comply with these tax exemptions, but this has already happened to the story at the end of 2013, when WooCommerce added this function within its module, and finally now if it allows to add all the taxes and rules that are necessary.
The most common case is how to configure the VAT exemption in the Canary Islands, Ceuta and Melilla, for this we only have to add tax rules as we see in the image.
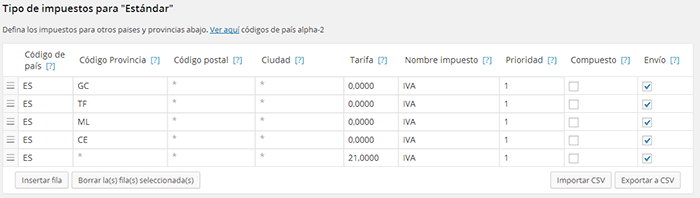
It is important that we learn the coding of the provinces so that we can apply more specific and concrete rules.
Province codes
GC: Gran Canaria
TF: Tenerife
ML: Melilla
CE: Ceuta
If you have any questions configuring the taxes in WooCommerce, you can leave me a comment below.
How to configure payment methods in WooCommerce
There is always confusion and doubts when choosing the forms of payment that our online store will have in WordPress, but we must know that not by offering more forms of payment we will have more sales, the ideal is to offer those that are just necessary for our store . These are the most common forms of payment:
1.- Paypal. It is the most standard and well-known way, so it is very important to create and configure a company paypal account.
2.- Bank Transfer. It is also one of the common payments for those who prefer to pay in a more classical way or those who do not have a credit card, or simply do not like to make credit card payments over the Internet.
3.- Payment through the bank payment gateway. This form of payment I always recommend that it be implemented when the online store is generating enough income to make its start-up profitable. This process involves an integration between WooCommerce and the POS of the bank that we have chosen.
4.- Cash on delivery. Many online stores underestimate this form of payment as a generator of trust in their customers, and the truth is that if we are going to take the first steps with our online store in WordPress, we cannot rule out or discard any mechanism or action that generates trust and security to our customers. visitors.
Shipping options in WordPress with WooCommerce
There are several basic ways that the WooCommerce installation includes, such as; single price, free shipping, international shipping, local shipping and local pickup. The most logical and normal thing is that we have several forms of delivery to our clients. One way of shipping where the best price is offered and another way where the speed of the shipment comes first.
In this sense, we will always choose the transport service that offers us the best price and guarantee, whatever it is. It is recommended that we do the consultation in at least 5 different companies, from the initial list we must choose 3 with which to negotiate price and other conditions.
One of the difficulties we have when we are going to create an online store in WordPress with WooCommerce is to establish different prices depending on where we send our order, or when we want to enter a price table based on the weight and place of delivery, and we start To worry, because the truth is that this task is very tedious and complex to perform with WooCommerce, to solve this problem there are two simpler solutions:
1.- The ideal way is to go to the checkout and buy the module that costs a whopping $ 199, it is a very powerful and easy to manage module, and it will surely meet all our requirements when establishing forms and calculations of shipping, but you have to think, is it worth investing so much money in this module when I don't know if the online store will be successful or not?
2.- WooCommerce - APG Weight and Postcode / State / Country Shipping
La segunda opción, sería analizar si este módulo gratuito de WooCommerce cumple nuestras necesidades. En principio añade a WooCommerce el cálculo de los gastos de envío según el peso, dimensiones y el código postal, provincia (estado) y/o país del client, aunque es una auténtico rollo y algo tedioso configurarlo correctamente, por deciros algo tenemos que establecer grupos de códigos postales por cada lugar de envío, es decir uno para Baleares, otro para Ceuta y otro para Melilla introduciendo los códigos postales de cada una de estas comunidades, es decir, un auténtico trabajo de chinos que os aseguro os dará problemas a futuro, si no están introducidos todos y cada uno de los códigos postales.
Other shipping ways:
Free shipping. It is very common to establish a free shipping cost from a certain purchase amount, in this case we must be careful that a bad configuration does not give us a scare and for example we establish free shipping costs from 70 euros, and we make an order from Melilla that costs us 30 euros to send it, and not only do we not earn anything on the sale but we have to put money from our pocket for this order. This causes us a problem because we cannot establish rules within the free shipping in WooCommerce if we want to correctly establish a free shipping we have to go to a payment module or modify the code.
Picked up at the store. We must always allow our customers to collect the order in the store, this has two positive aspects; the first one that the customer saves shipping costs and the second one that gives our visitors greater confidence since we invite them to visit us at our physical store and we are totally transparent, but do all online stores do this? the truth is that no, but we should ask ourselves why they don't.
Accounts
Here there is little that I can comment on, we only have to decide 2 aspects that are; allow or not that users register from "My account", I consider it positive and allows to provide the online store in WordPress with greater transparency to the visitor, and the second thing that we must decide if we automatically generate the password to the user and send them your user data and password by mail, I think it is recommended, since it is proven that more than half of the users who register or create an account do not save the data of it, and soon forget how to access to her, having to request a new password to be able to access her account, what would we do if the I forgot my password button did not exist?
At last we come to the last section of the WooCommerce configuration and here we will define the name of the sender and his email, as well as the image or logo of the company and the text of the footer of the email that will be generic in all our notifications.
I remember that in the first versions of WooCommerce the email templates had to be modified directly from their code, but now the process has been greatly facilitated, being able to change aspects of the header and the subject very easily and without having to have technical knowledge.
If we want a more advanced personalization of our emails we will have to modify the code of the email templates.
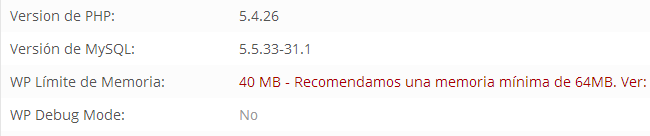
Check WooCommerce system status
If we have installed and configured WordPress and WooCommerce correctly, no text should appear in red, but if for example we have not increased the memory size it will tell us that we have 40 MB and that this amount is below the 64 MB minimum required by WooCommerce To work properly, I am not going to go into how to solve it because at the beginning of this guide I have explained it.
5.- Installation and configuration of the best WordPress plugins
The great versatility and flexibility that WordPress has allows us that by installing 3 or 4 plugins in our online store we can optimize it and grease all the internal machinery very well so that the work we do uploading products has its reward in many sales.
For this we must take into account different aspects to optimize:
Plugins to optimize the SEO of our online store
1.- WordPress SEO. Without a doubt it is the most complete plugin in WordPress and an essential module and with which, when you get used to it, you can live without it.
Nos permite optimizar el SEO on-page, crear y configurar nuestro sitemap, crear nuestro breadcrumb o también conocido con las “migas de pan”, integrar nuestras publicaciones con nuestras redes sociales, como por ejemplo Google+, y un largo etc.
2.- SEO Friendly Images. Si quieres olvidarte de introducir el título y texto alternativo de todas y cada una de las imágenes, esta es tu herramienta.
3.- Broken link Checker. Very useful to detect broken links and allows you to remove or modify them easily.
4.- WP Super Cache. A good plugin to manage the cache of our online store well and easy to configure, practically child's play.
5.- W3 Total Cache. It is the most complete cache plugin in the WordPress world, yes, configuring it well and making the most of its potential is complex and requires advanced knowledge.
I have been looking for a complete guide in Spanish but I did not like any, so I leave you one Very complete guide in English on how to correctly configure W3 Total cache.
6.- Google XML Sitemap. A plugin well known to all and that we can use, in the case that we do not want to use the one that WordPress SEO by Yoast has.
7.- RDFa Breadcrumb. A fantastic tool for creating spectacular snips in search results.
8.- BJ Lazy load. Images are usually one of the elements that most affect the loading speed of an online store, so if we use this plugin, only the images that are on the user's screen will be loaded and in this way our online store will work much faster and therefore, it will improve the user experience and SEO.
Other interesting WordPress plugins for an online store
1.- Digg Digg
It allows us to add our social media bookmarks to both our online store products and blog posts. Decide if you prefer to place these social media bookmarks in a classic or floating way so that they are always visible on the user's screen and capture their attention more.
It allows us to add a box with the author information in our blog in WordPress.
3.- Contact Form 7
With this module we will be able to create several and different contact forms, in a very easy way and in a short time.
4.- Mailchimp
It allows them to subscribe to our list of subscribers, to whom we can send promotions and offers from our online store, something very interesting and that will undoubtedly increase sales.
6.- Creation of categories and upload products to our online store in WordPress
Before starting to upload products like crazy to your new online store in WordPress, pay attention to the following tips or considerations:
1.- The first step before starting our product catalog is to define a good category structureBearing in mind that we must always use the fewest possible categories and the fewest possible levels, it makes no sense to create 4 levels of a category in an online store. Establish these categories not according to what is easier for you or according to the names that the company uses, since we must use the categories that future buyers recognize more easily.
Example online clothing store:
Women (Dresses, pants, t-shirts, shirts and shoes)
Men (suit, pants, t-shirts, shirts and shoes)
Girl (Dresses, T-shirts, socks and shoes)
Child (Pants, T-shirts, socks and shoes)
Hay que distinguir muy bien entre categoría y attribute, para evitar que utilicemos un atributo como categoría de forma innecesaria. Por ejemplo “Talla” y “Color” serían atributos y nunca una categoría o sección de nuestra tienda online.
2.- Create the product catalog in Excel.
In this document we are interested in knowing the following data; reference, product name, short description, long description, category, attributes, price and finally the image or images of the product.
It is important that we analyze the price of our closest competition so that we really have a competitive price, without it, no matter how good your product is and your visibility on the Internet, you will not sell on the Internet.
Why do we buy online?
- 94% Convenience and comfort.
- 94% Unique offers.
- 82% By price.
- 79% I found something interesting while browsing the Internet.
- 71% Trust in those websites.
- 69% Because the physical store is far or closed.
Source: IV Study of Social Networks IAB
If you cannot get or cannot have a competitive price on the Internet, it is preferable that you do not invest money in creating an online store in WordPress, because it is very likely that it will not be successful. With this he does not try to discourage you but to put your feet on the ground and show you reality.
How to make the product file of my online store?
Is there any use in copying the 2 description phrases that appear on the website of my supplier or manufacturer?
Si quieres crear una buena ficha de producto lo que nunca y jamás debes hacer es copiar y pegar los contenidos de la ficha del producto del fabricante o proveedor, es decir nunca debemos partir de un contents ya publicado en Internet. Eso implica un gran esfuerzo ya que tenemos que elaborar contenido original para cada uno de nuestros productos, pero este aspecto es fundamental si queremos y pretendemos que nuestros productos tengan una buena visibilidad en el buscador.
This is not about making a rule, but whenever we can, we must enrich that product file to the maximum, so that we start with an original product file and with a good number of words. This enrichment should not only be based on the text but also on other multimedia contents that make the product more attractive. These images or videos must be made by good professionals in the field, since the image greatly influences the purchase factor of an online store, so the better these images are, the more possibilities to sell our future online store in WordPress will have.
We must know that the WooCommerce module allows us to upload 4 types of products, although the option that you will use the most will surely be the simple product:
- Simple products: It is the most standard type of product and used by any online store in WordPress, as long as these products are tangible and do not have specific product attributes, as I have explained before with the example of size and color, or any other specification, this type of product would not serve us.
- Grouped products: We will use this type when we want to sell the products of a set separately, that is, we can buy the complete set or we can buy each of its members separately.
- Productos externos o afiliados: Este tipo lo utilizaremos para mostrar la información de un producto de un affiliate, es decir, de un producto externo a nuestra tienda online en WordPress.
- Variable products: If we have different attributes for the same product, this will be your choice, and in this way we can define products with different price, image and reference based on the attributes chosen by the buyer. Example a shoe that is available in 10 sizes (35 -44) and in 3 colors (red, blue and green). Each size and color combination will have a different reference.
7.- Very useful advanced options when we create an online store in WordPress with WooCommerce
Add custom fields in WooCommerce
One of the shortcomings that occurs in most of the online store CMS is the little customization of the registration or purchase form of the store, and this is a problem that we must correct since in many cases we will need more information from the buyer than we need. appears in generic fields. To explain how to add additional fields in the WooCommerce purchase form I will do it with the following example. Suppose we are thinking of creating an online store in WordPress to sell flowers, but of course, for this type of online stores it is important to know the delivery date and time, as well as to give the possibility of sending a message on a card.
In this example we are going to add a single field, more specifically that of the delivery date. To do this, copy and paste the following code in the file of your theme "functions.php":
add_action ('WooCommerce_after_order_notes', 'my_custom_checkout_field2');
function my_custom_checkout_field2 ($checkout) {
echo ‘<div id="»my_custom_checkout_field»"><h3>’.__(‘ Fecha de Entrega e indica si se envía por la mañana o por tarde’).'</h3>’;
WooCommerce_form_field ('my_field_name2', array (
'type' => 'textarea',
'class' => array ('my-field-class form-row-wide'),
'label' => __ ('We place orders on the same day, provided they are received before 2 pm'),
'placeholder' => __ ('Write the date and indicate tomorrow or afternoon'),
), $checkout-> get_value ('my_field_name2'));
echo ‘</div>’;
}
add_action ('WooCommerce_checkout_update_order_meta', 'my_custom_checkout_field2_update_order_meta');
function my_custom_checkout_field2_update_order_meta ($order_id) {
if ($_POST ['my_field_name2']) update_post_meta ($order_id, 'Delivery date', esc_attr ($_POST ['my_field_name2']));
}
You can choose different types of fields for the value 'type' for example:
- 'text' - text
- 'textarea' - text box
- 'password' - password
- 'select' - selection of options
This would be the result in our online store:
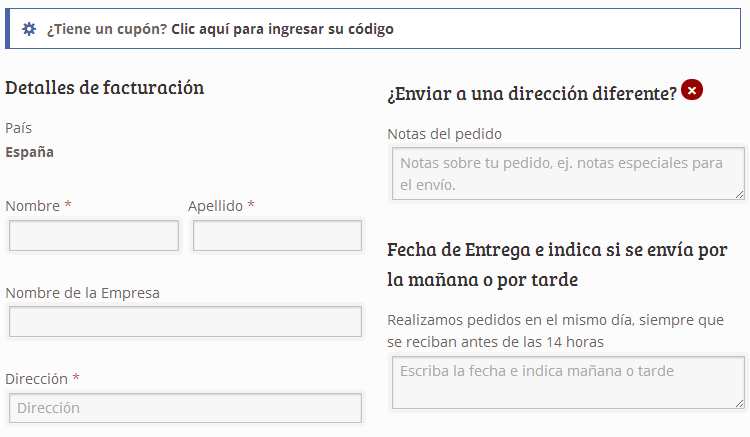
This field that we have added will appear when we view our order within the custom fields, as we can see in the image.
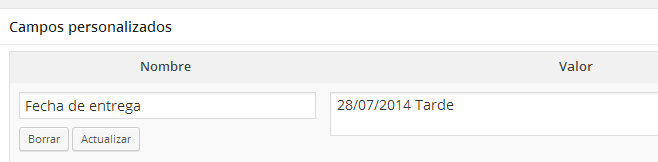
In this way we can add all the fields that we consider necessary to provide our online store with greater personalization.
How to translate a WordPress theme or plugin?
Not everyone has technical knowledge when it comes to editing the language files of a WordPress module or template, if this is your case you will like to know that there is a plugin called Codestyling Localization With which we can carry out the translation into Spanish in a very simple way and without having any technical knowledge of how we should do it.
Now you can not only translate into Spanish those annoying words that are not translated in the theme or in WooCommerce itself, but you can also change some texts or phrases that are poorly translated or that we simply see more plausible to use another.
Add attributes in WooCommerce to products
8.- Dar de alta en Google analytics and Google Webmaster.
Congratulations !!!, You have already created your online store in WordPress with Woocommerce, after many hours and days of work, and you want to index it in the Google search engine and make it known through social networks, for this, what we will do first is go to Settings> Reading and uncheck the option "Discourage search engines from indexing this site".
Then, once we allow the indexing of our online store in WordPress, what we are going to do is create an account of Google Webmaster and verify it for our store, the process is simple since we only have to upload a file by ftp to the root of our online store and click verify, and we will have access to our Google Webmaster account. Once we have access, we must go to Tracking> Sitemaps and add the sitemap of our store, most likely it is sitemap.xml, and do not be scared if you get a warning message that something is blocking Google from reading and indexing this file, this happens because until a few minutes ago the online store was blocked for indexing and Google will take a few hours to happen again through our website to see that you can already index all our web content.
The next step will be to create an account Google analytics para que podamos ver la Web Analytics de nuestra tienda online. Una vez creado debemos añadir el código que nos da Google Analytics a WordPress y lo podemos añadir a través de un plugin, o del propio theme o directamente en el pie de página de la tienda (footer.php), we will have to wait 24 hours for us to see statistical data of the online store since they are updated on a daily basis.

Existen muchas apps para el móvil que funcionan muy bien, yo os recomiendo que utilicéis Dashboard for Google Analytics, que nos permite acceder a las estadísticas diarias, semanales y mensuales a tiempo real, es decir podemos consultar cada día las visitas que llevamos en ese momento del día.
To end this article with some tips for your new online store:
- More than 50% of SMEs affirm that they have increased their sales thanks to the Internet, pero la gran mayoría de ellos no conocen el punto en el que los usuarios abandonan la compra. Esto demuestra la importancia de accessibility y usabilidad de nuestra tienda online, y también del valor que tiene no sólo conocer el camino que tiene que realizar un usuario cuando va a realizar una compra en nuestra tienda online, sino también en que punto de ese camino abandonan el proceso y saber cuáles son las causas.
- More than 60% of SMEs do not have an optimized website and 45% do not use fraud prevention tools. If your objective as a company is to create a website or online store and then abandon it or leave it out of date, it is preferable that you do not invest a euro in it. The attitude of a company with any web project, whatever its nature, has to be that of a daily and constant work.
- The new online store must have the mobile standard "Responsive Design", yes or yes. There are no other options. The use of smartphones connected to the Internet already surpassed conventional computers in 2013, and it is expected that in a short time tablets will also surpass it, so that in a short time most of the sales will come from mobile devices.
- Las tendencias marcan la importancia del Social Commerce, with the aim of creating real and social experiences in a totally collaborative environment. This year online stores will proliferate on social networks and many companies will seek to convert experiences into sales.
- The importance of having brand ambassadors or also known as Consumer Empowerment, it will allow us to go better and further through social media.
- It will be necessary to take into account Pinterest's influence on Social Commerce.
- The offline medium can no longer live if it does not merge with the online. This is already a reality today and this year we will see totally symbiotic strategies between offline and online.
- Fusión total del SEO y del Social media. Si queremos vender con nuestra tienda online necesitamos visibilidad y presencia de marca tanto en el buscador como en las redes sociales. Si no contamos con una buena strategy de marketing online, es altamente probable que nuestra online store in WordPress fails before the first year of life.
- Offers total confidence and security in the purchase of your products and establish the communication channels that are necessary for this purpose.
- Make a study of competitor prices to be able to offer a super competitive price to your products. If you don't have a competitive price, you simply won't sell online.
- Facilitates access to purchase, and do not allow users to abandon the purchase process for reasons such as difficulty or because it is long and tedious.
- Merge your online and offline events to publicize your brand. Today we can organize face-to-face and online events totally simultaneously for a very low cost.
- Always analyze your competition and try to be more original, and always anticipate their actions, "whoever arrives first hits twice."
- Creating an online store can be done by almost anyoneBut creating an online store that is a profitable business is not done by just anyone, so always have the help of good professionals to help you sell your products.
I hope that this guide on how to create an online store in WordPress with WooCommerce will be very useful so that you can take the leap and start selling online.
Good luck with your future online store in WordPress !!!
If you liked the article "How to create an online store in WordPress with WooCommerce", you can share it with a friend.