

- 1. Right now reading: The Ultimate Guide to WordPress Image Management
- 2. 3 Lesser-Known Image Management Tips in WordPress
- 3. WordPress Image SEO Errors and How to Fix Them
Visual impact is one of the most important characteristics when it comes to an impactful content marketing plan. Welcome to a new series of posts: the definitive guide to image management in WordPress.
It is designed to give you the must-have tools to manage your image assets in WordPress, from technical optimizations, SEO, CDN onboarding, and library management. In this multi-part guide, we will only recommend those methods, tutorials, plugins, and themes that we have tried or are recommended by industry experts.
In addition, we will avoid blindly suggesting plugins that have a high use in the WordPress repository. Rather, we will recommend the ones that are a great fit between value initiative and performance optimization.
You may wonder how we would do it. Over 24,000 downloads of our Total - Responsive Multipurpose WordPress theme on ThemeForest might not be a great indicator.
Well, we have crawled the best blogs from industry leading WordPress hosting companies (like WPEngine and Pagely) and I learned that they learned by serving hundreds of millions of page views from hundreds of high-profile customers. We have compressed all of this information for you into small paragraphs and bullets for your online success. Now let's get started, shall we?
Technical and performance optimization tips for WordPress images
There are quite a few image optimization options available in WordPress that do not put unnecessary load on the web server. We will look at some of the most common image optimization tips of all should follow along with a few others that are useful on special occasions.
JPG or PNG? Using the correct image format
The first step in image optimization is a good start. They comment that a job well started is half done. That is precisely the case when it comes to image optimization in WordPress. It all starts with choosing the right image format. JPG and PNG are the two most common image formats used online in content marketing.
The trick is to understand which format to select for each type of image. Selecting the wrong one causes a monumental increase in image size. These are the rules.
When to use PNG format?
For flat images, such as vectors, illustrations, fonts, logos, banners, shapes, banners, etc., anything that is created in a vector format such as EPS or Adobe Illustrator (.AI) format, use a PNG. You will end up with an optimized image with almost zero quality loss. If you use a JPG for this case, you won't compromise on size, but you could run out of quality. Actually, at higher resolutions, the PNG would be lighter with no loss of quality. The JPG would suffer.
Take their example. We will create a flat image at 5000px and save it as JPG and PNG.

Sample image used for testing
| Flat image | |
| JPG | 233 KB |
| PNG | 42 KB |
In short, the JPG image was 455% taller than the PNG for the same resolution.
When to use the JPG format?
For everything else, use a JPG. Anything other than a flat or vector image, use JPG. Photos of people, places, things, etc. - use JPG. Most stock photos in this category use JPG. If you use PNG instead of JPG, you will run into some serious performance issues.
You must be very careful in this case. If you use a JPG instead of a PNG, there will be little or no damage. However, if you use a bloody PNG in the case of a JPG, you create a lot of room for damage. Take a look at this example.
Prepare: I downloaded this image from Shutterstock, weighing around 10.3 MB to a resolution of 6149 × 4562 - essentially a 28MP stock photo. Unless we are preparing something like a print-ready brochure, we will not use the full resolution of the photo on our blogs. Suppose we have a fixed maximum image size of our blog from 1600px.
To experience: We will resize the source image to 1600px and create four versions - two for PNG format and two for JPG. For each format (JPG / PNG), we will use the (a) recommended compression setting and (b) maximum compression setting.

Sample image for the JEPG experiment
Results: Here are the results in a good graph for you to follow:
|
Original image (KB) |
10870 | ||
| Target resolution | 1600 px | ||
| Format | Configurations | Size (KB) | % Decreasing |
| JPG | Progressive, Quality = 85 | 231 | 98% |
| Non-progressive, quality = 85 | 239 | 98% | |
| PNG | Compression = 0 | 5575 | 49% |
| Compression = 6 | 1852 | 83% | |
| Compression = 9 | 1750 | 84% | |
At first glance, you might think that the 84% compression of PNG is good enough versus the 98% achieved in JPG. That's not true at all. If you take a closer look at the sizes of the images, you will see that the PNG is a little over 1.7 MB while the JPG is 0.22 MB. Which means that the PNG is 8 times heavier than JPG version of the same image with the same resolution. In other words, for the same image and resolution, the JPG version is 700% lighter than the PNG.
For the same image and resolution, the JPG version is 700% lighter than the PNG.
As a general guideline, use PNG for flat images and JPG for everything else.
Checklist for uploading stock photos to blogs
There are tons of blogs where editors directly upload the full resolution version of the image in their blog posts. Here are some tips for uploading stock photos to blogs. I use a free software called IrfanView that has many amazing features. I'll illustrate each one for you.
1. Resize your image
First of all, you need to choose a maximum resolution for all your images on your WordPress site. Any image above that dimension would change in size, unless it is decidedly smaller.
IrfanView have a Batch conversion function (press B after launching the app) that can apply a list of functions to a bunch of images in one go. For our purposes, the functions include resizing, cropping, adding a watermark, etc.
2. Clear EXIF data
The photos that are clicked on a normal camera have many metadata - which is nothing more than small (but useful) bits of information about the image. Examples of such information include GPS coordinates of where the image was clicked, ISO settings, camera model, etc.
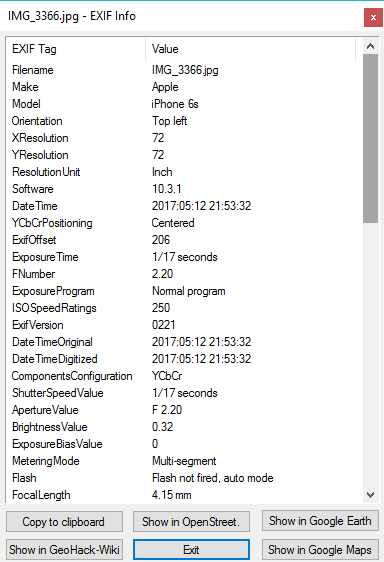
EXIF information of a random photo that was clicked on my iPhone
Unless we are on a photo blog, we generally don't want that information in the image of a blog post. When you batch save or convert images in IrfanView, the EXIF data is usually removed. This helps preserve your privacy, especially your physical location. The size difference for most photos is approximately 200-300KB per image.
3. Save as progressive JPG
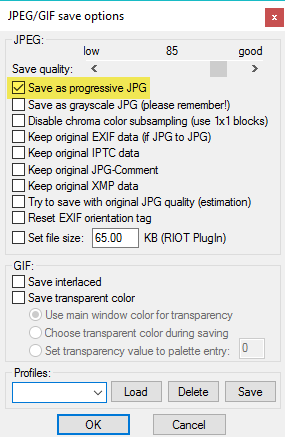
IrfanView saved JEPGs as progressive by default
A progressive JPG image loads the image layer by layer, which speeds up loading time. Content distribution networks such as KeyCDN have been started converting automatically JPG to JPG progressive to speed up image delivery and make the most of storage.
4. Set the DPI to 72
DPI or dots per inch is a measure of image quality. A high DPI setting is used for media. For the web, a value of 72 is perfect.
Well, summarizing the above, the following are my settings. I run this function once I have compiled all the images for my blog post, before uploading the images to WordPress.
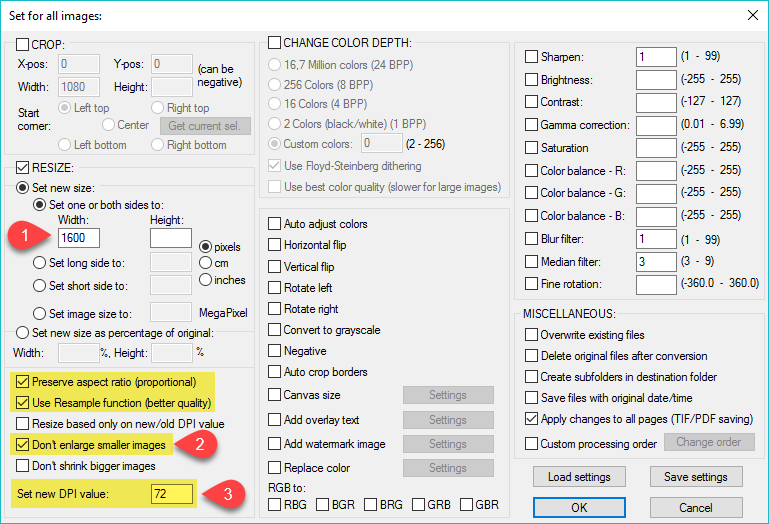
Batch conversion setup in IrfanView for a typical WordPress blog
5. Optimize your images
It doesn't matter if you've used JPG or PNG, you need to get the most out of your image. There are many truly amazing online tools that help you get the most out of your images and save one lot from space.
I am talking about services like TinyPNG or TinyJPG which basically optimizes your PNG / JPG images with some advanced algorithms.
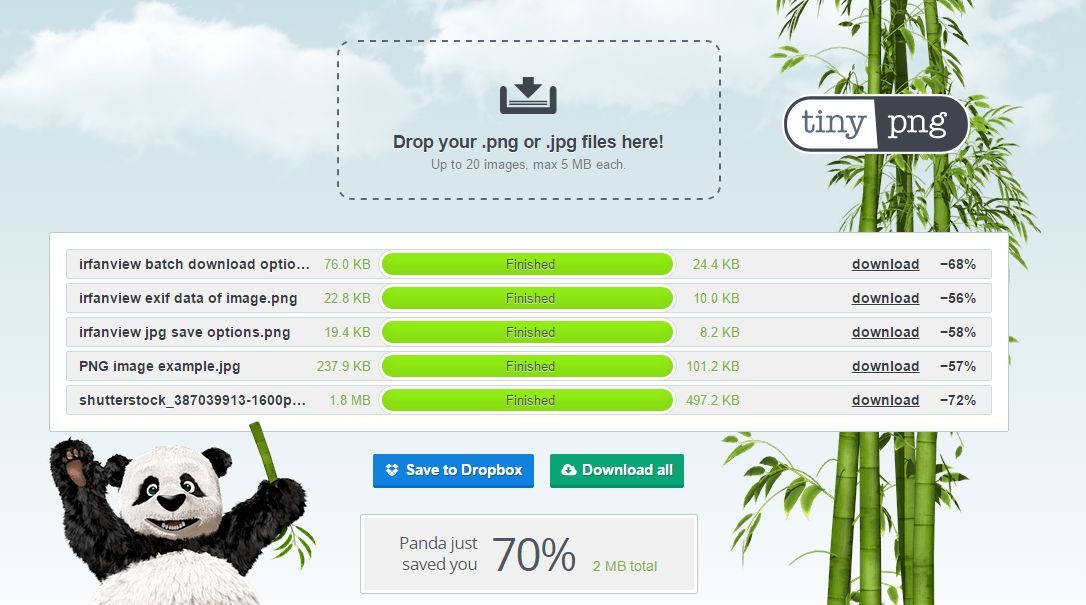
Optimized images in TinyPNG
To be honest I don't know how the algorithms work, but they do and I have always been able to get a 50-70% decrease no matter how better I save them.
You can also buy the pro version from the service as a Photoshop plug-in for $ 50 USD. Windows and Mac versions are available. For my purposes, the online version (along with the Save to dropbox function) works better.
Image optimization plugins in WordPress
So far, we have learned the steps to get started Right. What if you've come across this post now and already have thousands of images uploaded? Well here are some plugins to help you with that:
EWWW Cloud Image Optimizer

This plugin is a fork of the original and very popular Image Optimizer EWWW plug. With over 500,000 downloads, these image optimization plugins allow you to get the most out of your images as they are uploaded to WordPress.
What sets it apart from the competition is its ability to make the most of the existing images in its database, resulting in a huge performance boost. It also saves significant bandwidth costs, since most of its traffic comes from old posts. Optionally, you can also choose to enable lossy image compression (which is barely visible to the naked eye) but it can save a lot of space and bandwidth. In terms of optimization technology, you can use TinyPNG or the TinyJPG API to get the most out of new and existing images.
But here's the problem. Many hosts (including WPEngine) do not allow the EWWW Image Optimization plug-in as it places a lot of additional load on the server. If you somehow manage to bypass the server's restrictions, you may risk having your account suspended due to policy violations.
This is where the EWWW Cloud Optimizer the complement comes into play. Download all the calculations needed to get the most out of the images to the cloud and basically replace the non-optimized images with the optimized ones. Since virtually zero CPU power is used for compression, there is no additional load on the server. This is valid for all new and existing image conversions on your WordPress site.
Plans and prices: Unsurprisingly, the plugin is free as the developer has to pay the bills for the cloud computing. however, the prices is extremely reasonable and costs $ $ 9 for 3,000 image optimizations for a prepaid subscription.
The EWWW Cloud Optimizer plugin is beautifully designed. The media scanner tells you how many images you need to get the most out of before making a purchase. Based on your server images, you can buy a relevant prepaid plan.
TinyPNG WordPress Plugin

This is another great image optimization plugin that integrates directly with the TinyPNG / JPG service. New and existing images are automatically uploaded to the WordPress media library. This add-on offers a free plan of 100 image optimizations per month.
Freddy had compiled a list of image optimization plugins a while ago; read it if you want to know more about it.
conclusion
This brings us to the end of the first post in this series. In the next post, we will learn some lesser known image optimization tips and tricks, such as preventing direct links, getting images from remote servers, and the like. Do you have any tips below the starting well category? Let us know in the comments below.


