

Images are an important part of the design of a blog or the presentation of an article. In this tutorial you will learn how work the images for WordPress.
Why are images important?
One of the main advantages of content on the web is the interactivity what are you offering. And the ability to display one click away Additional information. Complementary information such as a graph, infographic, photo, audio, video. In short, any file that allows us to expand the data that we present with words.
And the most commonly used files are graphics files or images.
To us like bloggers we love working with images. And to the audience that we do it.
This is why we have prepared various tutorials where the image is the protagonist. Tutorials like:
In each of them we have talked about how vital it is to work with images. And at the same time we have insisted that you illustrate your content with good photos or graphics.
But at the same time you get it right. This is why we show you:
How should images work for WordPress?
To work with images we have several options. The idea is that before uploading them to your WordPress are already optimized.
How to optimize images before uploading them to WordPress
To optimize graphics files before uploading them to your blog, you need to consider some important factors. As the size.
Size (and weight) do matter
Yes, apart from our content being visually appealing, we want it to load fast. We already know the relevance it has for the SEO and for the user experience in general the loading times.
For our blog, web or ecommerce we need light photos.
How to reduce the weight of our images?
We have several options.
1. Start from the source
The first option and one of the most effective is without a doubt to start from your source files. If you are a photographer and have a briefcase on the web you may want to upload your best shots in the best workable quality.
But it would be counterproductive for your loading times, navigability and SEO upload the RAW files from your SLR camera to your WordPress. That without counting on all the space of storage what would you consume in your host.
This is why you must work with files that are friendly with the web and browsers.
2. Choose image file formats with "lost"
The more friendly files with the web browsing experience are:
Nothing to be uploading things in RAW, TIFF or your files of Photoshop with layers.
3. Reduce the weight of your files.
It is recommended that before uploading our images to WordPress Let's follow a series of steps that allow us to obtain a light image. And that it still maintains the quality.
The first without a doubt is compress them. But okay, calm down, we are not talking about passing them through the compressor and leaving them in RAR or ZIP.
To reduce the size of the images we have several options.
Decrease the weight of images with Photoshop
Decrease the weight of an image with Photoshop it's simple.
Follow the steps below (the location of the menus and the paths may vary slightly depending on the version of the program you use).
- Open your image in Photoshop.
- Go through the following path:
File> Save for web and devices
- Adjust the quality of the image by modifying the parameters shown below.

This until the graphic element you want to upload has the desired weight (no more than 70 kbs).
- Save the file.
- Change the file name. Photoshop saves images with-names-like-this-using-hyphens. But in terms of SEO it is not very good. Remove the hyphens from the titles of your images.
Reduce the weight of images with Microsoft Office
In case you don't have dedicated image editors like Photoshop or its free alternative the Gimp. You can reduce the weight of your images with a tool that comes by default in the office suite.
For this we locate our image. We right click: Open with Microsoft Office.
Once the image is open, we locate the taskbar. And we follow this route:
Image> Resize
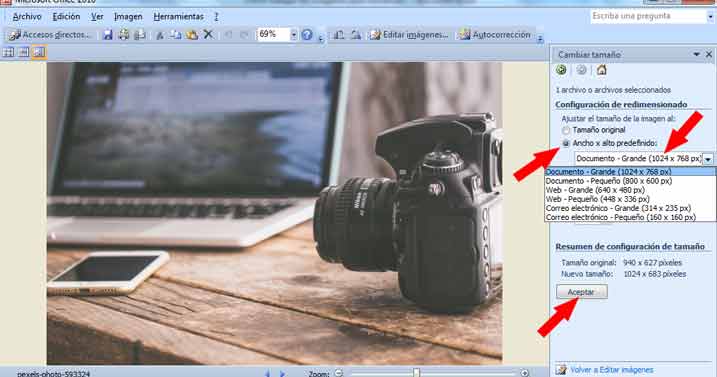
Ideally, they should have a size that does not exceed: 1024 x 768 px.
Once the size is reduced we need to reduce the weight.
We follow the following route:
Image> Compress>
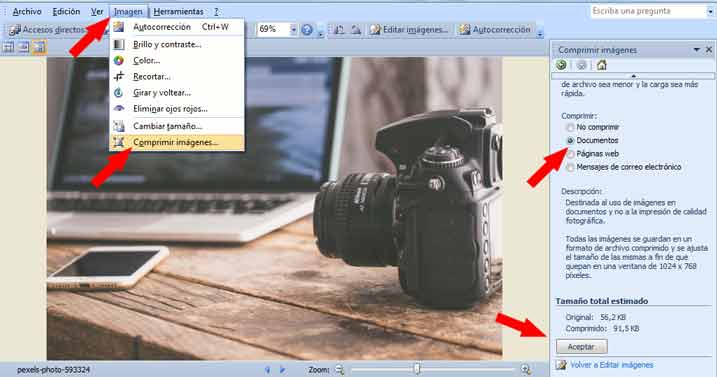
We select the option that offers us the best weight. We recommend choosing the option: Documents.
Decrease the weight of an image using RIOT
RIOT or Radical Image Optimization Tool it's a tool free Very powerful. This will help you reduce the weight of your images before uploading them to your website. At the same time with RIOT it is very easy to optimize images.
Finally
Images are an important element for webs and blogs. They offer many possibilities for the visual appeal and positioning of a page, a blog or an ecommerce. But that is a broad topic that we will continue to discuss if you need to continue learning you can sign up to the best online and Spanish WordPress course and become an expert.


