
In this tutorial we’ll learn how to install WordPress manually on any shared web host, using cPanel. Although there are quicker ways to install WordPress, such as using script installers such as Softaculous, this guide takes us back to the basics. It will give us a better understanding of how the different components of WordPress are linked internally.
If you wanted to install WordPress locally without purchasing a shared alojamiento server, you’re in luck! We have equivalente tutorials for installing WordPress offline in Windows, MacOS and Linux. The principles are all the same.
Installing WordPress manually consists of three basic steps:
- Upload the WordPress files to your server
- Create and enlace the database
- Run the famous 5-minute WordPress installation
These steps remain unchanged in almost any WordPress setup – be it shared alojamiento, managed WordPress alojamiento or an offline setup. Of course, the complexity would increase with managed alojamiento, but we won’t have to worry about that now, would we? (Hint: Because it’s a managed service!)
In this tutorial we’re going to install WordPress manually using cPanel. Then, as a bonus, we’ll also show you how to use an automated script installer (Softaculous) to install WordPress in the same shared alojamiento server.
Using cPanel
With the advent of cPanel, a lot of our work has been reduced. Almost every shared alojamiento provider that you find today will include a license of cPanel in your alojamiento account. If you manage to find that doesn’t offer cPanel, you’re better off going with one of the best WordPress alojamiento companies.
Okay, so let’s break down this tutorial. We’ll first list the prerequisites and then move on to the table of major tasks.
Prerequisites for this guide:
- We assume you’re on a shared host with cPanel installed. If you’re having a hard time deciding which shared host to go for, you could try BlueHost.
- You have FTP access to your public_html directory. This is the folder that will hold the WordPress installation files.
- You have a standard database like MySQL.
- You have downloaded the wordpress.zip file and are able to extract the contents.
Major Steps in Manual Installation:
- Upload WordPress Files to Shared Alojamiento Server
- Uploading WordPress ZIP archive using cPanel File Manager
- Understanding which Directory to Install WordPress
- Upload, Extract and Move
- Uploading the wordpress.zip archive via FTP
- Uploading WordPress ZIP archive using cPanel File Manager
- Creating a new MySQL Database and User
- Create a New MySQL Database in cPanel
- Create a New MySQL User in cPanel
- Connecting the MySQL User to the Database
- The Final Configuration (WordPress’ 5 Minute Installation)
- Bonus: Install WordPress Manually with Softaculous in cPanel
- Select WordPress
- Configure Settings
- Why Use Softaculous (or other automated script installers)?
1. Upload WordPress Files to Shared Alojamiento Server
First we download the latest version of WordPress from the WordPress.org repository. Uploading the WordPress files to your alojamiento server can be done in two major ways.
- You could use the cPanel File Manager to upload the zip file, OR
- Upload the file using FTP access.
We’re going to highlight both the methods.
Step #1.1 – Uploading WordPress ZIP archive using cPanel File Manager
- Login to your alojamiento provider’s Client Area and launch cPanel.
- If you’re unable to locate it, you could try yoursitename.com:2082 since cPanel’s default port is 2082 (2083 for cPanel over SSH).
- In case you cannot login to cPanel, contact your alojamiento company’s support.
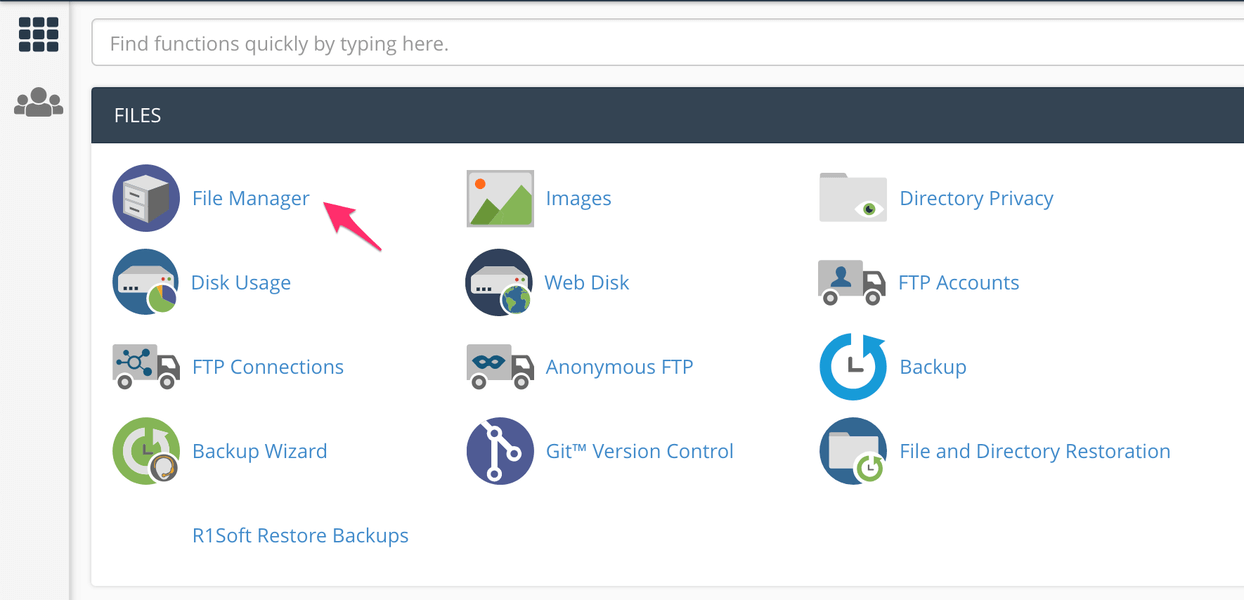
Launching the File Manager from cPanel
Locate and launch cPanel’s File Manager.
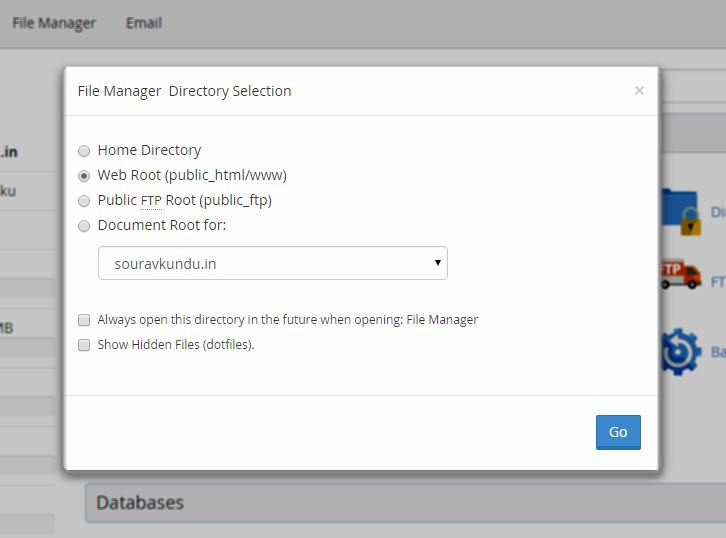
cPanel File Manager Default Directory
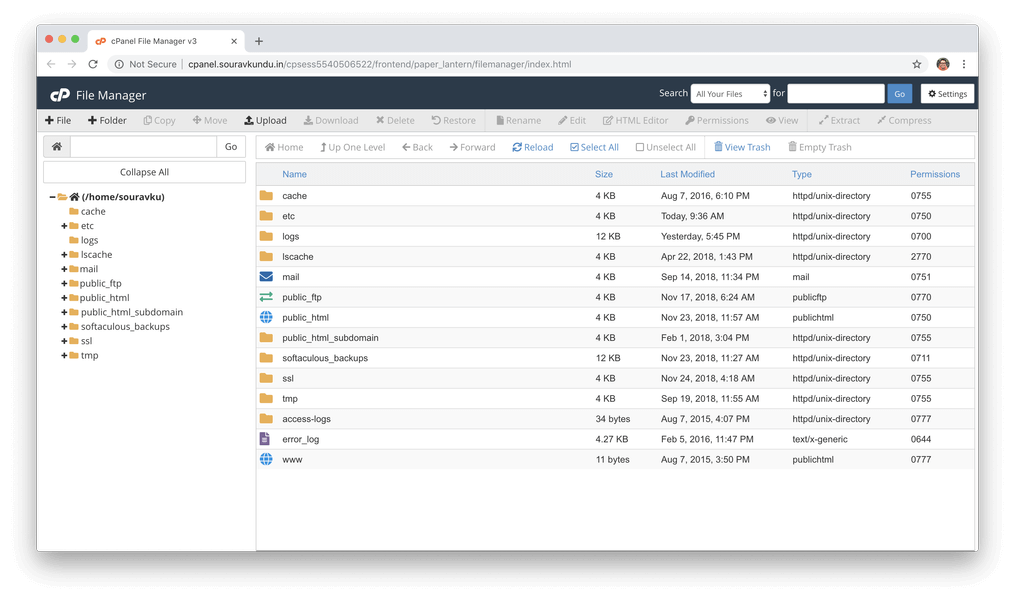
cPanel File Manager
If a message like the one shown above appears, select the Web Root directory. In other cases, the File Manager would launch automatically.
Step #1.1.1 – Understanding which Directory to Install WordPress
We’ll assume that we have one domain connected in our shared alojamiento account. The Web root directory is also referred to as the www directory. The actual folder for the www directory is called the public_html folder. This folder contains all the files that are publicly available in our website.
Technically speaking, the web root directory for a domain or a sub-domain is the base directory containing all the files available to the public HTML port (i.e. port 80). If the last line is all mumbo-jumbo to you, consider an example.
Suppose you’ve purchased and linked your domain to your alojamiento account. The content of your website, say www.yourwpsite.com will be available in the www directory (i.e., the public_html folder). When you create a new folder (say ‘enigma‘) inside the www directory, it’ll be available in your domain through the enlace www.yourwpsite.com/enigma
Let’s apply this newfound knowledge to help us decide our WordPress installation directory.
- Using the same rules, if you want your WordPress site to be available under yourwpsite.com, install it under the root directory.
- Else, you can make a folder and install WordPress there. Please remember this step as it’ll be useful when we talk about installing WordPress using automate script installers like Softaculous.
Step #1.1.2 – Upload, Extract and Move
So far we’ve downloaded the wordpress.zip file, and decided which folder to install WordPress in. Cool, now we will navigate to (or create) the folder where we want to install WordPress and extract the wordpress.zip archive in that folder.
Let’s say we want to install WordPress in a folder called ourwpsite, located inside public_html. In this case, our WordPress site would be accessible under yousitename.com/ourwpsite
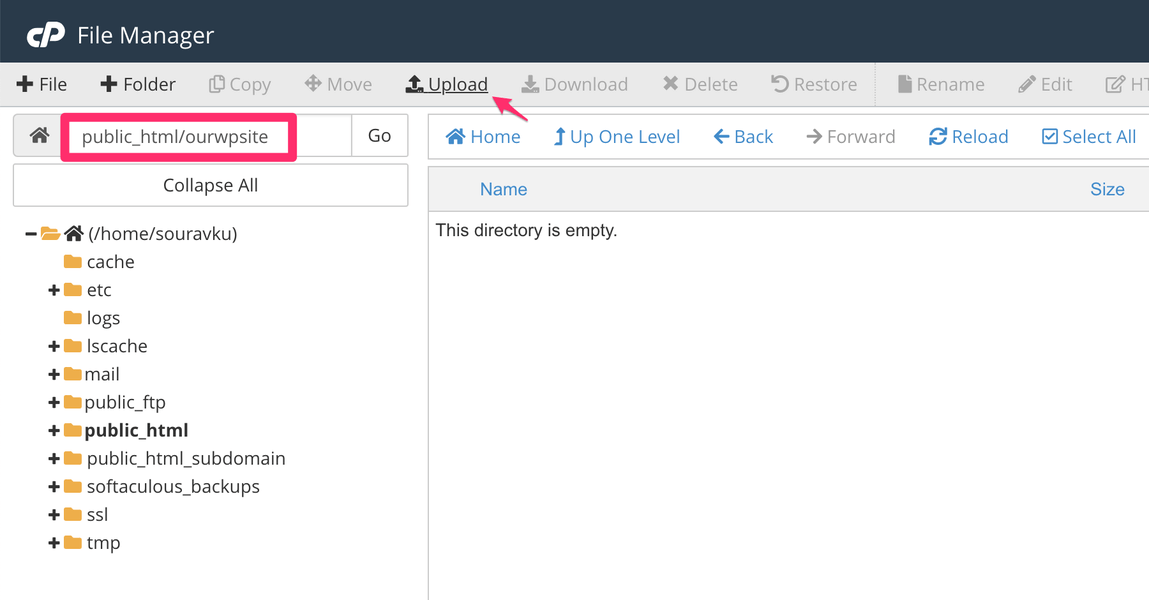
In the above screenshot, we’ve created the ourwpsite folder and are currently inside it.
Upload the Archive
- Now we’ll upload the wordpress.zip file inside this folder using the File Manager’s Upload function.
- On clicking the Upload button, a new tab opens up.
- Select the wordpress.zip file and the upload automatically starts.
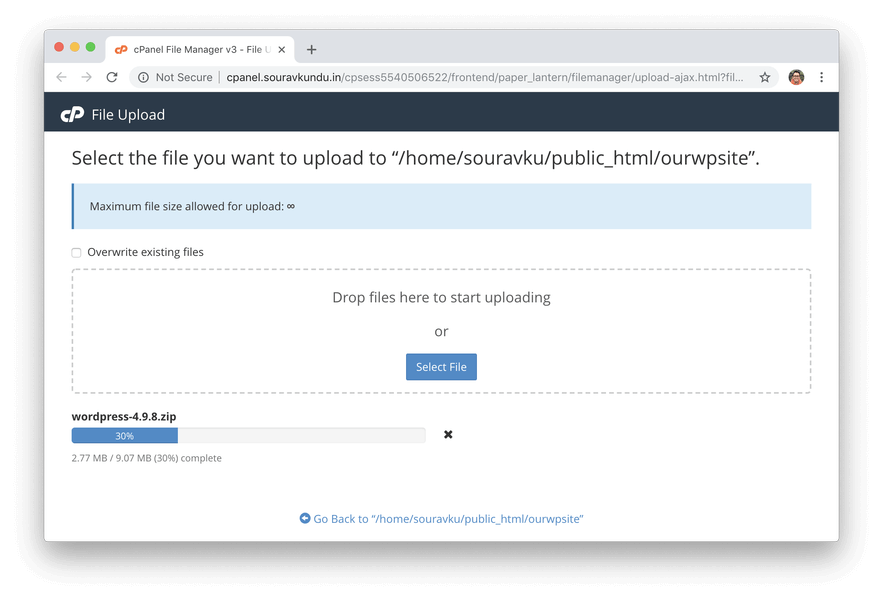
Once the upload is complete, close the tab and return to the File Manager. If you still don’t see a file in the ourwpsite directory, click the File Manager’s (and not the browser’s) Reload button. You should see the wordpress.zip file now.
Extract the Archive

- Now, select the recently uploaded WordPress ZIP file and click on Extract.
- Leave the extraction directory unchanged and click on Extract File(s) to begin the extraction process.
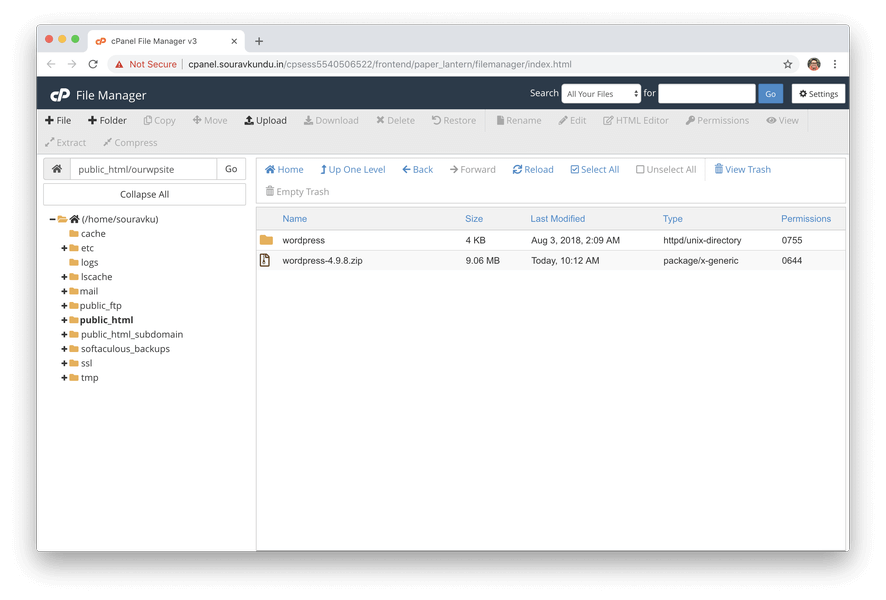
Once the extraction is complete, again click on the Reload button. You should see a folder called wordpress.
Move the Contents of the Extracted Archive
You might have realized that if you leave it in this state (i.e. not move the contents of the wordpress folder), then our WordPress site would be accessible from www.yoursite.com/ourwpsite/wordpress.
What happens when WordPress is installed in a sub-folder.
- Thus, we must move the contents of the wordpress folder back to the parent (or your preferred) directory.
- To do this, we can either use FTP or cPanel. Let’s go for the latter.
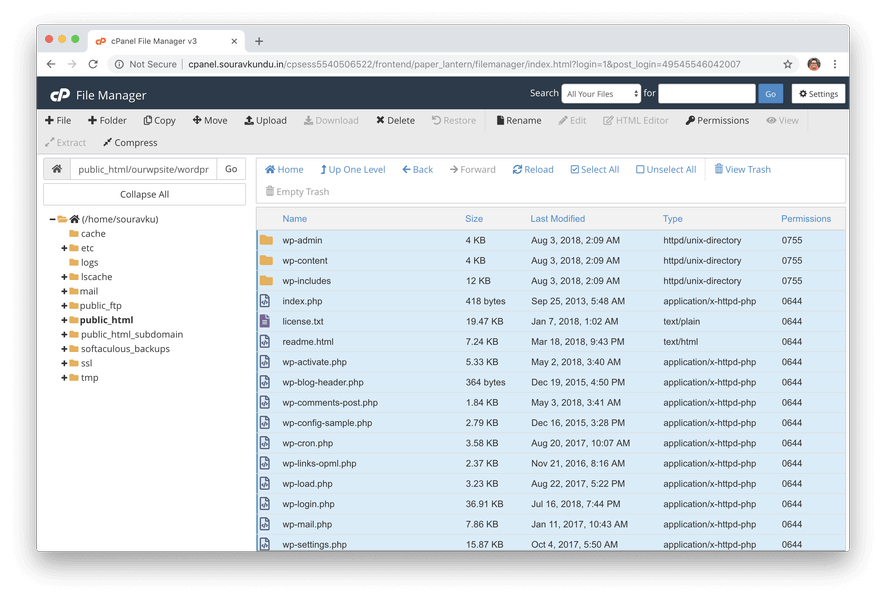
Enter the wordpress folder and click on the Select All button. Then click on Move.
Source directory of the WordPress files
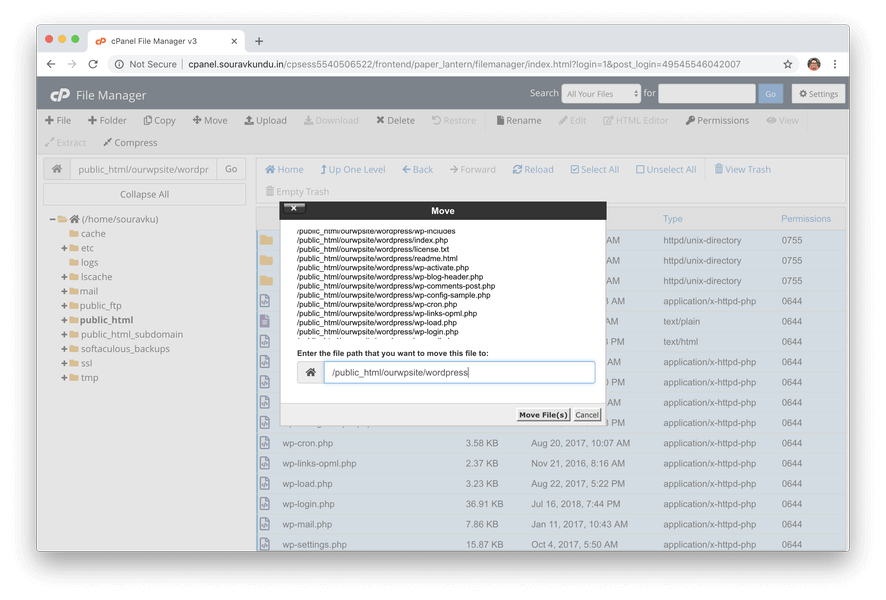
Now, you’ll find a pop-up modal asking your for target directory (i.e. where to move the files you just selected)
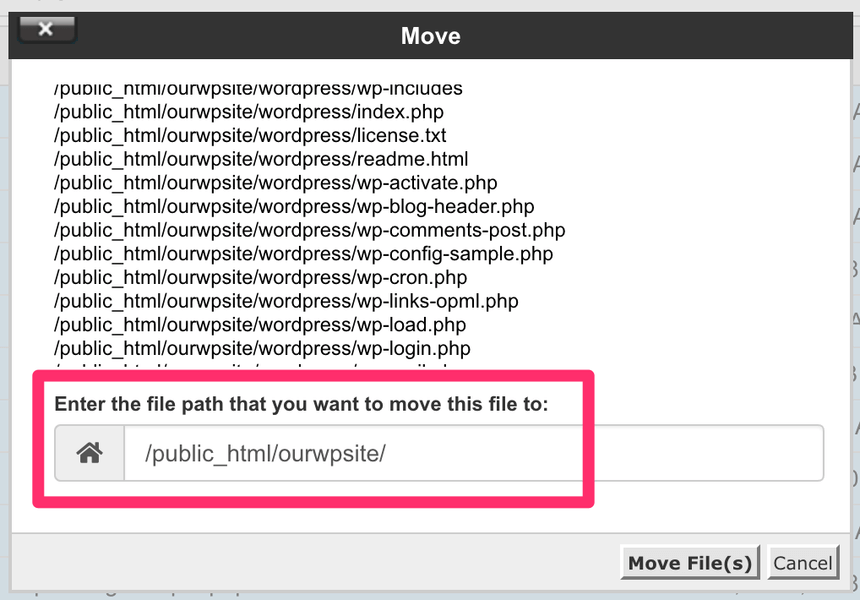
Destination directory of the WordPress files
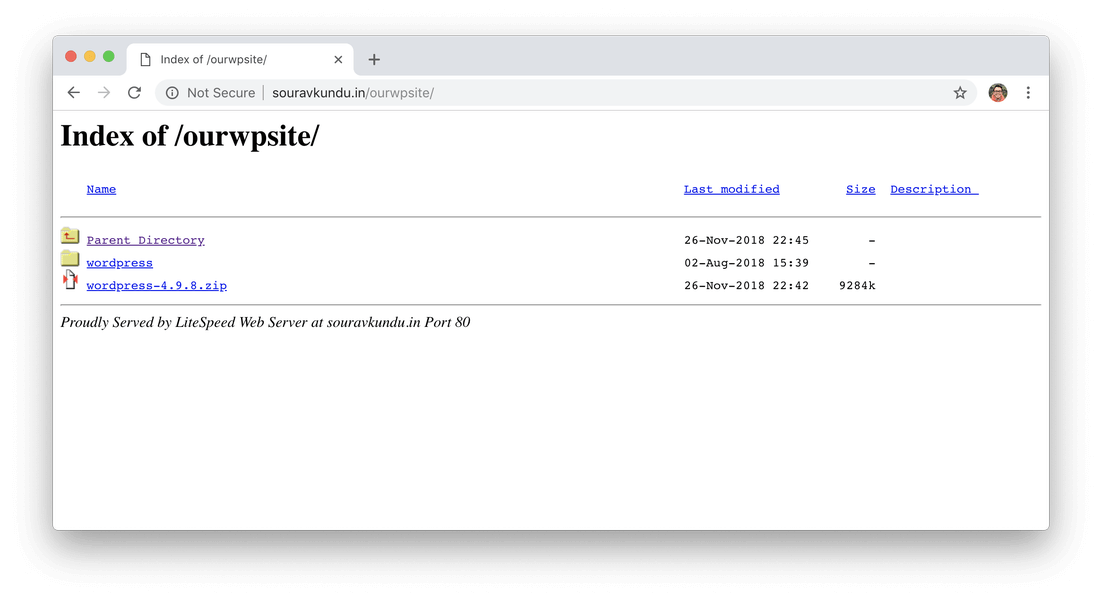
Since we don’t want it under a folder called wordpress, we’ll simply move the files to it’s parent directory. Thus, we remove the “wordpress” word and click on Move File(s). The files should be moved and the wordpress folder should be empty. You can delete it along with the original WordPress ZIP archive.
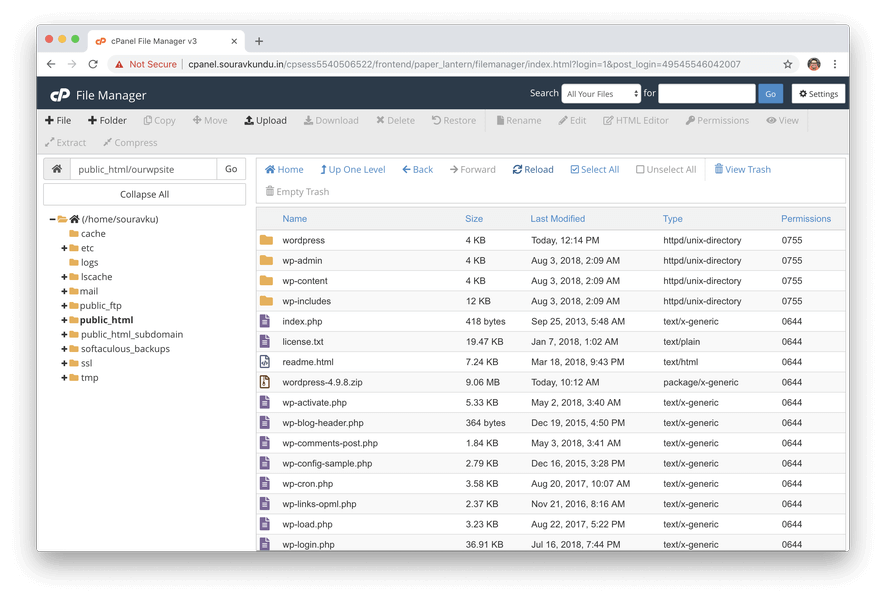
Navigate back to the previous folder (ourwpsite) and you should find all the WordPress files ready and waiting for installation.
Step #1.2 – Uploading the wordpress.zip archive via FTP
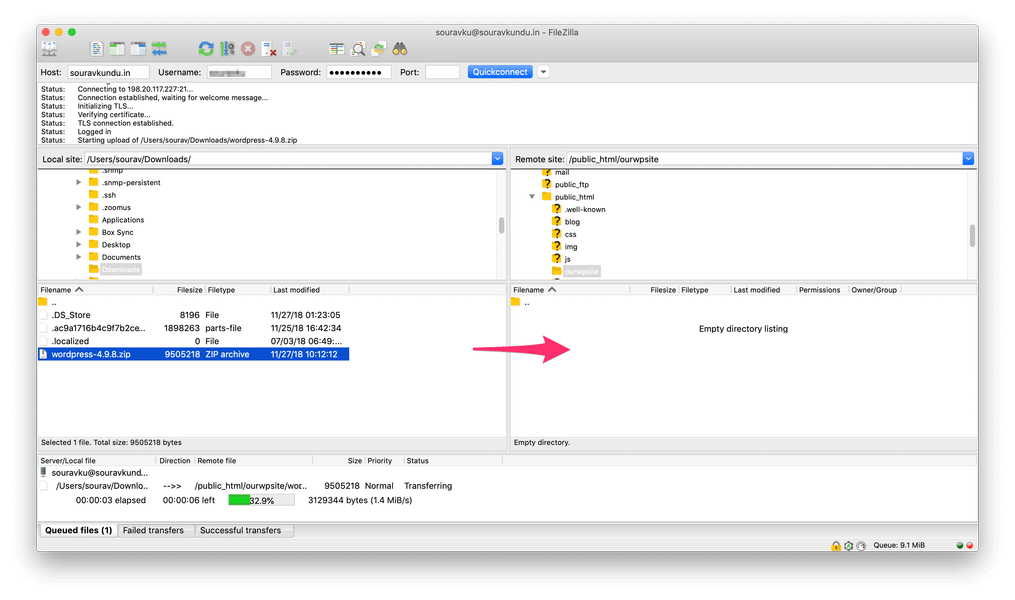
Uploading WordPress ZIP archive via FTP
First of all, you need an FTP client such as FileZilla.
- Next, you need to familiarize yourself with the concepts we discussed in steps 1.1.2 to 1.1.3. This will give you an understanding of where to install WordPress.
- Once you’ve understood step 1.1.2, login to your site via FTP, create the ourwpsite folder and upload the wordpress.zip file in it.
- Next, follow the instructions in step 1.1.3 to extract the files and move them to the appropriate folder using cPanel.
In another case, if you’d like to keep it simple, you could extract the wordpress.zip archive in your local computer, and upload the extracted files in the desired installation directory in your server. However, the uploading process would take a lot of time. On the plus side, you can skip step 1.1.3 altogether. This marks the end of step 1.
2. Creating a new MySQL Database and User
In our WordPress Internal Functioning guide, we’ve seen that WordPress needs a database to store its text and configuration data. In this section, we will:
- Create a new MySQL database
- Create a new database user.
- Connect the new user and the database.
Step #2.1 – Create a New MySQL Database in cPanel
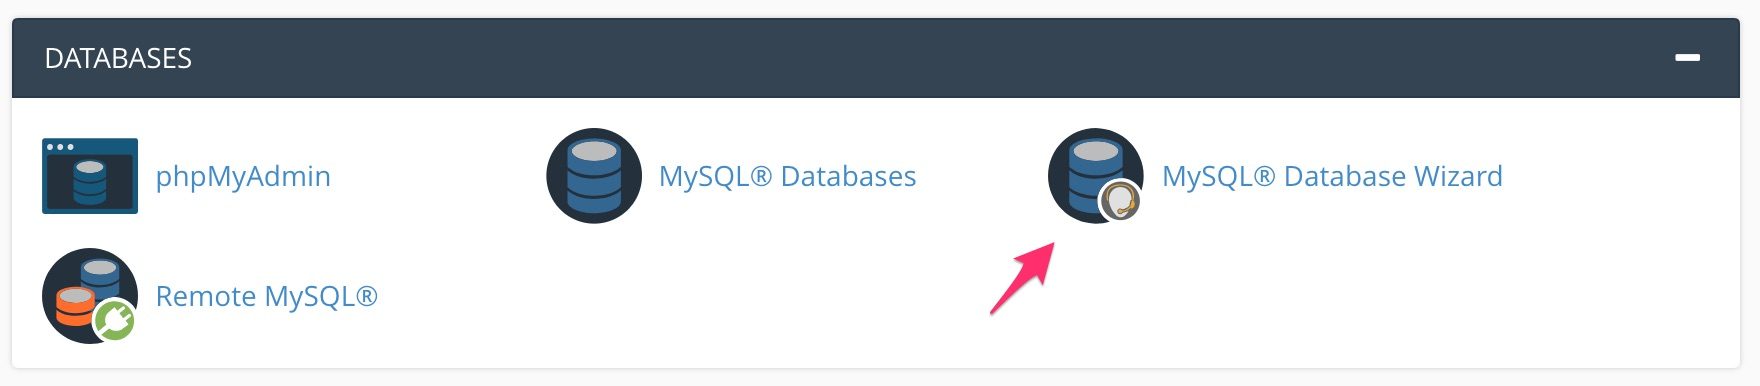
Login to your cPanel and launch the MySQL Database Wizard.
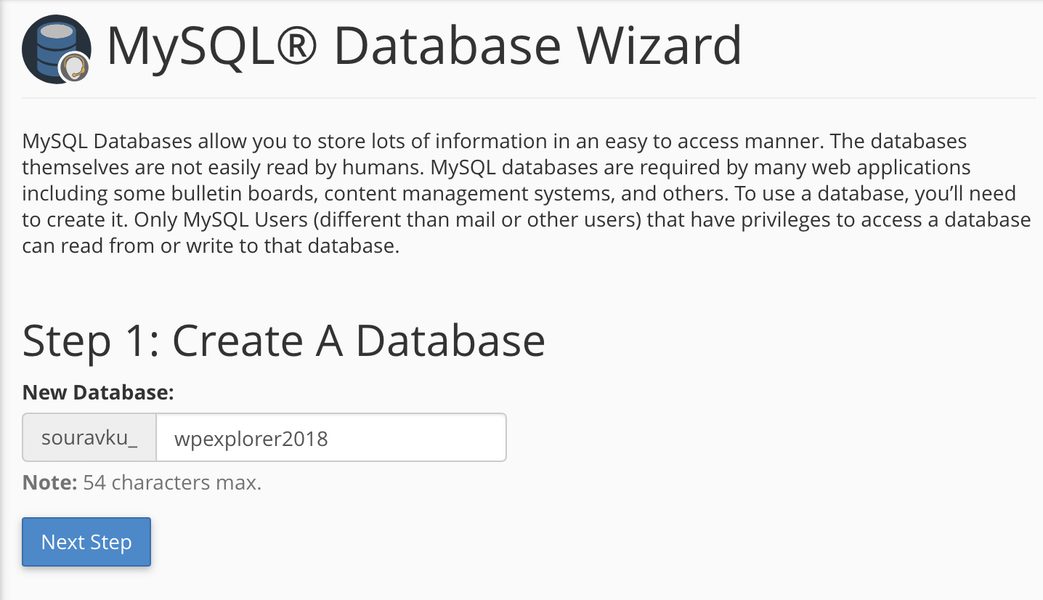
Set a unique database name. It is a good security measure to use alphanumeric characters. In this case, our full database name is souravku_wpexplorer2018
Step #2.2 – Create a New MySQL User in cPanel
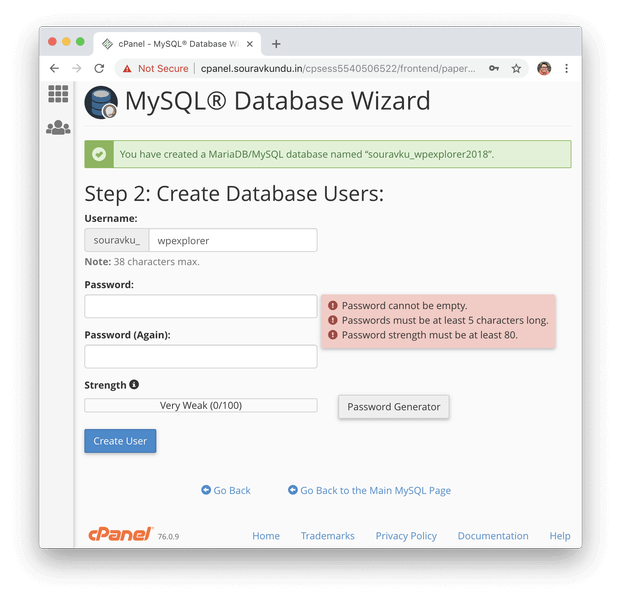
In this step, we’ll create a new user. We’ve set the username to souravku_wpexplorer. We should also generate a strong password and save it in a secure place. cPanel will auto-fill the generated password for you. Click on Create User to proceed.
Step #2.3 – Connecting the MySQL User to the Database
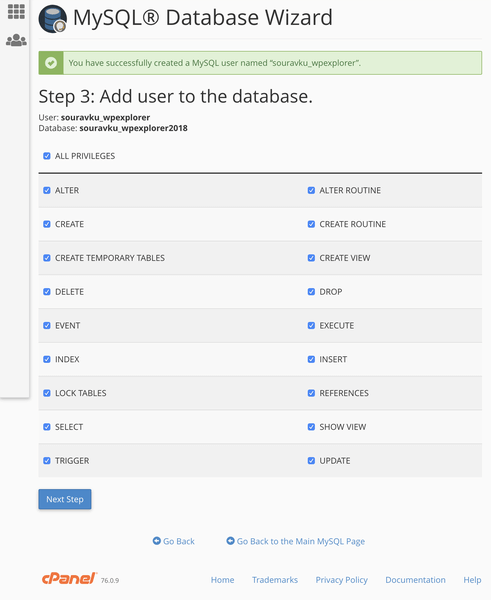
Granting permissions to the newly created user to the new database.
The new user is now created. In this step we will grant permissions to the user, so that he may access the database.
- Simply, click on ALL PRIVILEGES to grant all the permissions.
- Click on Next Step to proceed.
- cPanel will now make the necessary changes to the user as directed.
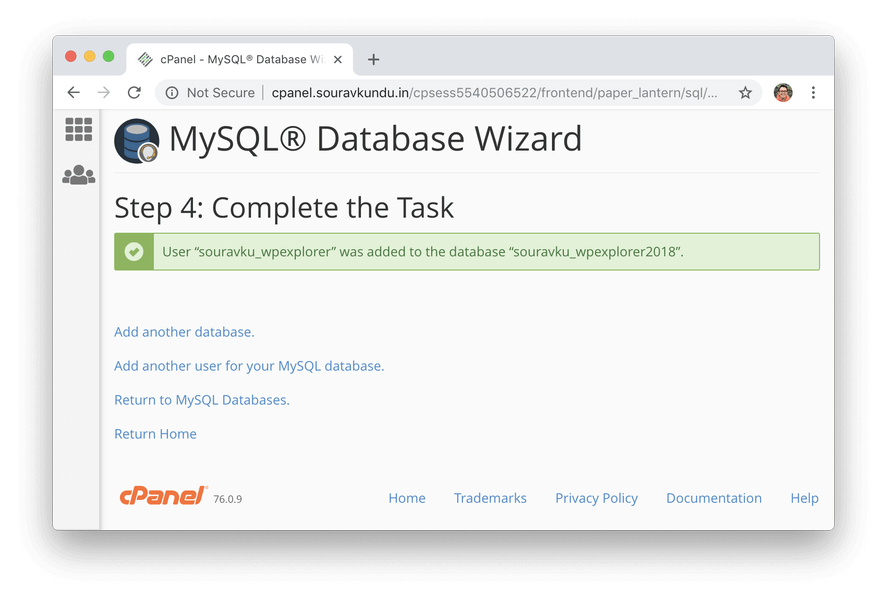
Successfully created and linked a new database and user in cPanel using the MySQL Database Wizard
Done! You’ve successfully created a new database and user. This concludes step 2.
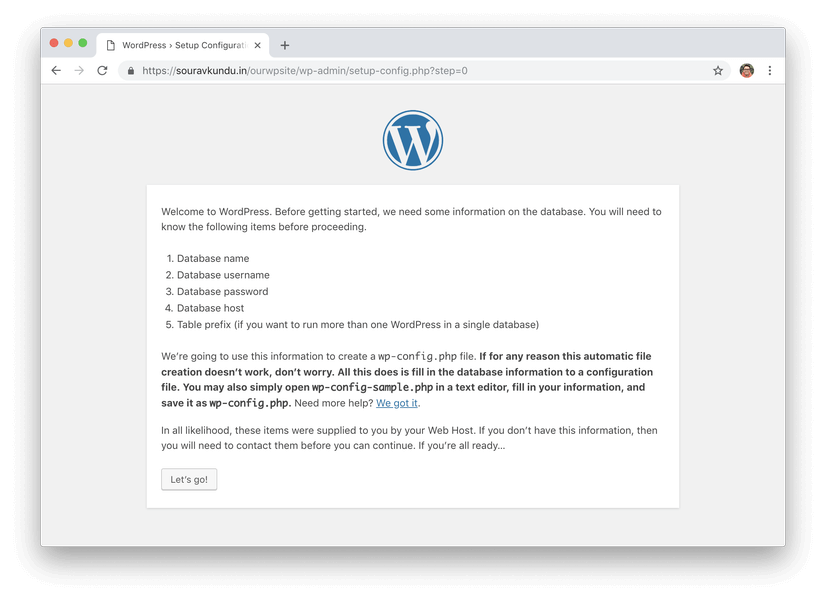
3. The Final Configuration (WordPress’ 5 Minute Installation)
Now that we’ve completed the installation procedure, let’s run the famous five minute WordPress installation. Head over to your WordPress directory via your domain (and not via cPanel). In our case, it would be yoursite.com/ourwpsite. This will launch the installation process.
In the first step, select your preferred language to proceed.
This is some troubleshooting information if your wp-config.php file isn’t writeable. In most cases the installation should finish without any hiccups.
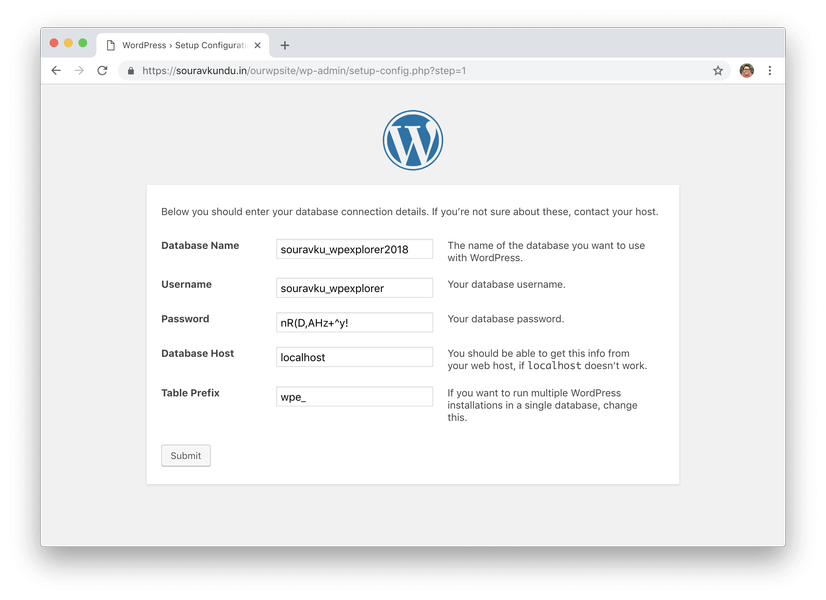
Entering database and user information in WordPress’ 5-minute installation
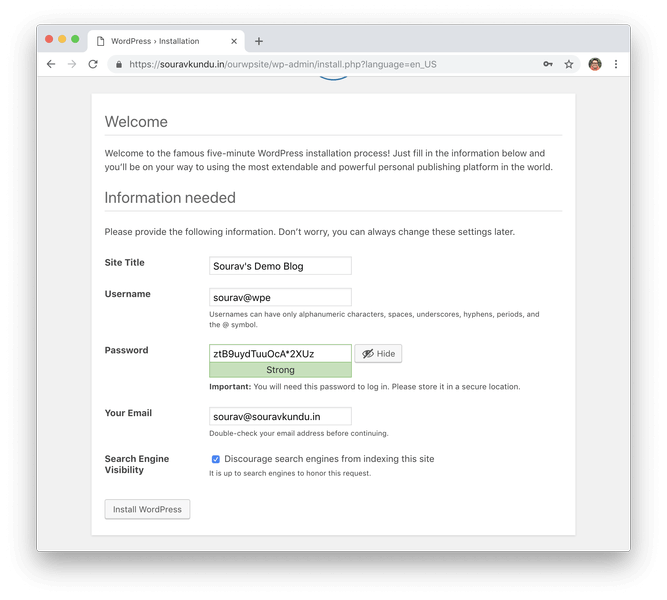
Enter the database information from the last step. Make sure your table prefix isn’t “wp_“, making it difficult for hackers to attack your website. For instance, we’ve used “wpe_“. It’s best when you choose an alphanumeric value.
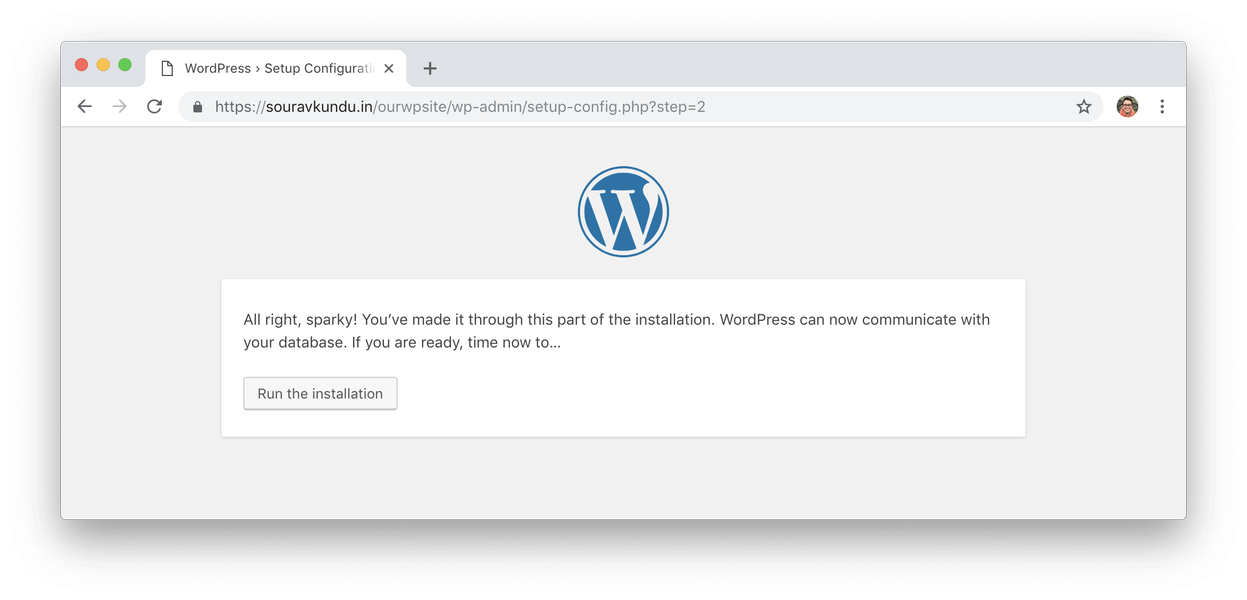
Click on Run the installation to begin the setup process.
If you see the above screen, it means that WordPress has been installed successfully. The next part is simple, but important.
- Enter the username, password and your correo electrónico address you’d like to use for this WordPress setup. Save these details in your ordenador.
- Once crucial step is not to use admin as an username, as stated in our WordPress Security Guide.
- Since this is a temporary experimental WordPress installation, disabled search engine indexing. You should also do the same when you’re working with a new site. You can enable it once you have some content in your site.
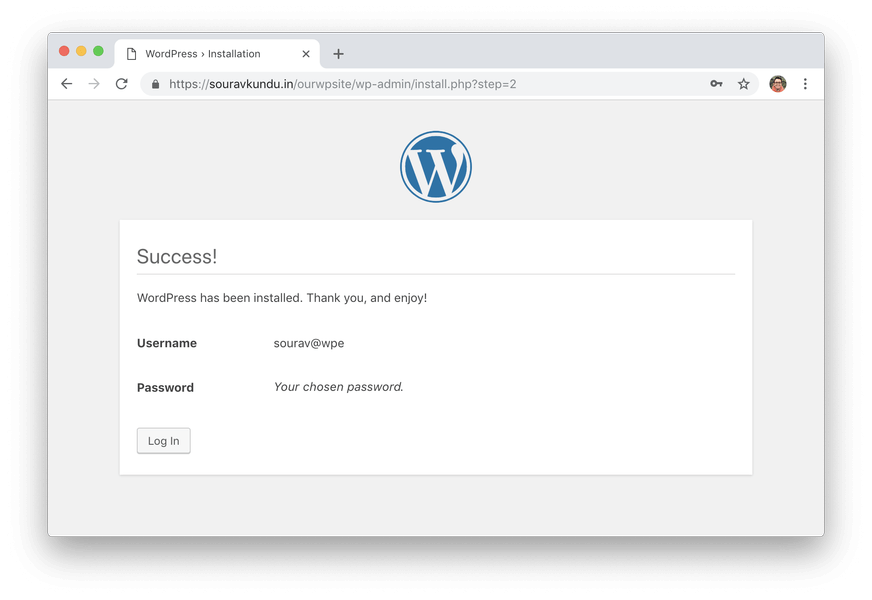
WordPress is successfully installed, configured and ready for use
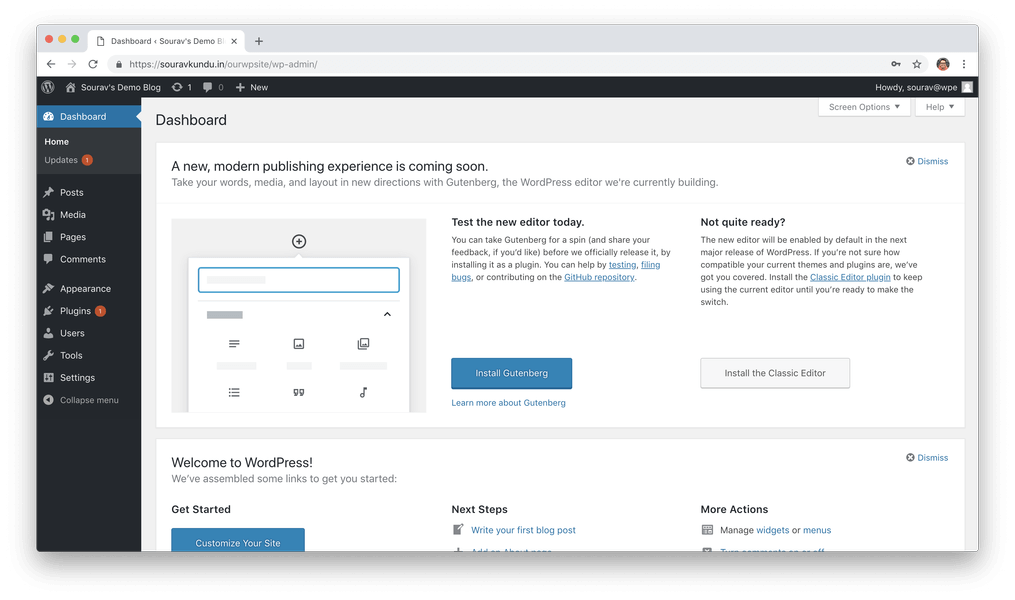
Done. We’ve successfully installed WordPress 100% manually.
Bonus: Install WordPress Manually with Softaculous in cPanel
Most shared alojamiento companies offer an automated script installer called Softaculous along with cPanel. Think of Softaculous like the Google Play Store or the App Store. The Softaculous store offers multiple aplicaciones (also known as software or scripts) that can be installed with just a few clicks. WordPress is an example of one such CMS software that can be installed in just a few clicks, using Softaculous. Let’s see how:
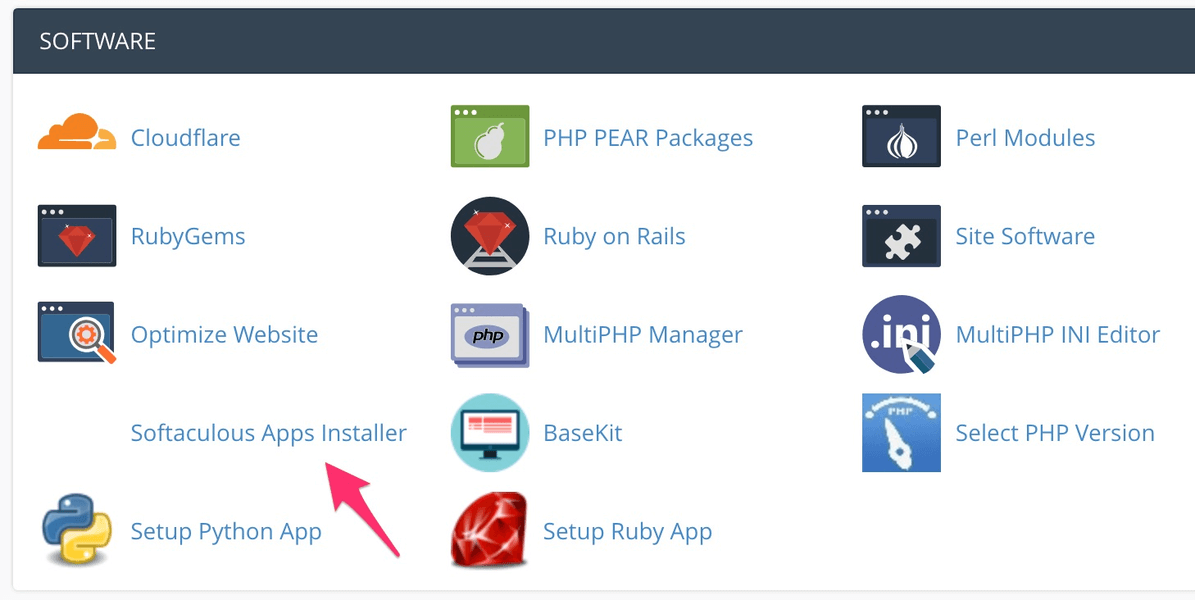
We begin by logging into cPanel and launching Softaculous.
1. Select WordPress
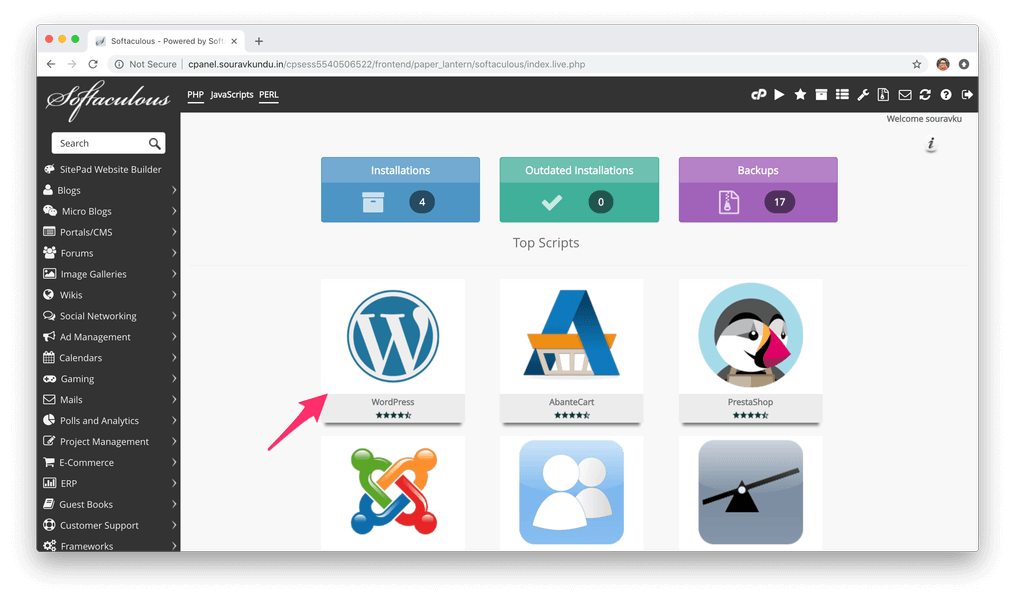
Next, we select the WordPress CMS to install using Softaculous. In case your Softaculous isn’t equivalente to mine, you can use the top-left menu to go to Blogs > WordPress.
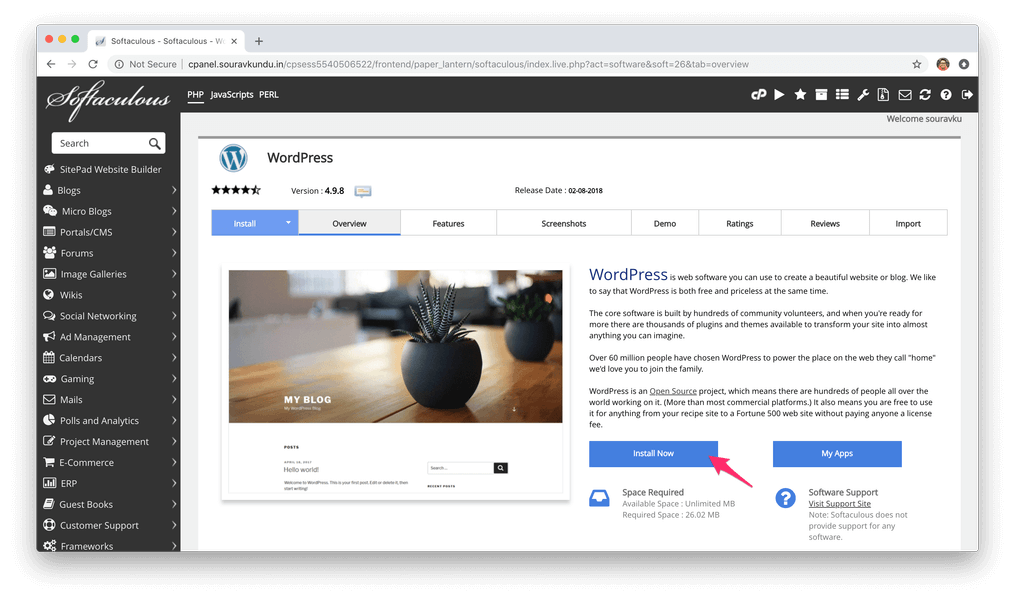
Starting the WordPress installation process with Softaculous
Click on Install Now to create a new installation of WordPress. Additionally, you can use the My Aplicaciones option to view all the existing installations of WordPress done using Softaculous.
2. Configure Settings
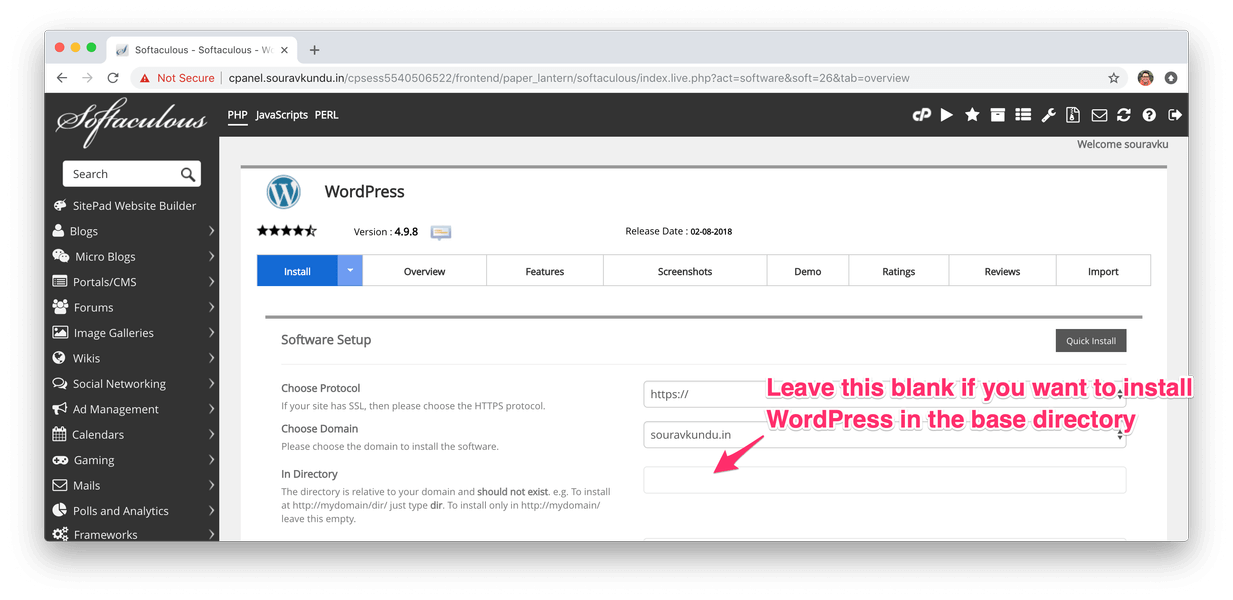
WordPress installation location settings in Softaculous
Now we configure the WordPress installation details in this step.
- In most cases, you’re going to leave the Directory field blank. This way, WordPress will be available in your base directory.
- The protocol should be HTTPS.
- In case you have subdomains in your site, you can select it from the Choose Domain option.
Upon entering this information, we scroll down to the next step.
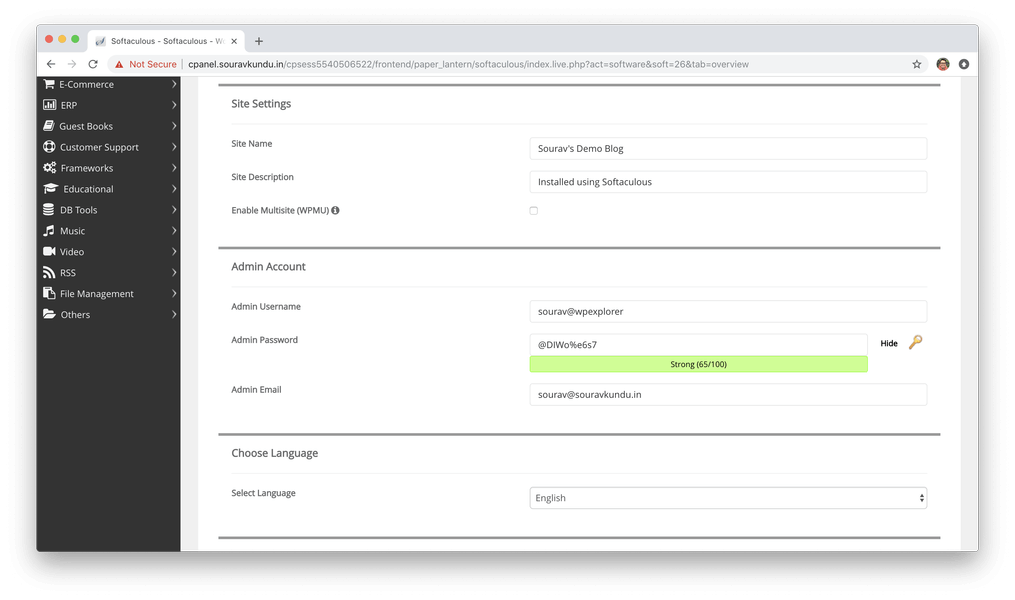
In this section, we enter our WordPress site’s name, description, admin username, password and correo electrónico. Remember to not use admin as your username, as an added security measure. Scroll over to the next section.
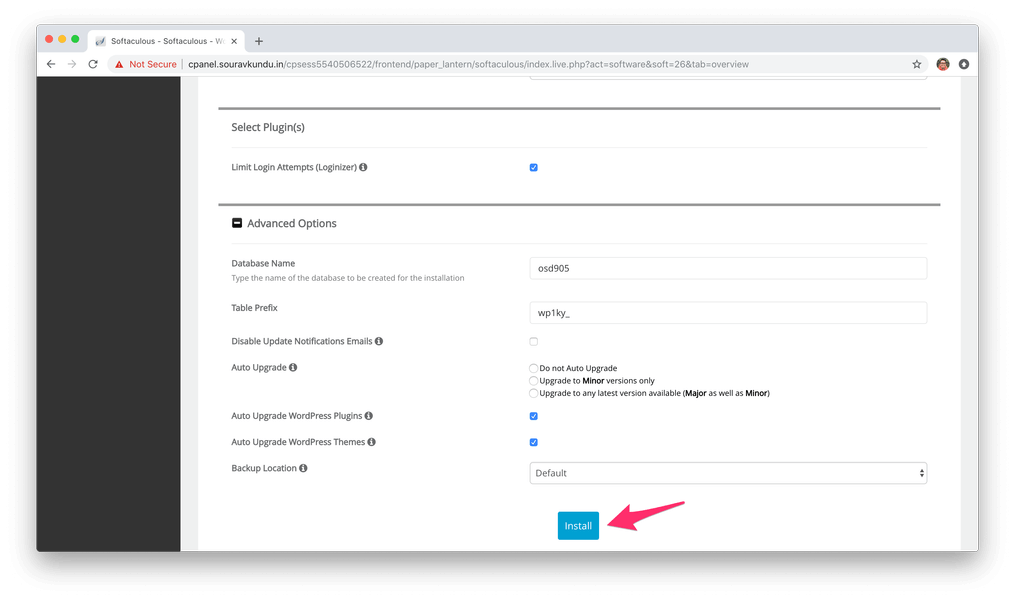
In this section, enter the database name and table prefix. Don’t worry, we do not need to create a database and user. Softaculous will automatically do it for us!
- You can also select the Auto Upgrade WordPress Themes and Plugins options for to enable automatic updates to this installation. I would recommend enabling this feature.
- We’ve also installed the Limit Login Attempts plugin as an additional security measure. The plugin basically blocks login attempts from an IP for 15 minutes after three failed login attempts.
Once done, you can begin the WordPress installation by clicking on Install.
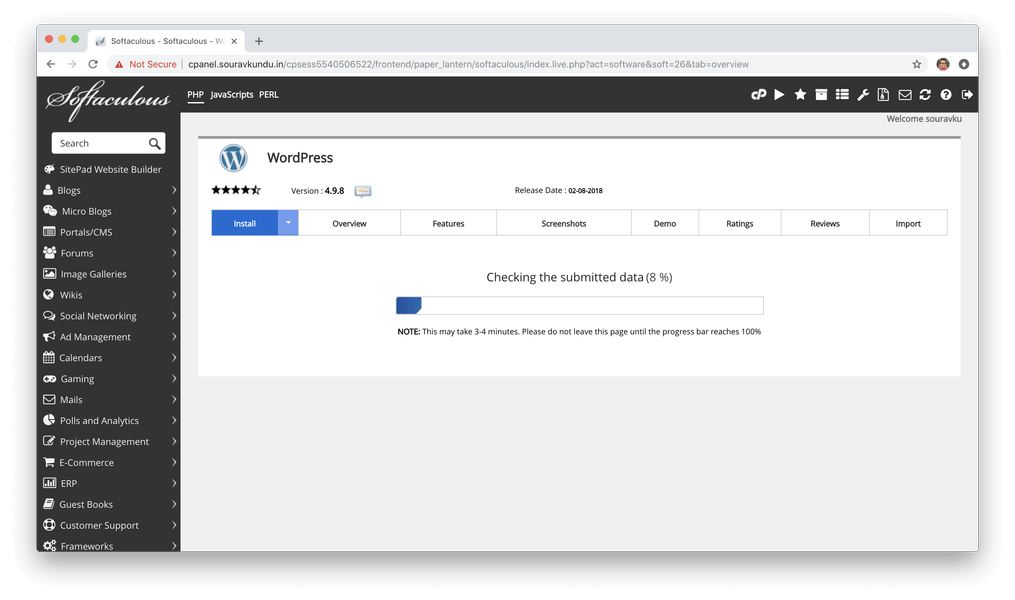
Softaculous then verifies the submitted information and begins the installation process. This usually takes a less than a minute.
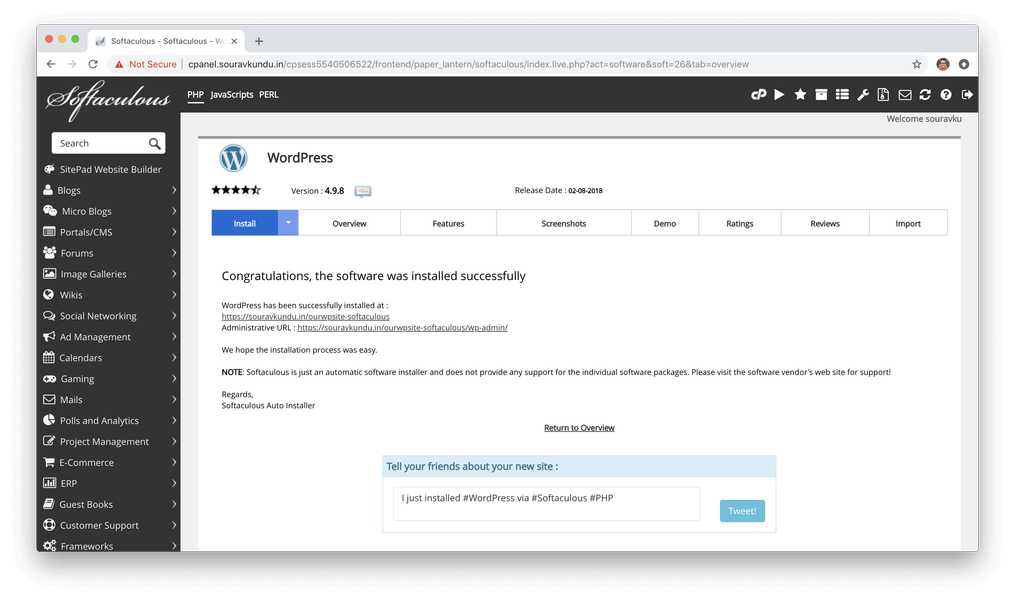
Once Softaculous successfully installs WordPress, you’re greeted with the above screen. That’s it, WordPress has been successfully installed using Softaculous.
Why Use Softaculous (or other automated script installers)?
The biggest advantage of using Softaculous to install WordPress is the underlying convenience. Unlike the manual installation process, we only need to enter the relevant site information and Softaculous takes care of the rest. It is very useful for creating quick websites for trying out a new theme or plugin.
However, one thing it lacks is the ability do disable search engine visibility during the configuration process. Therefore, once WordPress is installed, you should login and disable search engine visibility. This ensures that your domain’s existing SEO scores are not hampered.
We hope you’ve enjoyed this “back to the basics” tutorial as much as I’ve enjoyed writing it! If you have any questions, please drop us a comment or feel free to tweet me at @souravify.
If you think I’ve missed a step or have any suggestions for us; please let us know. We’d love to hear from you!


