

The articles of a Blog are the basis of most websites and of any strategy of content marketing. Learn in this tutorial to show all your articles on one page.
The world of blogging moves with the following premise: "Content is king".
If you are a blogger, webmaster, SEO or web enthusiast and WordPress, with some of the road you already know. Items are the best way to get visits, generate engagement in your audience, position yourself as an expert in your sector and generate profit.
Why show all your articles on one page?
As we commented on our tutorial on how to display the most popular posts from your WordPress blog:
The bloggers and webmaster We always seek that: that visitors never leave our sites that go from one post to another. We like and Google at the same time.
How to display all your articles on a single page in WordPress
For show all your items on a single page in WordPress there is no single method. Many will vary, even depending on the theme you have installed and the version of WordPress with which you work.
In this tutorial of CourseWpress.com We explain several methods that will allow you to display all your articles on a single page of your blog. You choose the one that best suits your way of operating.
Show all your articles on a single page in WordPress without plugins
If you are to fiddle with the different options of the CMS of your website, you will have realized that WordPress makes it possible for you to show everybody articles on one page. The point is that:
- That everybody sometimes you have a limit.
- It has very few customization options.
The advantage is that: you don't need to install anything, you can do it without modifying code, without applying complex procedures. Even by default WordPress, sometimes it shows all your posts at the beginning.
To configure it you have to follow the following route:
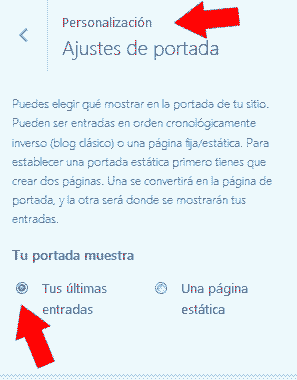
Appearance> customize> Cover settings
If you follow the option path: Appearance You will find a little sign that explains something like:
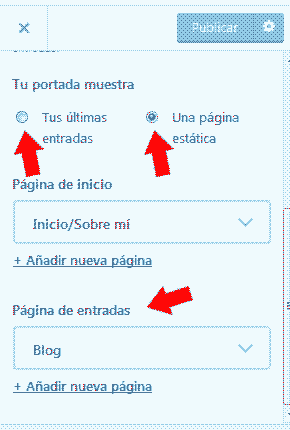
You can choose what to expose on the cover of your website. They can be articles in reverse chronological order (classic blog) or a fixed / static page. To set a static cover you first have to create two pages. One will become the cover page, and the other will be where your posts will be displayed.
There you have two options:
- Have your home page show your blog posts as explained: in reverse chronological order (classic blog) or:
- Show a static page type landing page and your tickets apart.
Another way to put your posts on a single page is through this route:
Settings> Reading settings>
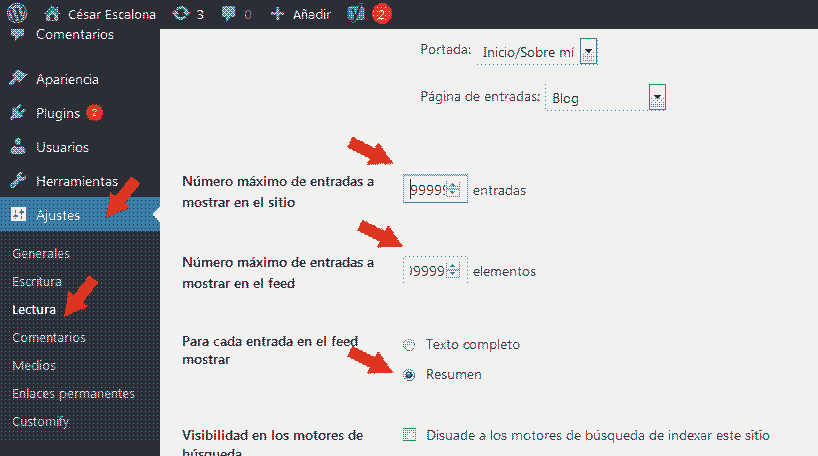
There you can even configure the maximum number of posts you want to display on the site. And if for each entry shown in the feed you want visitors to view the entire entrance or a portion of it.
Once you configure everything as you need you save the changes and ready. Now you can display your posts on a single WordPress page, without installing anything.
Show all your articles on a single page in WordPress with plugins
In order to show all your WordPress blog posts on a single page, there are many plugins. We have worked with some. Within this area the most used is: Display Articles Shortcode.
You can locate it in the WordPress plugin repository.
Or following the route:
Plugins> Add New
We locate the search bar, we type the name of the plugin: Display Articles Shortcode. We seek. It is easy to recognize because it has more than 100.000 active installations. And although as of the date of publication of this article, it has not received any updates, still does its job well.
You install it. Installing it will be easy for you if you follow the steps in this dedicated tutorial:
www.cursowpress.com/plugins-wordpress-que-son-y-como-instalarlos/
You activate it.
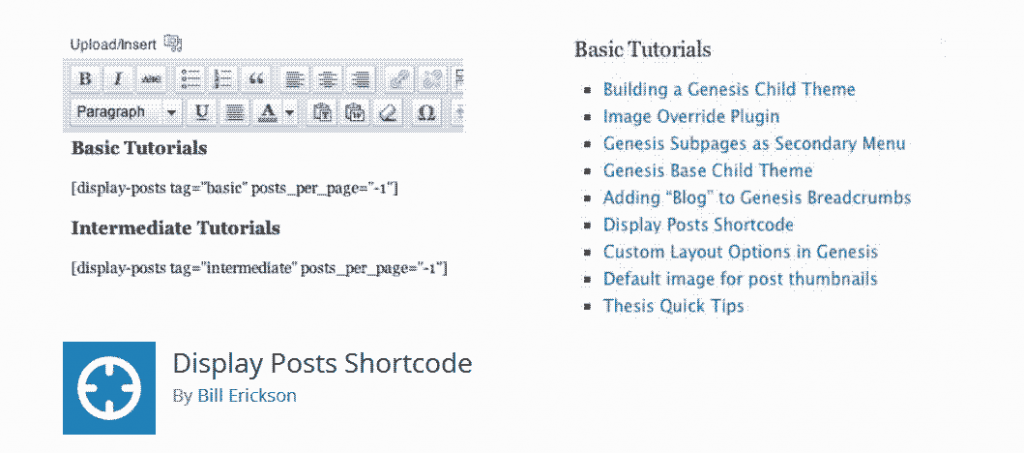
Now all you need to show all your posts is to paste a simple shortcode.
Locate or create a New page where you want all your items to be listed and paste the following shortcode:
[display-posts]
Clever. Now you have your files on one page.
At the same time you can configure other parameters that they will allow you personalize the sample you make of your articles:
All the parameters are fully explained on the developer's website:
https://github.com/billerickson/display-posts-shortcode/blob/master/README.md#parameters
We usually use:
- author: Yes, as you imagine, this tag allows you to show only the articles of a specific author. Example: [display-posts author = »cease»]
- category: Let's say you want to show your posts from a certain category. [display-posts category = »tutorials, wordpress»]
- date: For some bloggers and in some niches it is important to be able to show the entries taking into account the date. If this is your case you can use the shortcode as in the example: [display-posts date = »2018-05-22 ″]
- image_size: It allows you to accompany the title of the post or article with an image. You have four options: thumbnail, medium, large and custom image size. We usually use: [display-posts image_size = »thumbnail"] And [display-posts image_size ="medium«]
Remember if you want to be a expert in web development and everything related to the world of WordPress sign up for best online course in Spanish from the best content manager: WordPress.org


