


Multiplayer video games are already the largest volume on the market. In spite of everything, something that has not improved much in certain areas is the situation of the ADSL or Fiber Optic connection. In the latter case, you may care a little less lowering the PING as much as possible and improving the speed of data exchange, but in the case of ADSL, due to the copper installation and the numerous interferences, It is recommended to activate the function called "DMZ Host" if you want to optimize your connection. That is why today we bring you a very simple tutorial on how to activate the DMZ Host and be able to play with the best possible connection.
First of all, we are going to assign a fixed IP to our computer.
The first thing as always is to go to the Control Panel and select the option «Network and Sharing CenterNow we are going to click on the "local area" tab and if we choose the details button we will be able to see what IP we are using right now.
Here we will write down what is the address of «Default gateway«, Since it is the access to our router, in general it is»192.168.XX«, Depending on the operator. We will need this information later. We will click on »properties« with administrator functions in the same menu, we will choose version 4 of the internet protocol and we will select properties again. Now we will fill in the boxes with the IP address that we want to assign to the device, in «Default gateway”We will enter the data noted above. Area subnet mask we will fill it with the classic «255.255.255.0«, The automatic format
We still have the box of DNS serverIf we want to increase the connection speed, the best ones are generally those of Google, at least the fastest, which are:
Activate DMZ Host on our router
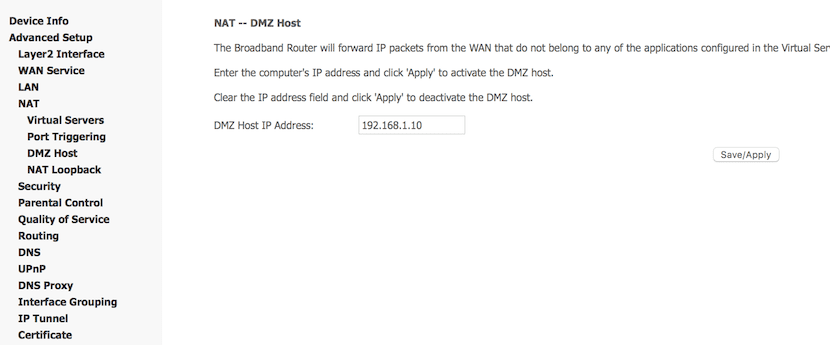
Now we are going to go to the router jam route, in the case of Movistar as an example it is 192.168.1.1 In the web browser, even if other companies use 192.168.0.1 (Vodafone), it will depend on your company. Once inside, we will go to the Advanced settings or "advanced settings". Now navigate the menu from the left to the list NAT, and we will see that one of the functions that opens is DMZ host.
Once inside, we will see a box where we can fill in a text box, in it we will enter the IP that we have assigned to our PlayStation 4 or our computer in a fixed way (Remember that this will not work with static IPs, because when you restart the computer it will assign you another one). And we already have the DMZ Host activated for that IP, which opens all the ports and improves the connection.


