
<>
2J7wes2
Learning how to create a Gutenberg block is a good investment for the future. No matter where you fall in the Gutenberg debate, the block editor is here to stay.
Incluso si ha vuelto al editor clásico, es muy probable que en algún momento de los próximos años empiece a crear páginas Web en forma de bloques.
Cada vez más temas, como Twenty Veinte y Diecinueve, se aprovecharán de lo que el nuevo editor de WordPress tiene para ofrecer. A la vez, pronto al mismo tiempo usarás bloques en otras partes de WordPress como el menú de navegación o los widgets. Por ende, es mejor que te concentres en ellos ahora.
The editor comes with a number of standard blocks that can be extended through plugins. However, being able to build your own custom solutions is often very helpful, which is what this Gutenberg block tutorial will teach you. But first, let's start with the basics.
What are Gutenberg blocks?
Before we get to the how-to part, let's first decide what we're talking about.
Gutenberg block examples
El principal cambio que Gutenberg introdujo en la creación de contents en WordPress es que, en lugar de tener un gran pedazo de contenido (como lo tenía el editor clásico), las páginas web ahora están segmentadas en partes más pequeñas, llamadas bloques.
These can be many different things:
- Paragraphs
- Headers
- Block appointments
- Images and Galleries
- Lists
- Integrated media
- Buttons
- Tables

Each block has its own content, format, and other options and you can move, delete, and reuse it at will.
Why the change?
¿Por qué cambiar un sistema en funcionamiento? Bueno, la idea principal detrás del editor de Gutenberg es hacer que la experiencia de edición be más flexible y fácil de personalizar, fundamentalmente para los usuarios principiantes.
Le da más control sobre toda la página, no sólo sobre el contenido principal. Puede personalizar los items de una manera más detallada y sin aplicarles clases CSS u otros inconvenientes técnicos.
En su lugar, puede modificar su formato, posición, colores, tamaños y mucho más directamente desde la user interface.
A la vez, los bloques en el editor tienen el mismo aspecto que en la página. Esto hace que la experiencia del Username sea mejor, puesto que la vista del editor se asemeja más al producto final.
At the same time, soon you will no longer have to learn different ways to display the items on the page (such as shortcuts and widgets), but simply one: the blocks. When you know how to use them, you can control all the different parts of your site.
So why create your own Gutenberg block?
One of the most exciting things about WordPress is that it is so customizable. Virtually anything on the platform is customizable to your needs.
As an example, the classic editor is fully customizable. So why not do the same with your new counterpart?
Especially if there are content blocks that you regularly need but that the editor, plugins or themes do not offer (yet), creating your own makes sense. Instead of putting custom code each time, it's more convenient to be able to choose it from the built-in menu. You do not agree?
After all, your website must be tailored to your needs so that working with it is as easy as possible. At the same time, knowing how to create your own Gutenberg block is fast becoming a useful skill.
It is easy?
Desde un punto de vista técnico, es importante tener en cuenta que la mayoría de los componentes de los bloques de Gutenberg están escritos en JavaScript. Esto va de la mano con el consejo de Matt Mullenweg de 2015 de aprender el programming language – profundamente (si necesitas hacer eso, consulta estos recursos útiles).
El cambio hacia JavaScript ha sido evidente en los últimos años, a modo de ejemplo, en Calypso. El lenguaje de programming viene con una tonelada de beneficios y las apps web JavaScript-powered construidas sobre APIs (como Gutenberg) son el futuro de la web.
However, that at the same time means that Gutenberg block creation is unfortunately not very beginner friendly. I'm not a developer even for a long word, but I've been working, writing, and building WordPress sites for almost ten years.
A pesar de ello, tengo que admitir que luché para completar el reto que me puse con este puesto. Espero que, presentando el proceso paso a paso, pueda abrirlo a otras persons que no se ganan la vida escribiendo código. Veamos, ¿de acuerdo?
How to create blocks for the WordPress Gutenberg editor
Alright, now that we've got the theory out of the way, let's talk about how to create a Gutenberg block.
For this tutorial we will use the Twenty Nine theme, the first theme that was made specifically for the new editor. Out of the box, it offers several custom blocks, including covers, widgets, quotes, pullquotes, and much more. To this we will add a simple call-to-action block with customizable content and custom styling.
In order not to start from scratch, we will use the development toolkit of guten block by Ahmad Awais. Everything you are about to read is based on it. At the same time, it will link to the official Gutenberg documentation when it deems it prudent or necessary.
1. Prepare your environment
Uno de los primeros retos para crear un bloque Gutenberg es configurar el development environment. Aunque es fácil configurar una instalación local de WordPress, para jugar con el nuevo editor necesitas cosas como webpack, React, ESLint, Babel, y más.
If you don't know what half of these things mean, that's fine, neither do I. The important thing is that all of them are included and configured correctly in the kit create guten block.
However, in order to use it, you must first install node.js and npm. To do this, go to the official node.js website and download the correct installation file for your system.
Once done, run and run the installation. Clever? Great, you just completed the first step.
2. Configure sus archivos de plugin with create guten block
After that, it is time to create the first block. You can easily do it through the console. If you've never worked with him before, don't worry. At the same time it was my first time.
The first thing you have to do is open the console. In Windows, press the Windows button, search for the Command line and open it. If you are on a Mac, use Cmd + F and then look for the console. They should both open something like this:
Here, the first thing you want to do is navigate to your local site's plugin directory. You can do it with the command CD. to write cd [directory name] open a directory, CD… go back to a directory.
At the same time you can copy the path to the plugins directory from the top of your window and just paste it after the command CD to go there directly.
Once there, you want to run the following command:
npx create-guten-block my-block
|
npx create-guten-block my-block |
Be sure to replace my block with the name of the block you want to create. As an example, in my case, I went with cta-block.
The machine will create a directory with the same name, download all the necessary information, and configure the plugin files it needs for your Gutenberg block.
It will take a bit of time, but when it's done, you'll be done with this:

Once this is done, take the advice of create a guten block and go into your plugins folder (remember, cd [directory name]) and type npm start.
The latter will run the block in development mode, keep an eye out for changes, and report bugs in your code.
3. Activate the plugin and test it
Once you have arrived here, you are ready to use the plugin you just created. To do this, log in to your WordPress site, go to the menu Plugins and activate it there.
When you go to the editor, click on the plus symbol and look for the name of the block, at the same time you will find it included.

You can even enter it on the page to find it on the screen:

Not bad, right?
4. Edit plugin.php
The reason you can't see anything at all is because the block currently contains dummy content. Time to change that.
The important files for any changes are plugin.php within the plugins directory as well as the three files within src / block called blocks.js, editor.scss and style.scss.
With them, you control everything that has to do with the functionality and design of your self-made Gutenberg block.
The easiest to change is plugin.php. Here is the plugin header that contains all the information you see in the plugin menu in the service module.
/** Nombre del plugin: cta-block – CGB Gutenberg Block Plugin * Plugin URI: https://github.com/ahmadawais/create-guten-block/ * Descripción: cta-block – es un plugin de Gutenberg creado a través create-guten-block. * Autor: mrahmadawais, maedahbatool * Autor URI: https://AhmadAwais.com/ * Versión: 1.0.0 * Licencia: GPL2+ * Licencia URI: https://www.gnu.org/licenses/gpl-2.0.txt * * @package CGB *//
|
/** * Plugin name: cta-block - CGB Gutenberg Block Plugin * Plugin URI: https://github.com/ahmadawais/create-guten-block/ * Description: cta-block - is a Gutenberg plugin created through create-guten-block. * Author: mrahmadawais, maedahbatool * Author URI: https://AhmadAwais.com/ * Version: 1.0.0 * License: GPL2 + * License URI: https://www.gnu.org/licenses/gpl-2.0.txt * * CGB package */ |
As a first step, modify all of this to reflect the correct name, author, and other information for the plugin. Everything is self explanatory, but if you have problems at your disposal, read this article.
Once done and saved, at the same time you will see the changes in WordPress.
5. Register your Gutenberg block
Luego de eso, quiere hacer lo mismo con la forma en que su bloque aparece en el editor de Gutenberg. Para eso, gire a block.js. Contiene todo el código para registrar el bloque en un sitio de WordPress y para lo que hace en el front end and back end.
The default file for create a guten block is very well scored. It tells you which party is responsible for what so you can make your own changes. registerBlockType is what registers the block. The following functions edit: and save: describe the content and behavior of the block within Gutenberg and on the page respectively. More information here and here.
In my case, I just delete everything starting with registerBlockType and replace it with the example from the Gutenberg documentation (down). This creates a simple rich text editor field with minimal formatting options, including bold, italic, hyperlinks, etc.
However, to make it work with what we've created so far, we need to change this part:
blocks.registerBlockType ('gutenberg-examples / example-03-editable', {title: "Example": "Editable", icon: "Universal access", category: N - "Design",
|
blocks.registerBlockType ('gutenberg-examples / example-03-editable', { title: «Example»: Editable », icon: «universal access», category: N - «Design», |
In particular, what you want to change is:
- Registration path - Refers to the path that appears after blocks.registerBlockType. You need to adapt to your current environment.
- title: - The name of the block as it will appear in Gutenberg.
- icon: - The icon associated with the block in the editor. You can use the dashicons. Make sure to insert the name without the dashicons- prefix. Alternatively, you can use your own SVG file.
- category: - Under which category your block will appear. Some of the standard categories are: Common, Formatting, Layout, Widgets, and Embedding.
In my case, I just changed it to this:
blocks.registerBlockType( ‘cgb/block-cta-block’, { título: «CTA Block», icono: «Testimonio», categoría: «Común»,
|
blocks.registerBlockType ('cgb / block-cta-block', { title: «CTA Block», icon: «Testimony», category: «Common», |
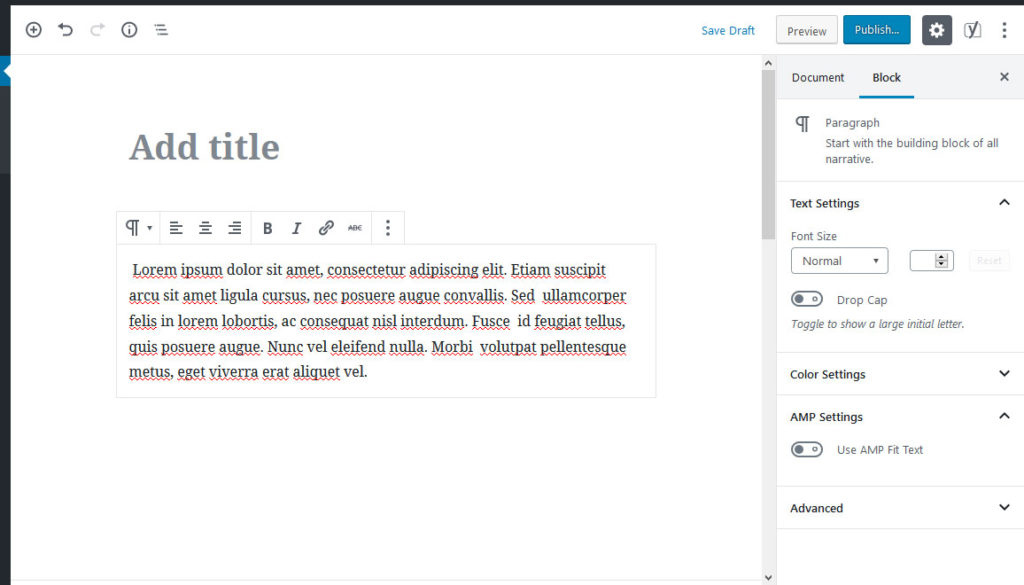
After that, it appears in the editor like this:
And this is how it looks on the page:

I left the rest of the code as I found it.
6. Adjust the block style
After that, it's time to adjust the display of your new block. This happens inside editor.scss and style.scss.
As the file names suggest, the former controls the look of your block within the Gutenberg editor, and the latter controls the front-end output.
In the default create guten block example you can see that the output is green in the editor but red on the page. This is a consequence of using two different sets of profit margins.
In most cases, it probably makes sense to keep the style of it. After all, one of Gutenberg's best sellers is that the editing experience and the final product are more aligned than before.
In my case, I add the following to both files:
.wp-block-cgb-block-cta-block {background: #d6f279; border: 0.2rem dotted #292929; margin: 0 auto; padding: 1rem; text-alignment: center; }
|
.wp-block-cgb-block-cta-block { background: #d6f279; from the border: 0.2rem dotted #29292929; margin: 0 auto; padding: 1rem; text-align: center; } |
And here is the result in the editor:
And in the front:

Por cierto, Gutenberg asigna automáticamente las clases CSS a los bloques en función de su nombre y puede averiguar qué son con las herramientas de su browser. Sin embargo, las hojas de estilo de create guten block they will already contain the correct class names. At the same time, you can determine your own.
7. Finish
Alright, once you're happy with your block, there are a few more steps. The first thing to do is go back to the console and press Ctrl / Cmd + C to prevent npm from monitoring your files.
After that, run the following command:
This will compile the files needed for the production code (don't worry, it won't stop your block from working, I've checked).
If you think you don't want to use this block again within create guten block, at the same time you can write npm run eject. However, this means that from now on you will have to maintain the project yourself.
Ready to create a Gutenberg block?
Gutenberg blocks are set to become the new WordPress default element. They help create modular posts, pages, layouts and layouts and offer a lot of control.
Learning how to configure custom Gutenberg blocks helps you stay on top of current development and provides you with the tools to customize your site with new technology.
Arriba, has aprendido una forma básica de crear un bloque para el editor de Gutenberg. Es más complicado que hacer cambios a las plantillas PHP y para modificaciones significativas, es probable que no tenga que aprender al menos algo de JavaScript.
However, knowing how it works in principle, you can start small and grow from there. If I can do it, you can at the same time.
At the same time, the creators of Advanced Custom Fields are working on a way to make block creation much easier. The feature is currently in beta, but as soon as it's available, you can expect to read about it here.
Have you created a Gutenberg block before? How was your experience? Any other tips or comments? Let us know in the comment section below!


