

Pruebas. Realmente no son tan horribles como las pruebas o los exámenes: su sitio Web no es una escuela, por lo que puede poner en práctica cuestionarios divertidos para hacer que su sitio be más interactivo e incluso solicitar comentarios valiosos de sus visitantes. Puede ver cómo responden los lectores a determinadas preguntas y puede averiguar qué les gusta y qué no de su sitio. Para terminar, los cuestionarios hacen que su sitio sea atractivo, único y divertido.
Las posibilidades aquí abundan. Ni siquiera necesita hacer preguntas sobre cosas que se relacionan directamente con su sitio, siempre que sus preguntas se conecten con las persons y creen una comunidad en torno a sus objetivos principales. A modo de ejemplo, pese a que ESPN ofrece cuestionarios deportivos en sus sitios todo el tiempo, siempre arrojan la cultura pop ocasional o la pregunta política allí, dependiendo de las tendencias actuales.
Creating a questionnaire is not that difficult; We can do it in seven quick steps, so let's take a look at how you can add one to your site today.
1. Add a new quiz with Quiz Master Next
The easiest way to create a questionnaire for your users is to access the plugin database. You could try doing your own little quiz without a plugin, but that quickly gets complicated. At the same time, there really is no reason to do so, because you won't have half the functionality of a plugin, and the plugin I'm going to talk about today is pretty lightweight on your site.
To get started, download the Quiz Master Next Plugin y activarlo en su panel de WordPress (puede tomar el complemento del link, o simplemente iniciar sesión en su instalación de WordPress y navegar a Complementos> Agregar nuevo, buscar el complemento Quiz Master y luego instalar y activar).
Una vez que el complemento esté listo para usarse en su dashboard, click on the Questionnaires tab on the left side of your dashboard. Go to elementary school Questionnaires page to create your first little quiz.
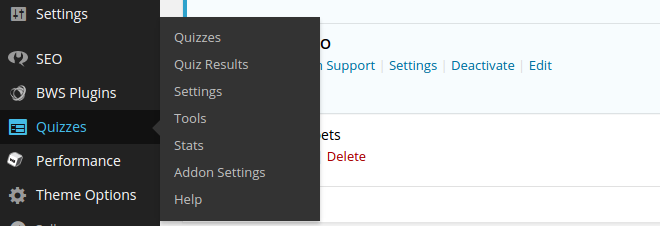
Click on the Add new button. Doing so will bring up a pop-up screen where you can enter a new test name. Call it what you like so you can remember what kind of questionnaire it is in the future. Click on the Create questionnaire to continue.

This puts the new questionnaire in a list of all the questionnaires that you will eventually create, but to really get started you have to click on the Edit , which is just below the name of the test; when you hover over your test name, you should be able to see that Edit botón. Haz click en eso.
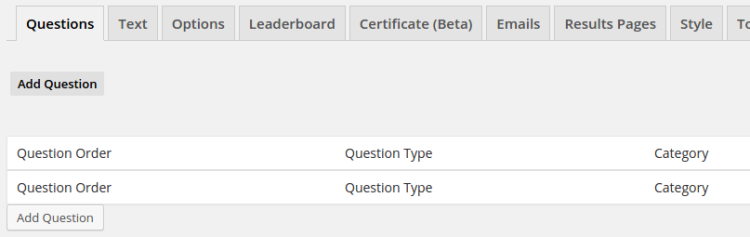
2. Add questions
This area is quite simple, as you have the opportunity to add the questions you want to the questionnaire. Start by clicking on the Add question which reveals a new pop-up window in which you can enter all the details for a new question. This is the fun and creative part.
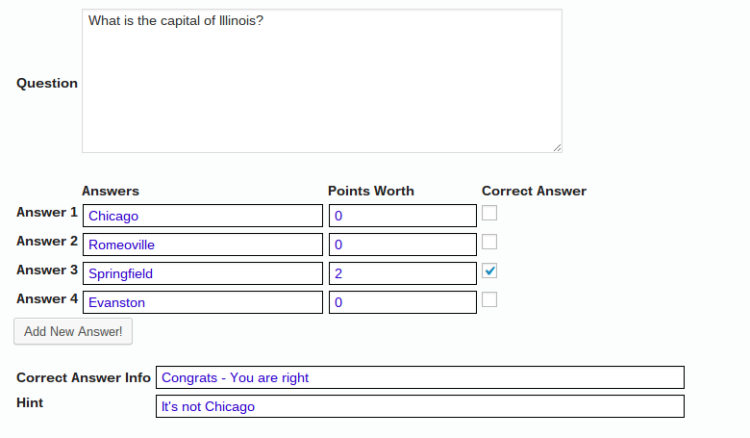
Write down the questions and all possible answers. You can specify the correct answer and even award a certain number of points to the people who get the correct answers. Write a message that will be displayed if users get the correct answer. At the same time you can complete a hint that users can call up if they get puzzled by a question.
There are a few other fields to fill in below that, but they are all self explanatory. Click on the Create question at the bottom once you've completed that question.
Add as many questions as you want by following this same process. I'm going to include a second question for the sake of this tutorial, as a one-question quiz is pretty boring.
3. Post your questionnaire
Navigate back to elementary school Exam página para ver la lista de pruebas que ha creado. En mi ejemplo, solo tengo una prueba, por lo que es fácil ver exactamente hacia dónde dar un paso adelante. Nuestro target ahora es publicar el cuestionario para que todos los que visiten el sitio puedan realizarlo y enviar sus respuestas.
A la derecha del nombre de su cuestionario hay algunas Url y códigos que puede usar para la publicación. A modo de ejemplo, la URL es donde reside el cuestionario, por lo que puede compartir esta URL con quien desee.
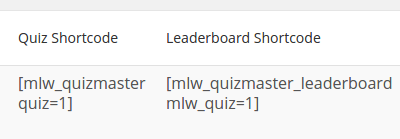
The real power of the plugin comes into play when you start using the shortcodes. These shortcodes are listed just to the right of the name, so feel free to copy and paste them anywhere on your site.
Como prueba, estoy copiando el código corto del cuestionario y lo coloco en una nueva publicación de Blog. Suelta este código en cualquier lugar de la publicación, úsalo en widgets o colócalo en una página dependiendo de dónde quieras que aparezca para tus visitantes. Al mismo tiempo hay otro shortcode disponible para copiar. Este código abreviado revela la tabla de líderes si planea gamificar su sitio y generar una pequeña competencia entre todos los visitantes.
I'll paste both shortcodes into a new blog post and hit the To post botón. Siéntase libre de escribir o cargar cualquier otro contents como lo haría para una publicación de blog estándar.
4. Play around with the quiz style
The plugin provides some solid style settings so you can make your quiz look identical to your own brand, but as you can see below, the quiz displays well and provides all the questions, suggestions, fields, and answers. This is a minimal quiz, but the customization features are quite abundant to make it look pretty.
(*7*)
5. Look at the results
One of the last steps is to take a look at your results and reward the winners or use the information to improve your business. When someone submits a test form, they are told how many questions they answered correctly and their name is placed on the leader board if they score high enough.
(*7*)
This is wonderful for engagement, but what about your own results? Once you have completed this critical step, you should consider the tools that are offered on the backend so that you can analyze the questionnaires and even organize them.
6. View shipping information
Go Tests> Test Results on the left side of your WordPress dashboard. Click on the Watch link to see how many people have submitted their questionnaire. The good thing about the results is that they work well for collecting email and phone number information if you run a company that uses those means for marketing.
The results provide personal information about the submission and the percentage of correct responses. The results at the same time show the answers that your users selected.

7. Analyze statistics
Another good area to analyze the effectiveness of your questionnaires is the Statistics page. Click on Tests> Statistics and scroll down this page after you start receiving a decent number of questionnaire submissions.
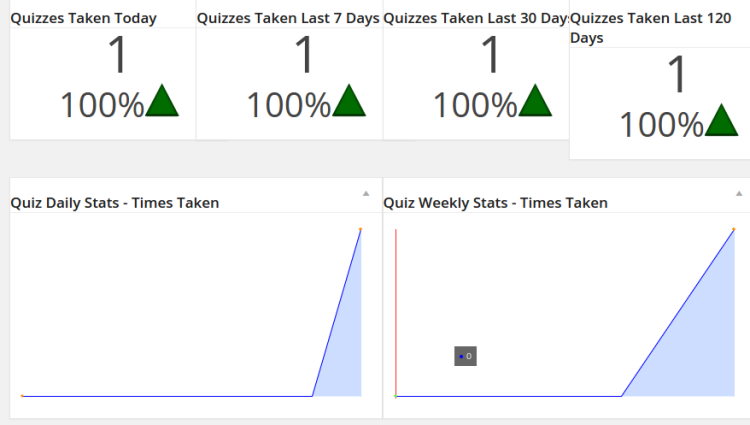
Statistics are helpful in determining whether it is worth using the quizzes on your site. As an example, this plugin provides figures on how many tests were done in the last days or weeks. If the trends are going down, you may need to change your content. If it increases, keep doing whatever you are doing with your quizzes.
Share your thoughts in the comment section if you have any questions on how to create a quiz for your users in WordPress. If you've triggered quizzes in the past, what plugins have you used or are you more likely to create your own with certain forms?
I know that Gravity Forms is a popular premium way of doing quizzes, but I didn't cover it because (IMHO) Quiz Master Next is just as good, and it's free. If you'd rather use Gravity Forms, I'd love to know why in the comments!


