
Creo que estará de acuerdo cuando digo: la función de programming in WordPress es un verdadero salvavidas. Puede programar fácilmente publicaciones, páginas e incluso productos de WooCommerce para una fecha futura, lo que le ahorra una gran cantidad de tiempo que puede canalizar para generar traffic y hacer crecer su Blog.
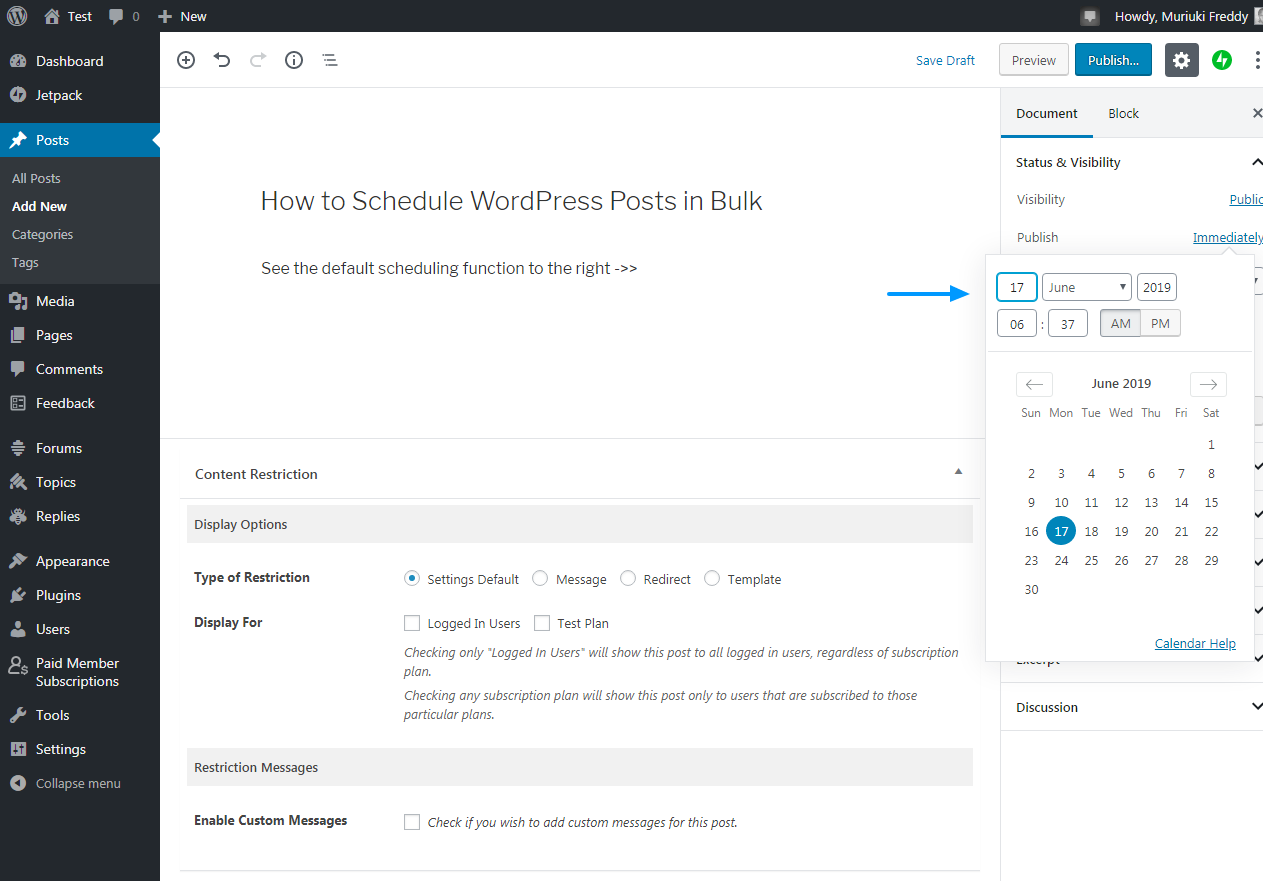
Cuando dispone de una sola publicación, página o producto, la programación es tan fácil como establecer una fecha de publicación futura en el editor de publicaciones de WordPress. La siguiente imagen muestra el programmer predeterminado de WordPress en acción.
If you have multiple posts, let's say you have a multi-author blog, scheduling each post individually can consume a large chunk of your time. If you want to recycle old posts to maintain your blog looking cool, editing the publication date of each post can be a daunting task, even more so if you have hundreds of posts.
What to do?
You can turn to automated bulk scheduling to save the day. And what do you need to schedule your WordPress posts in bulk? The free Auto Post Scheduler Plugin.
En la publicación de hoy, analizamos en profundidad las características que hacen que Auto Post Scheduler be el complemento perfecto de programación masiva para WordPress.
The plugin helps you schedule one-time posts, so you can keep your blog up and running even when you're on vacation. At the same time, it allows you to edit the publication dates of your publications, so that you can keep your blog updated.
Mass programming at the same time is perfect for running promotional campaigns during the festive and holiday seasons. Having said that, have a cup of coffee and let's put the automatic post scheduler to the test.
Don't leave without sharing your thoughts in the comment section at the end.
How to install the Automatic Post Scheduler

Auto Post Scheduler is a free plugin available from the WordPress plugin repository. You can download, install and use the plugin right now without paying a penny.
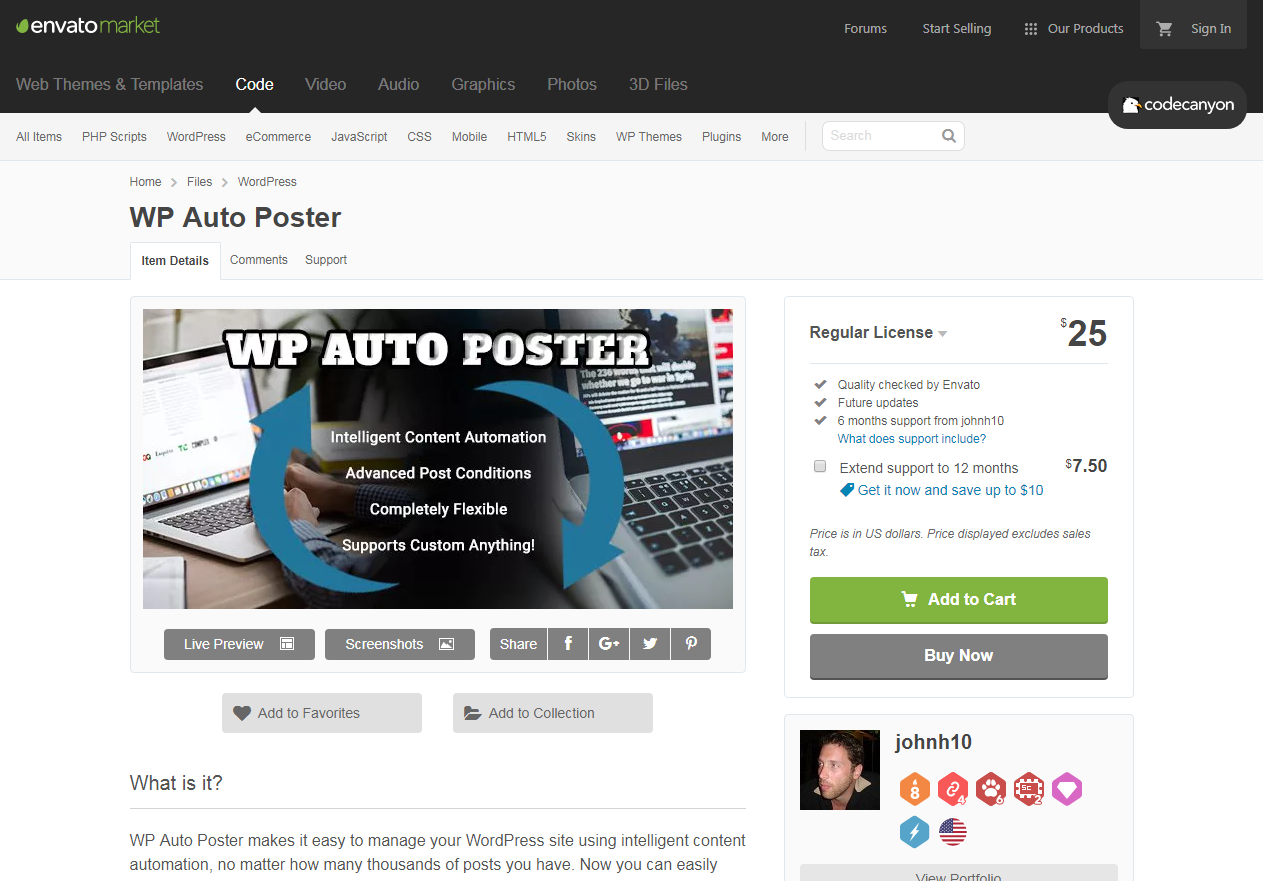
If you need even more options, the developer offers a premium version known as WP Auto Poster at Codecanyon. The premium version costs $ $ 25 at the time of writing.
For this post, we will use the free version. Having said that, let's start by setting up the plugin on your WordPress site.
Installing the Automatic Post Scheduler
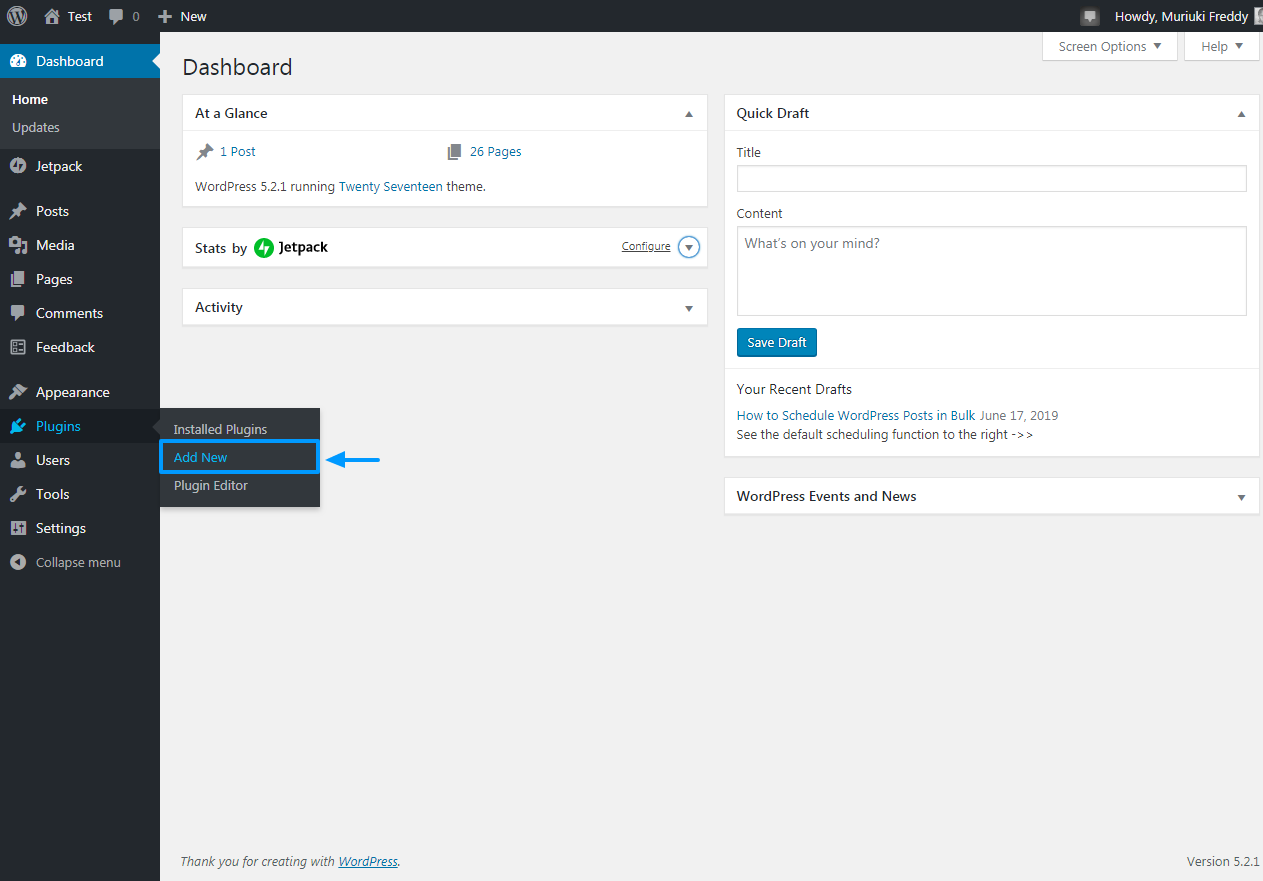
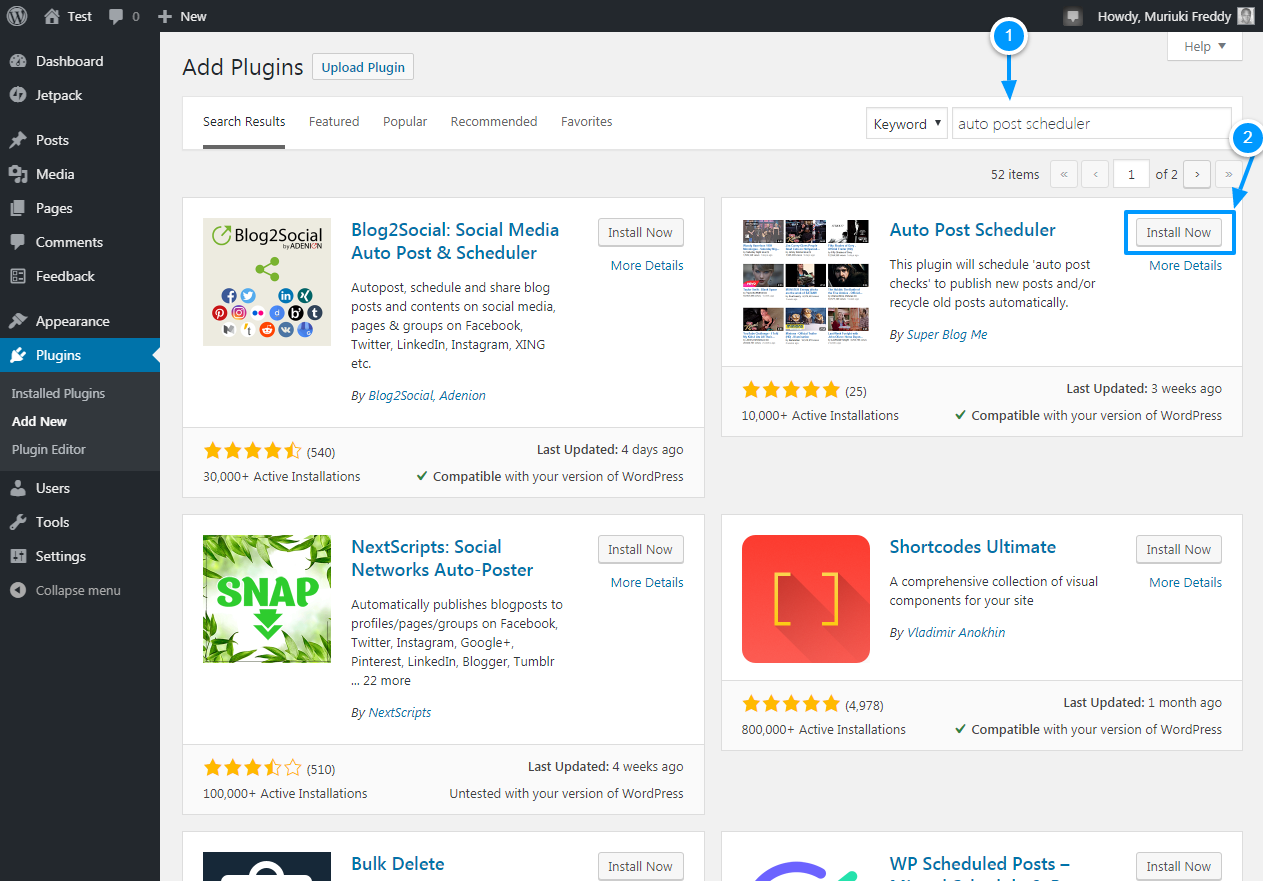
Login to your WordPress admin panel and navigate to Plugins> Add New as shown in the picture below.
A continuación, escriba «Programador de publicación automática» en el cuadro de búsqueda de keywords y posteriormente pulse el botón Install Now button as we highlight in the following screenshot.
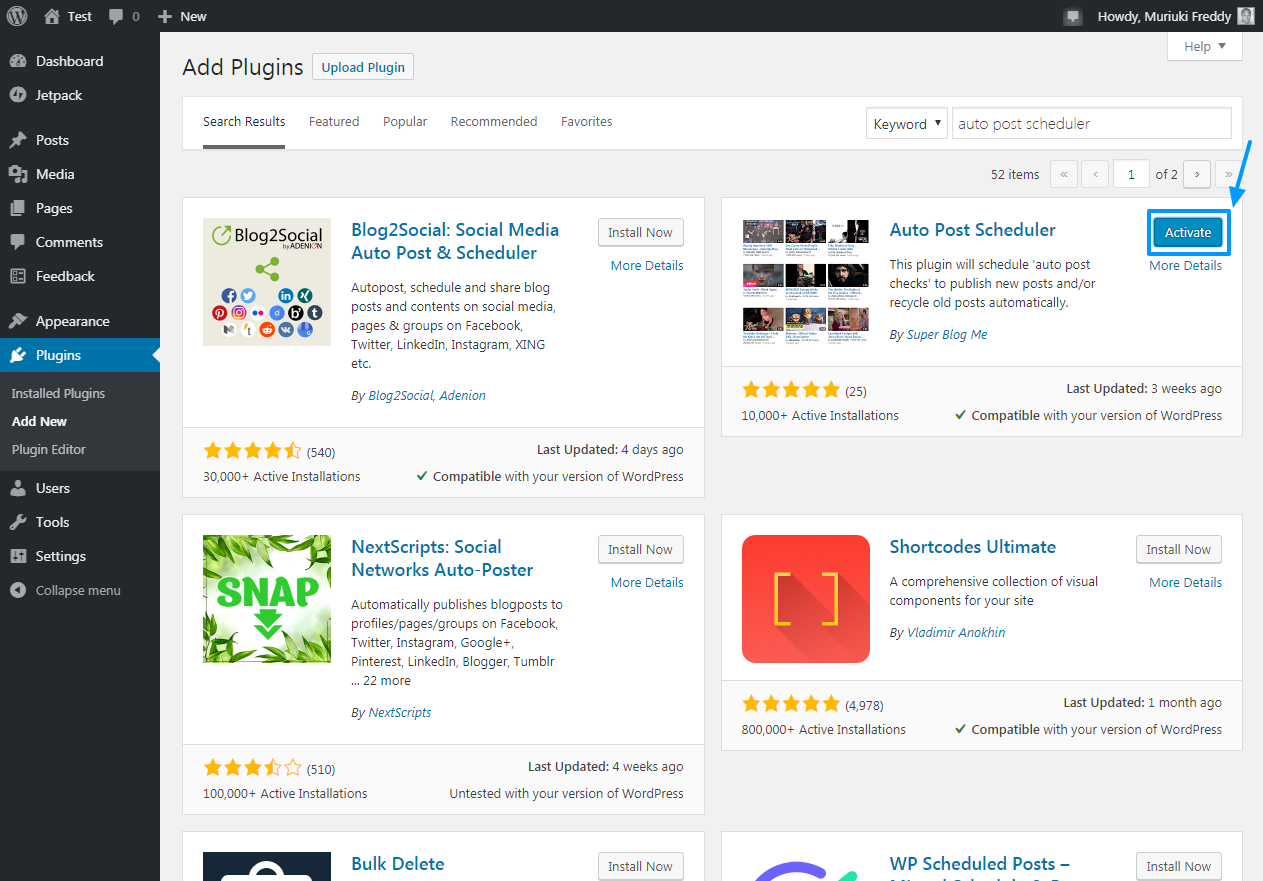
After that, click on the Activate to roll the ball as detailed below.
After activation, the Auto Post Scheduler plugin is ready to use, we just need to configure a couple of options.
How do you do that?
Read on to learn how to set up the Auto Post Scheduler plugin without breaking a sweat.
How to set up the WordPress Auto Post Scheduler plugin
Ahora que el complemento Auto Post Scheduler está activo en su sitio Web, echemos un vistazo debajo del capó y descubramos por qué el complemento solo tiene 5-star reviews on WordPress.org.
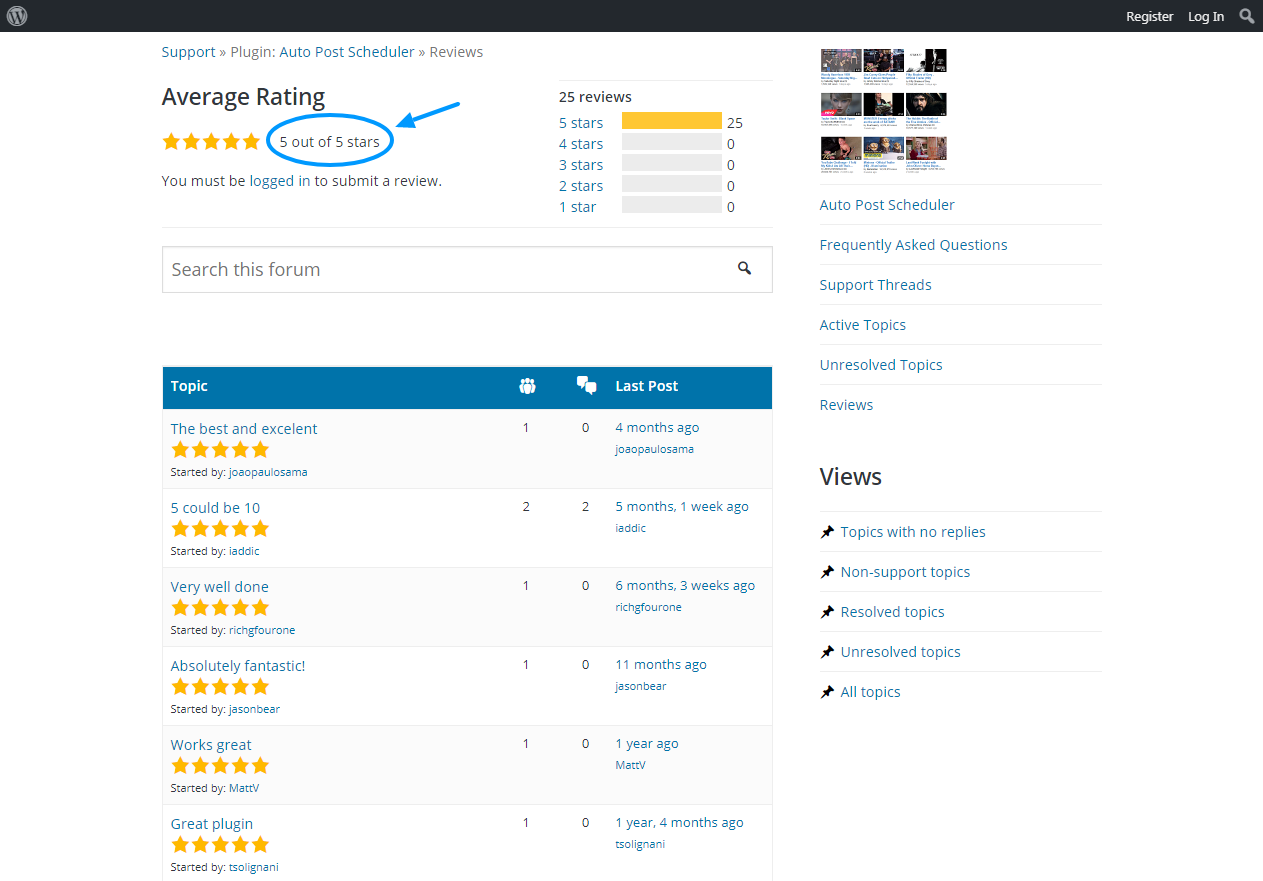
The rave reviews aside, let's get down to business.
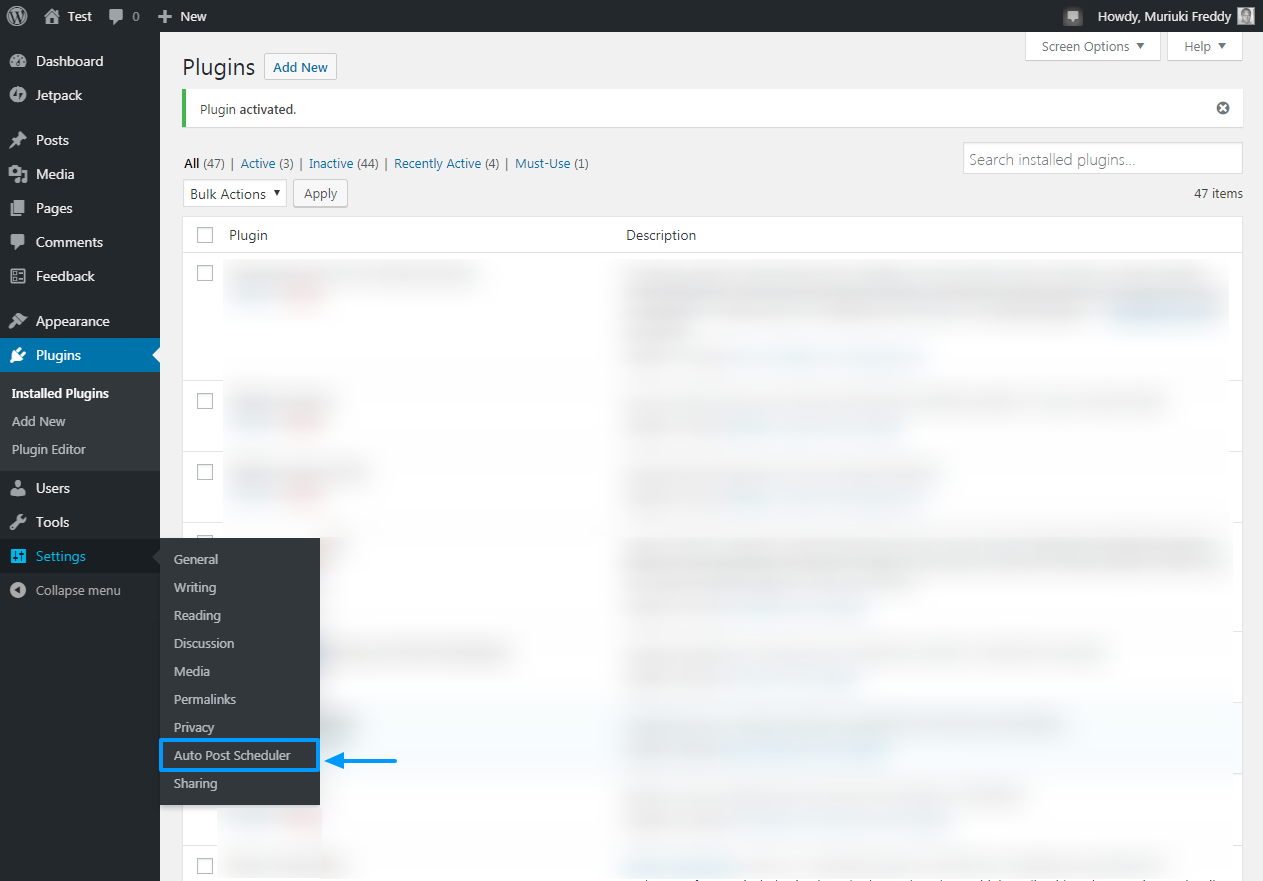
Navigate to Settings> Automatic Post Scheduler as we highlight in the image below.
Doing so will take you to the Auto Post Scheduler admin panel as shown in the image below.
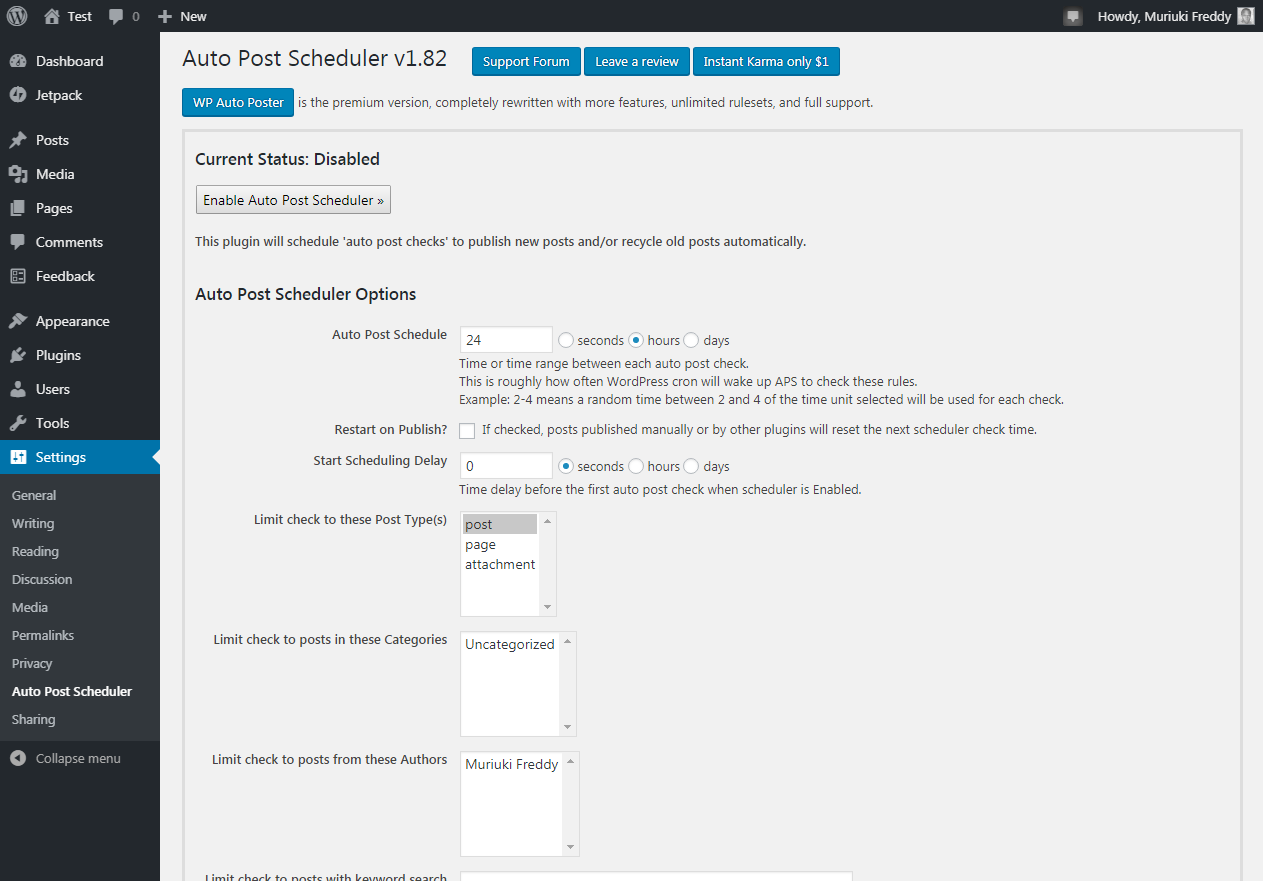
Pretty simple admin panel, don't you think? I love a simple admin panel that focuses on what matters. The Auto Post Scheduler options screen is very pleasant to use, since everything you need is just one click away. Just point and click, and your work is done!
Regardless, before doing anything else, take some time to familiarize yourself with the options available to you. Below is a summary of the available options starting from the top.
Outgoing buttons
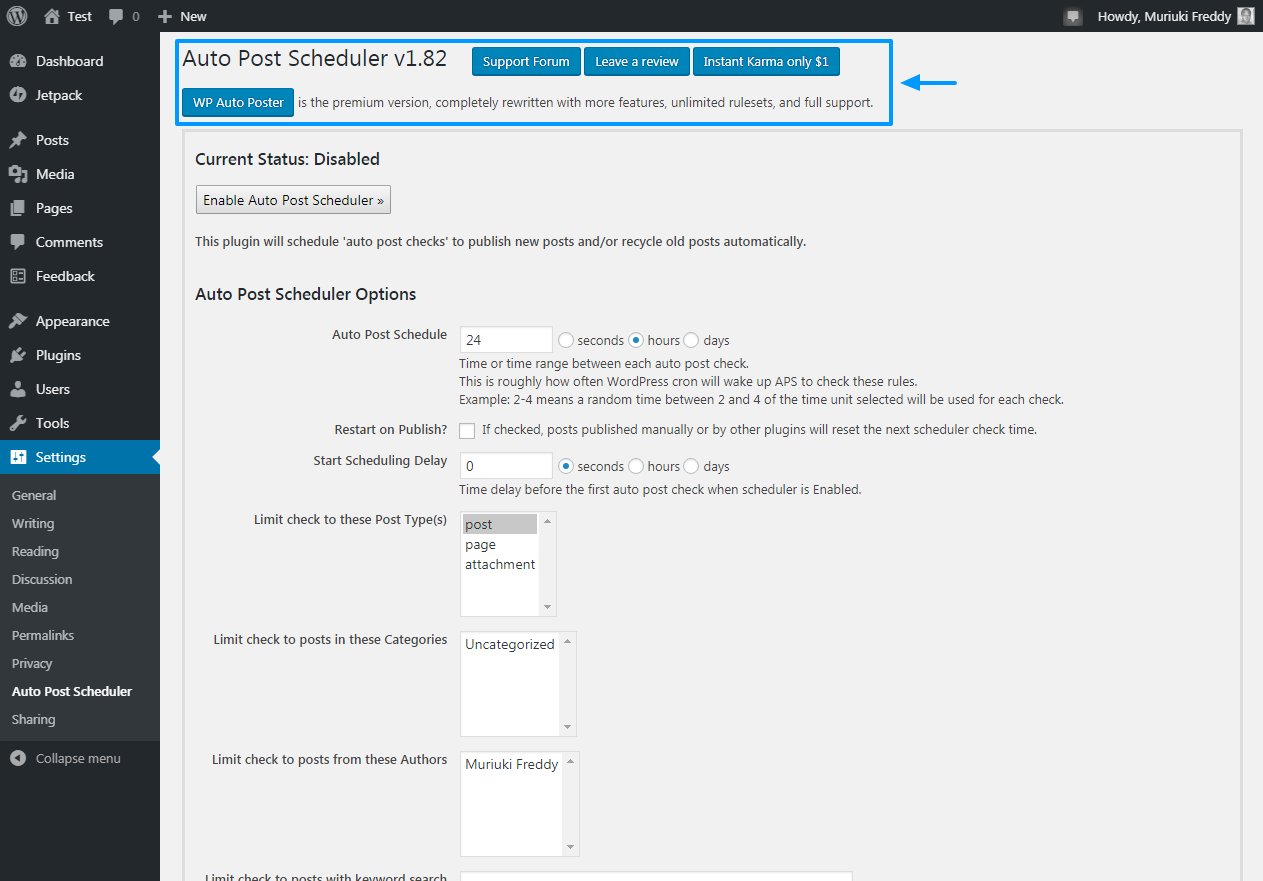
As shown in the image above, it has four prominent buttons at the top of the admin screen. First of all, you have the Forum de soporte button, which takes you to Auto Post Scheduler Support Forum at WordPress.org, where you can get free support. Second, you have the Leave a comment button that obviously takes you to the reviews section on WordPress.org.
Third, you have Instant Karma only $ 1 , que lo redirecciona a una página de donación de PayPal, lo que le posibilita admitir el programador automático de publicaciones. Puede hacer una donación única o una donación mensual marcando la casilla que se muestra a continuación.
Fourth, you have the WP Auto Poster button that redirects to premium version. WP Auto Poster has been completely rewritten with more features, unlimited rule sets, and full premium support.
Enable Automatic Post Scheduler
Even after activating the plugin, keep in mind that you must enable the scheduler through the Enable Automatic Post Scheduler button as shown below.
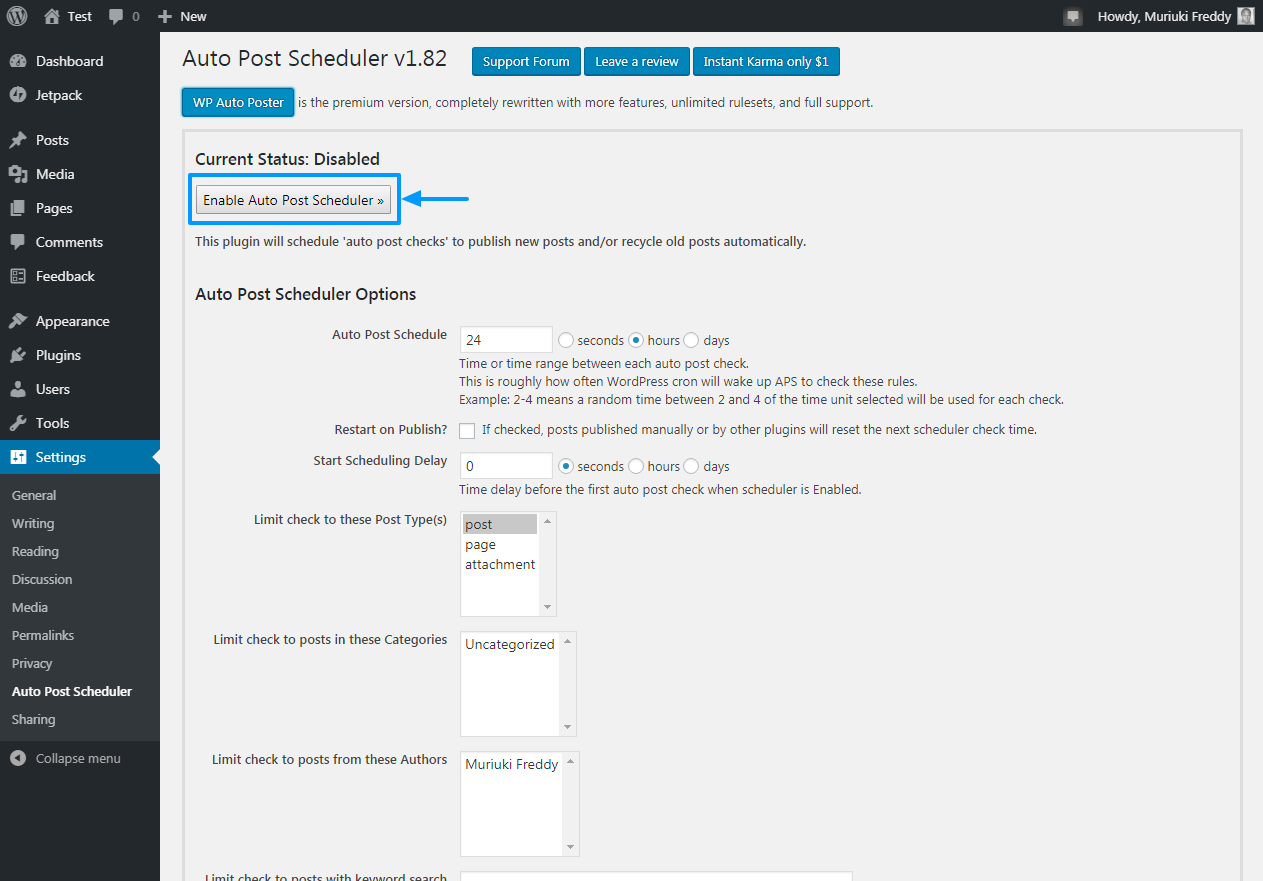
We recommend enabling the scheduler only after configuring its options. If you enable the scheduler right away, you will have to work with the default settings. If the default options work for you, go ahead and click the Enable the automatic post scheduler. Regardless, if you want to configure Auto Post Scheduler your way, read on to learn more about each option.
Automatic Post Scheduler Options
In this section, we'll go over each option, so you can take full advantage of the power of the Auto Post Scheduler plugin.
Automatic posting schedule
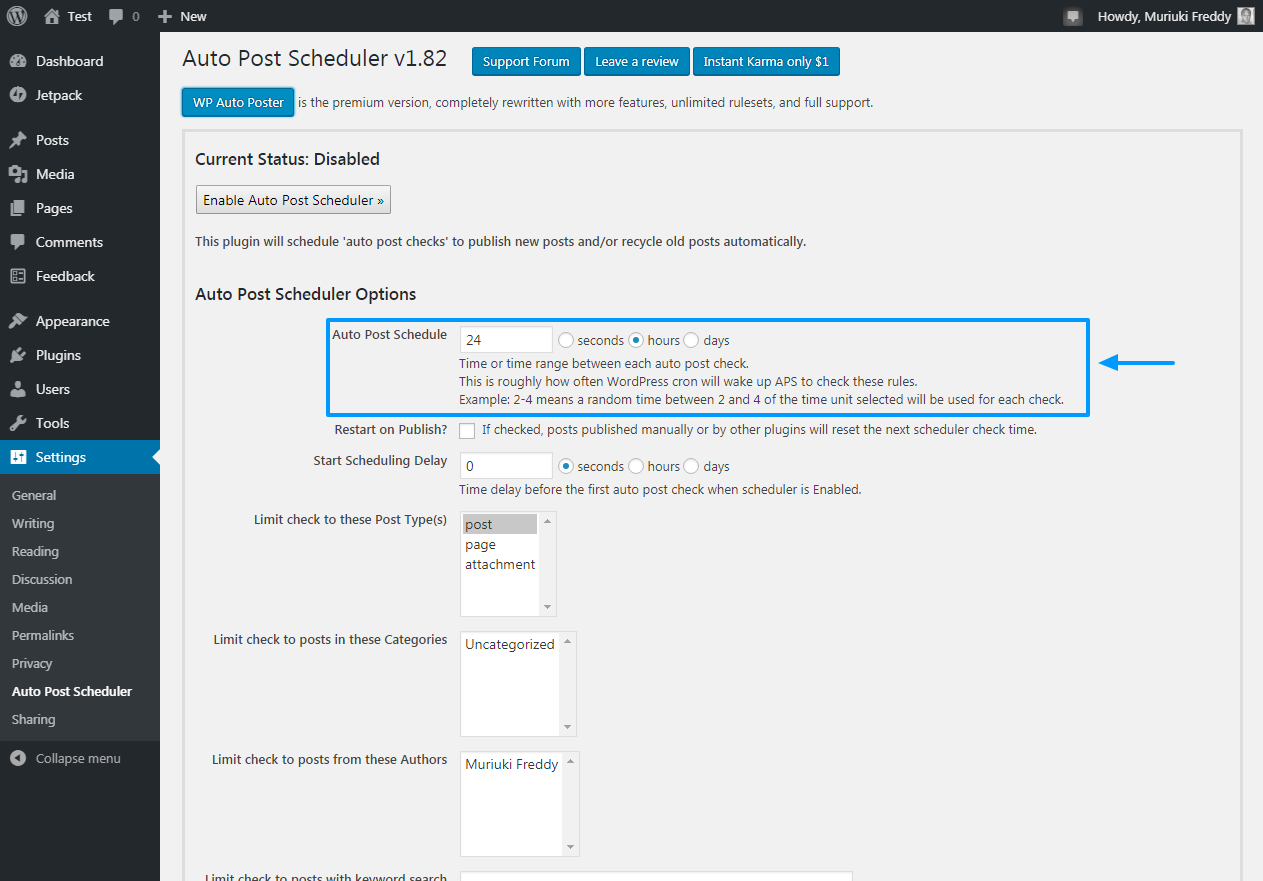
First in the lineup is the Automatic posting schedule option shown above, which allows you to configure your automatic posting schedule. 24 hours is the default, which means that it will automatically post one post per day. If you want to publish two posts per day, as an example, you should change the value to 12 hours. You need to post four pieces a day, change the value to six hours, and so on.
Restart when publishing?
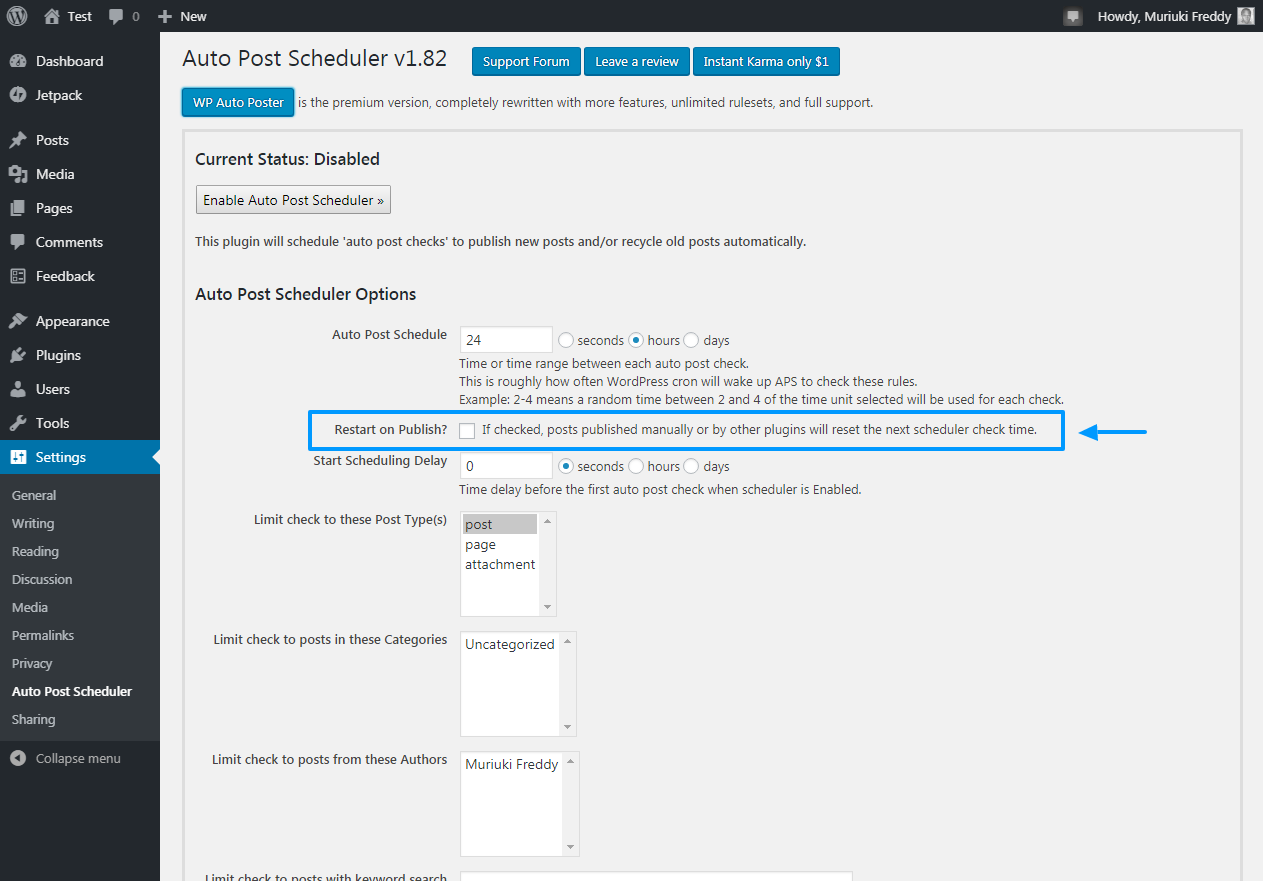
Second, you have the Restart when publishing? checkbox, which is useful if you want to republish old posts. Checking the box will republish your already published posts. Basically, the option helps you make your blog look new by automatically republishing your posts.
Start delay schedule

Third, you have the Start delay schedule, which helps you set a delay time before your first scheduled post is published. The default is set to zero (0), which means that if you enable Automatic Post Scheduler, your first scheduled post will be published immediately. You can set a start delay in seconds, hours, or days, which means you have complete control over when your posts are published.
Limit verification to these types of posts
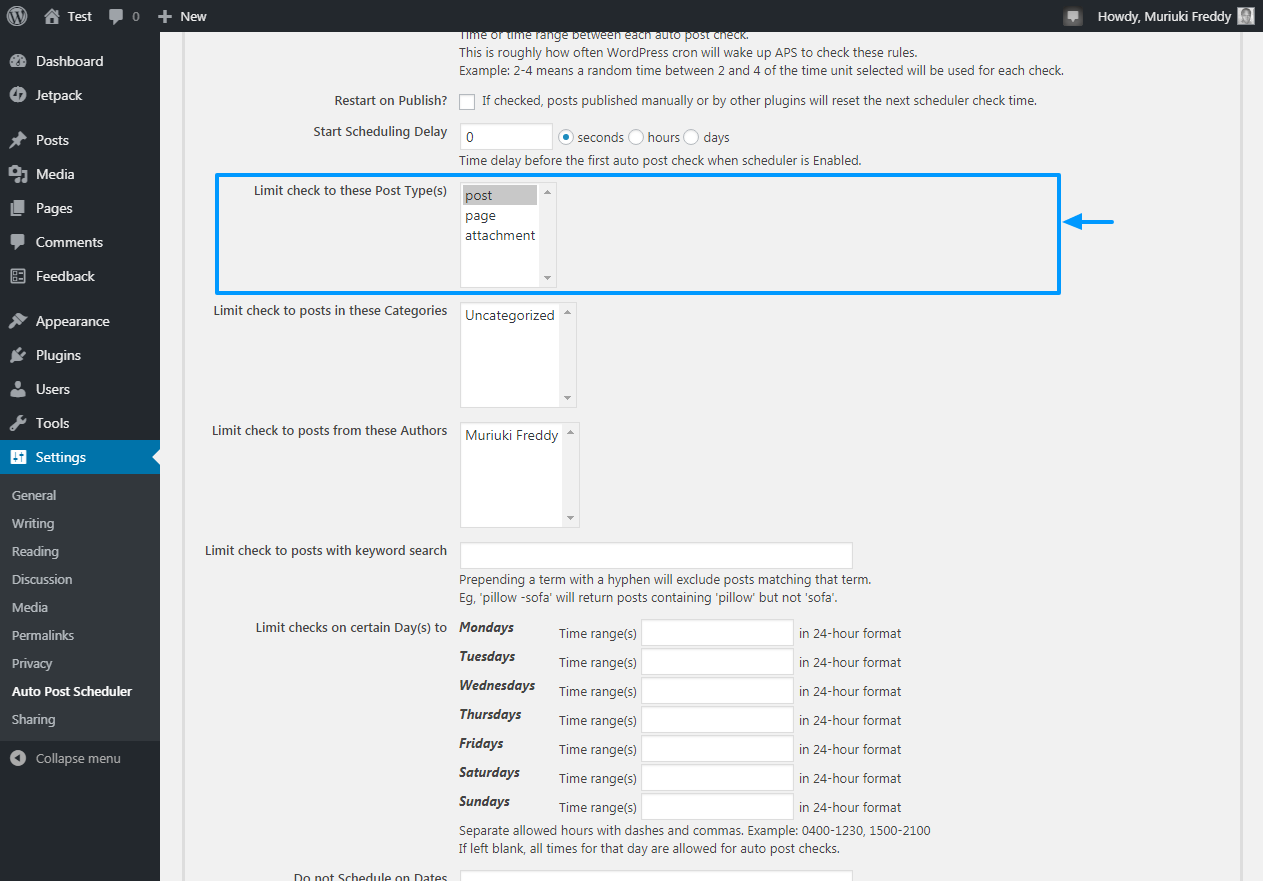
So we have the Limit verification to these types of posts option. The option allows you to choose what types of publications you would like to schedule. Send is the default, but you can add other types of posts to the selection. How? Just hold the CHANGE on your keyboard and select all the types of posts that you would like to schedule automatically.
Limit checking to posts in these categories
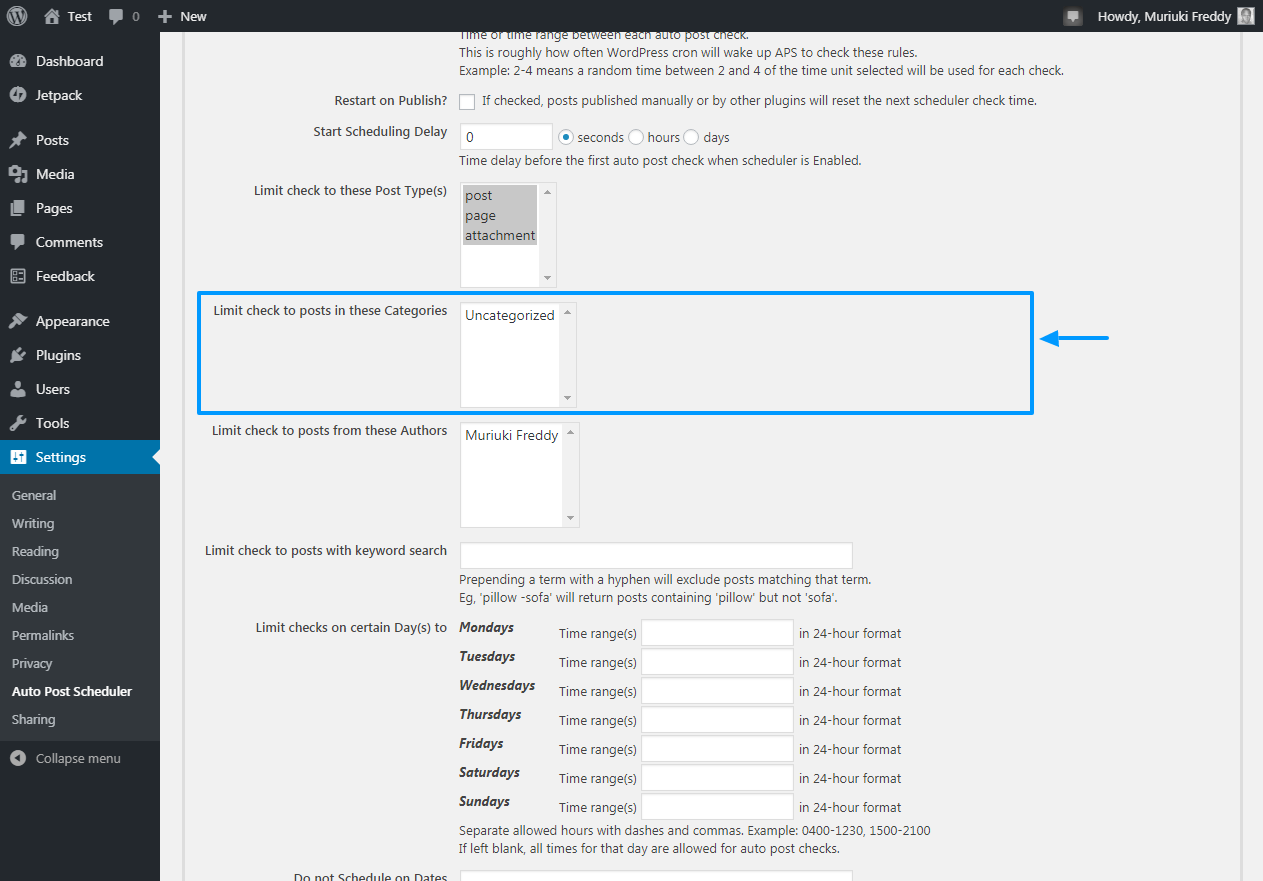
Next, we have the Limit checking to posts in these categories, which allows you to choose which categories to program. By default, all categories are selected, but you can always exclude the category you want. To add categories to your selection, just press and hold CHANGE on your keyboard and select the desired categories.
Limit verification to posts by these authors
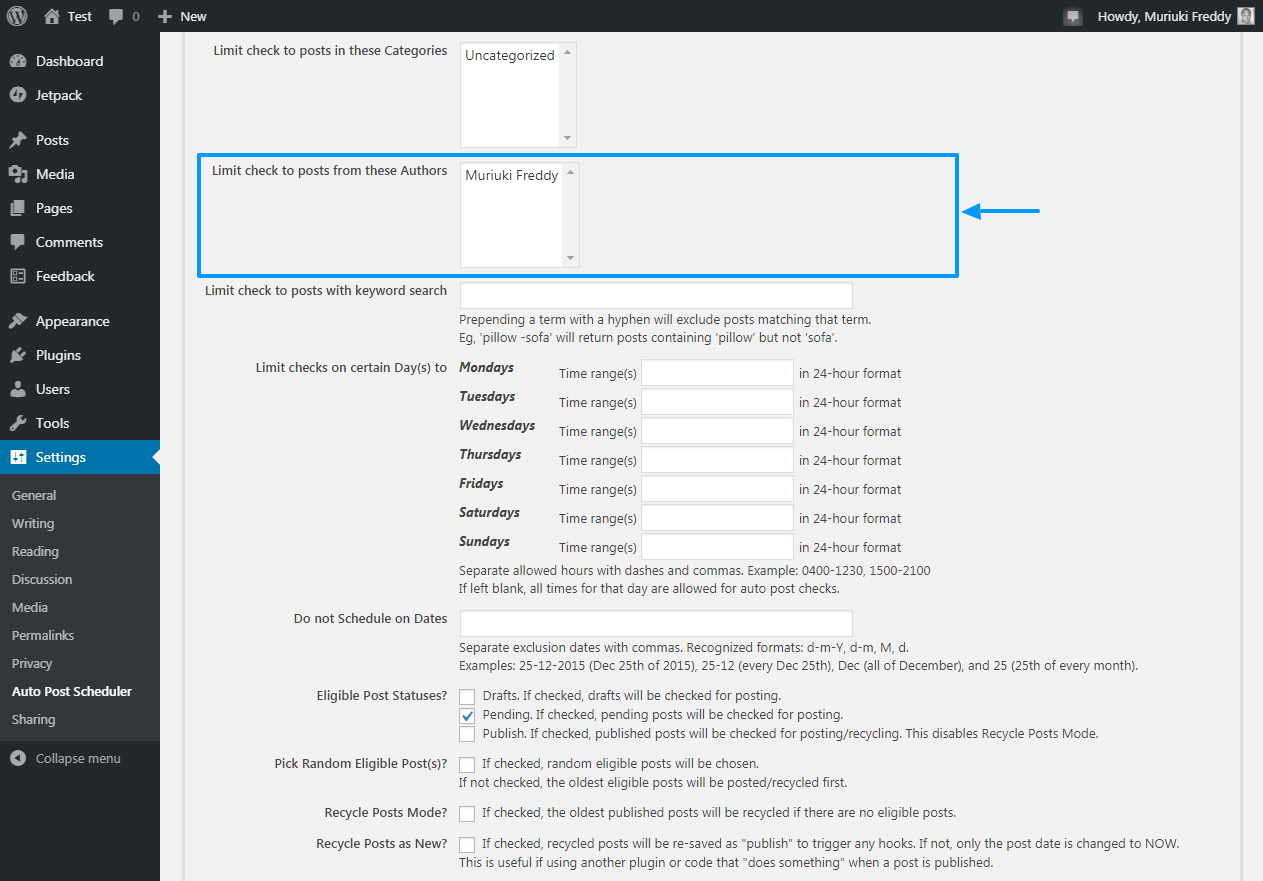
In the same way, you can choose to automatically schedule the publications of certain authors. Auto Post Scheduler includes all authors by default. You can include / exclude any author at will, again, by pressing the button CHANGE key to make your selection.
Limit verification to posts with keyword search
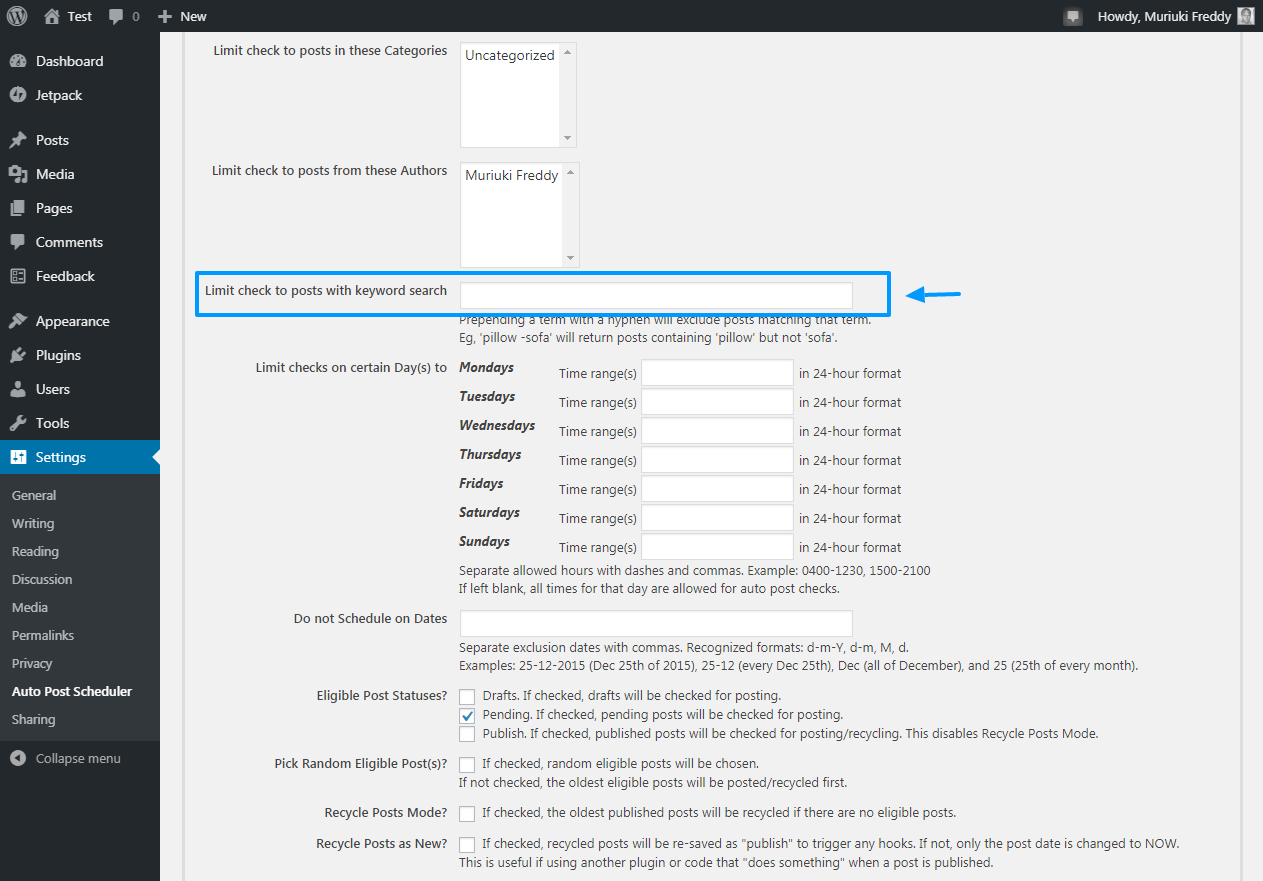
At the same time, you can schedule posts by keywords. According to the developer, prepending a term with a hyphen will exclude posts that match that term. As an example, 'John -Malkovich' will return posts that contain 'John' but not 'Malkovich'. Get it? Awesome, let's move on.
Limit checks on certain days to
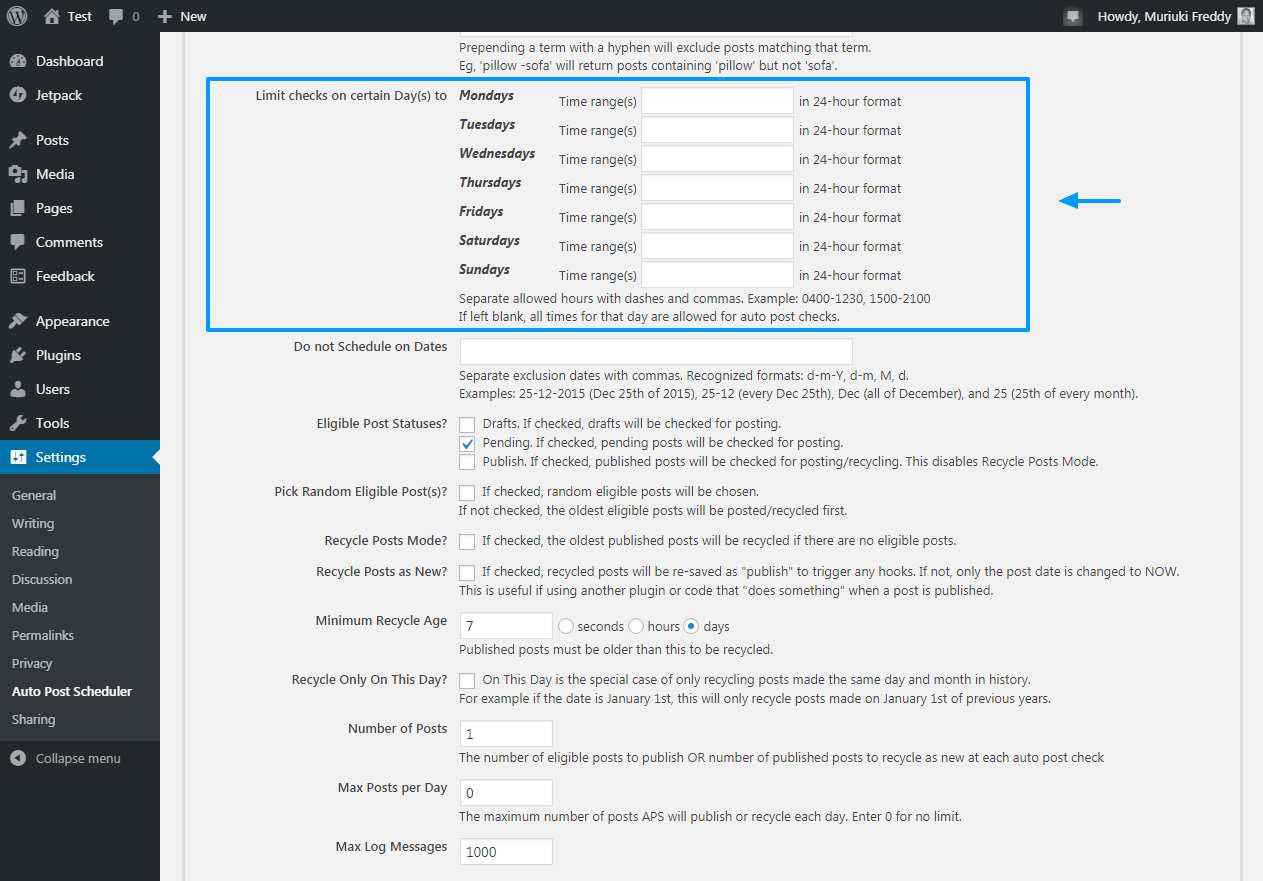
After that, you have the Limit checks on certain days to option that gives you great control over your posting times. The option helps you to set the time interval within which your posts will be published on a given day. You must access the time range in 24 hour format.
Do you understand how the above option works? Here is an example. Let's say you want to post your scheduled posts between 8 a.m. M. And 5 p.m. M. Mondays; you will enter 0800-1700 in the Monday space. If you want to post scheduled posts between 6 a.m. M. And the 1 p. M. On Tuesdays, you will need to access 0600-1300 in the space for Tuesdays and so on.
Do not schedule dates
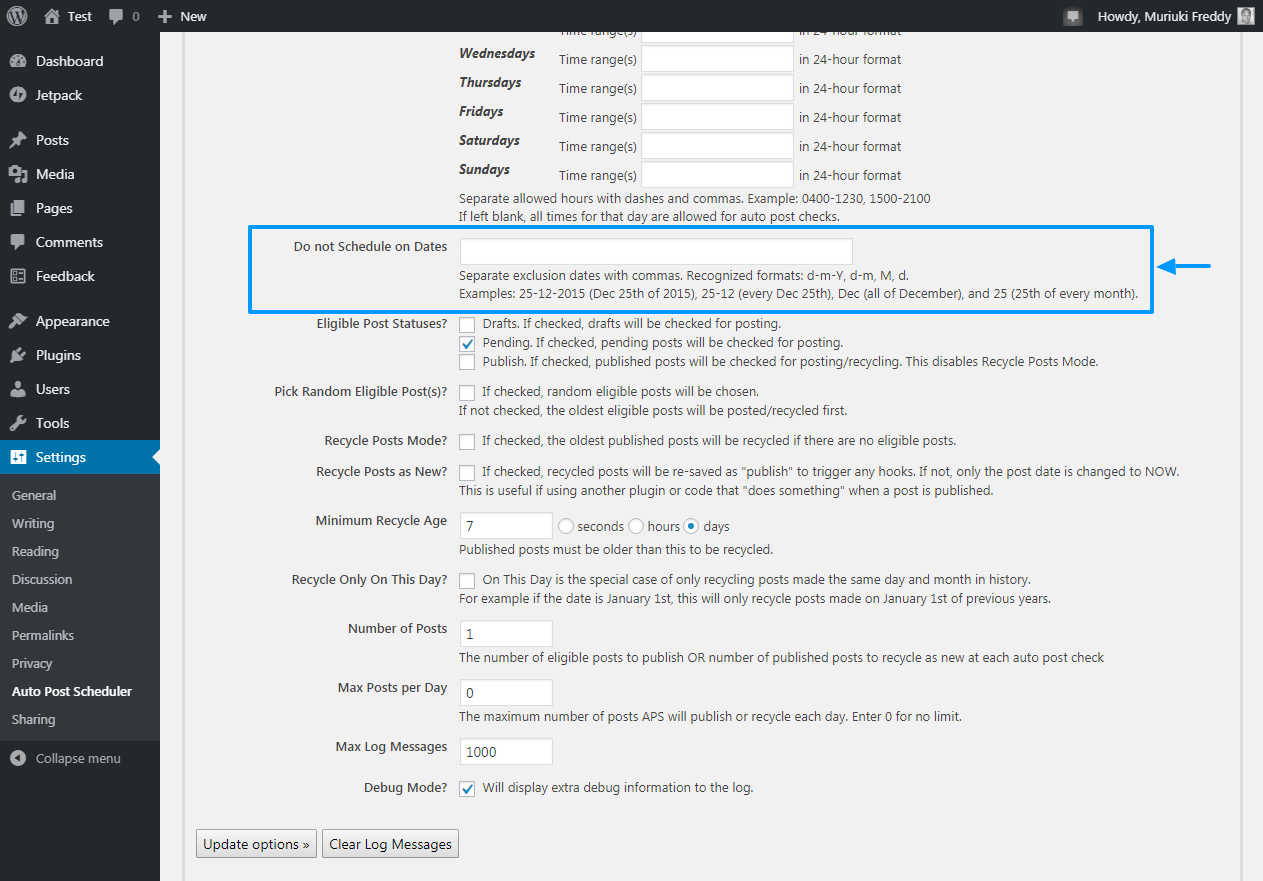
If you want to skip certain dates, Auto Post Scheduler offers you the option you need. the Do not schedule dates The option shown above allows you to choose on which dates you do not want to schedule posts. The plugin supports the following formats: dmY (as an example, 06-17-2019), dm (as an example, 06-17), M (as an example, 06) and d (as an example, the 17 of each month).
Eligible Post Statuses

You can then easily choose the post status to check. Have Drafts, Pending and Published post statuses to choose from. If you choose Erasers, posts will be checked against draft status for publication. If you choose Earringpending posts will be checked for publication. And if you choose To post, published publications will be reviewed for recycling.
Additional recycle mail options
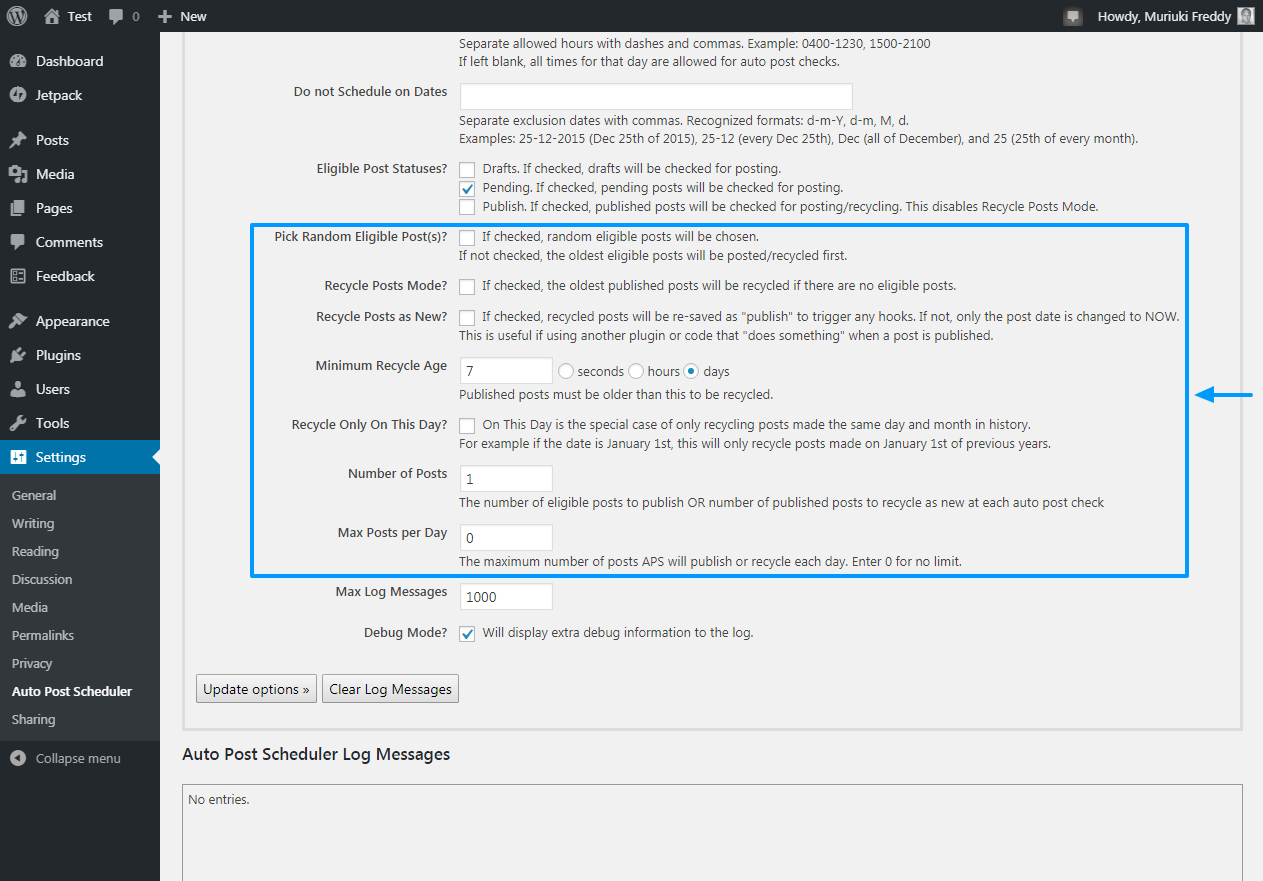
Towards the bottom, you get more options that help you control how you recycle your posts as shown above.
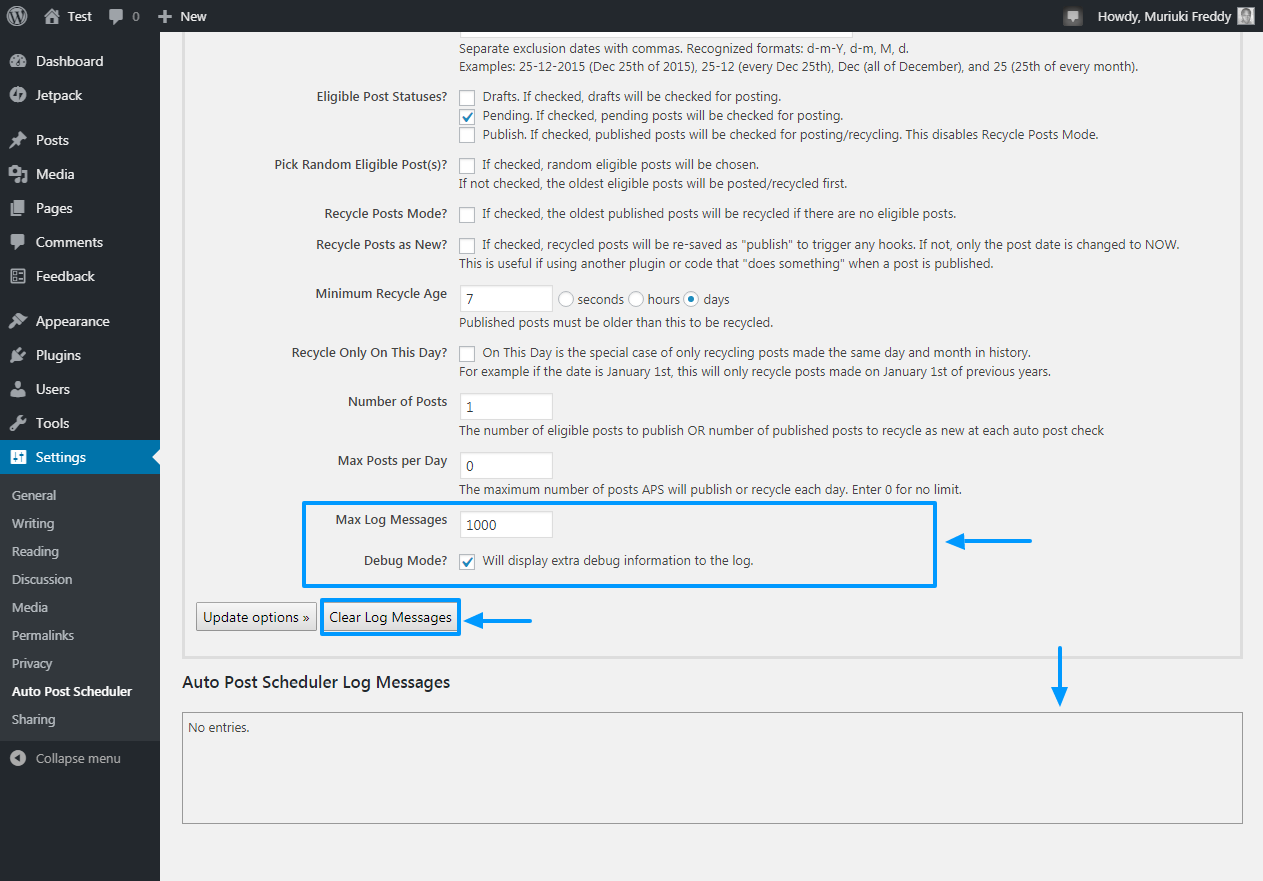
Debugging and logging options
Hapo chini kabisa (In other words, at the bottom), it has logging and debugging options, which are useful for troubleshooting. See the picture below.
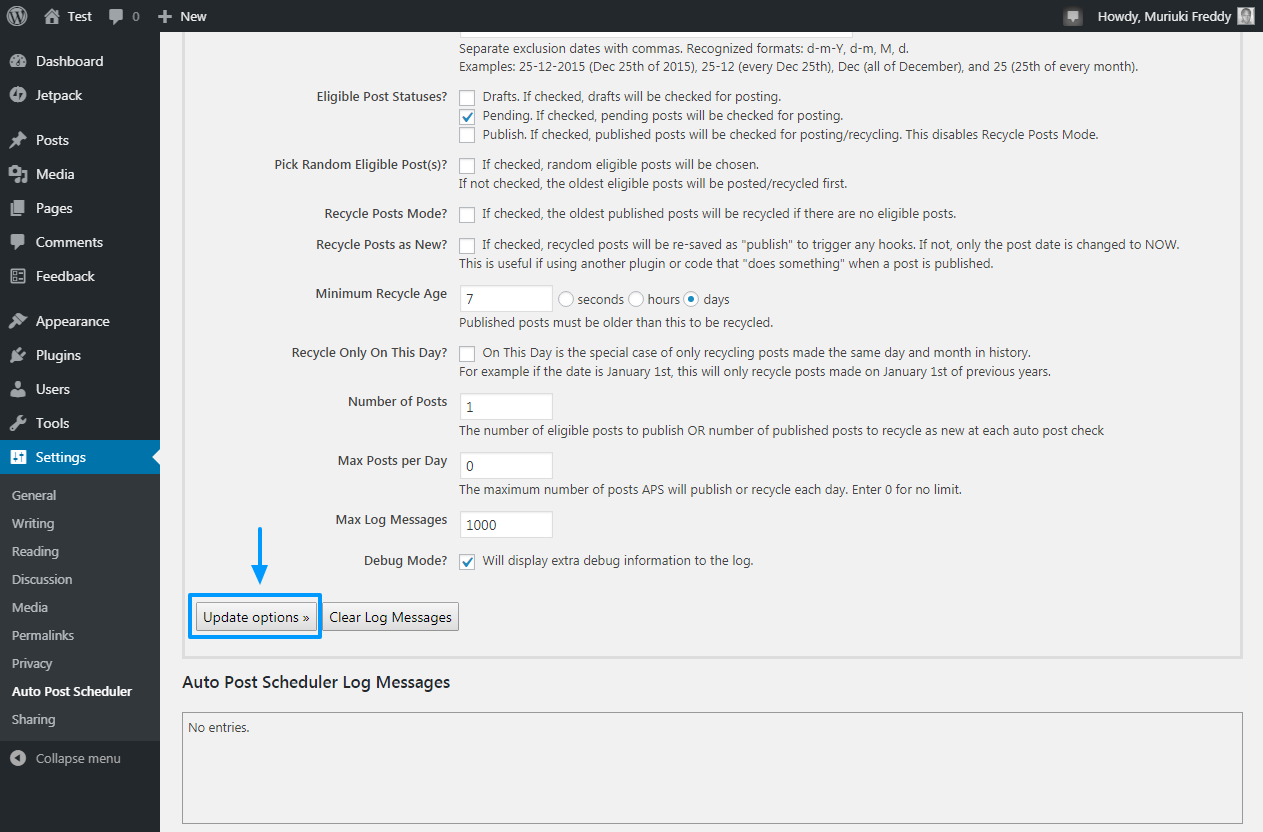
Save your options
Once you choose the desired options, simply click on the Upgrade options button as we highlight below.
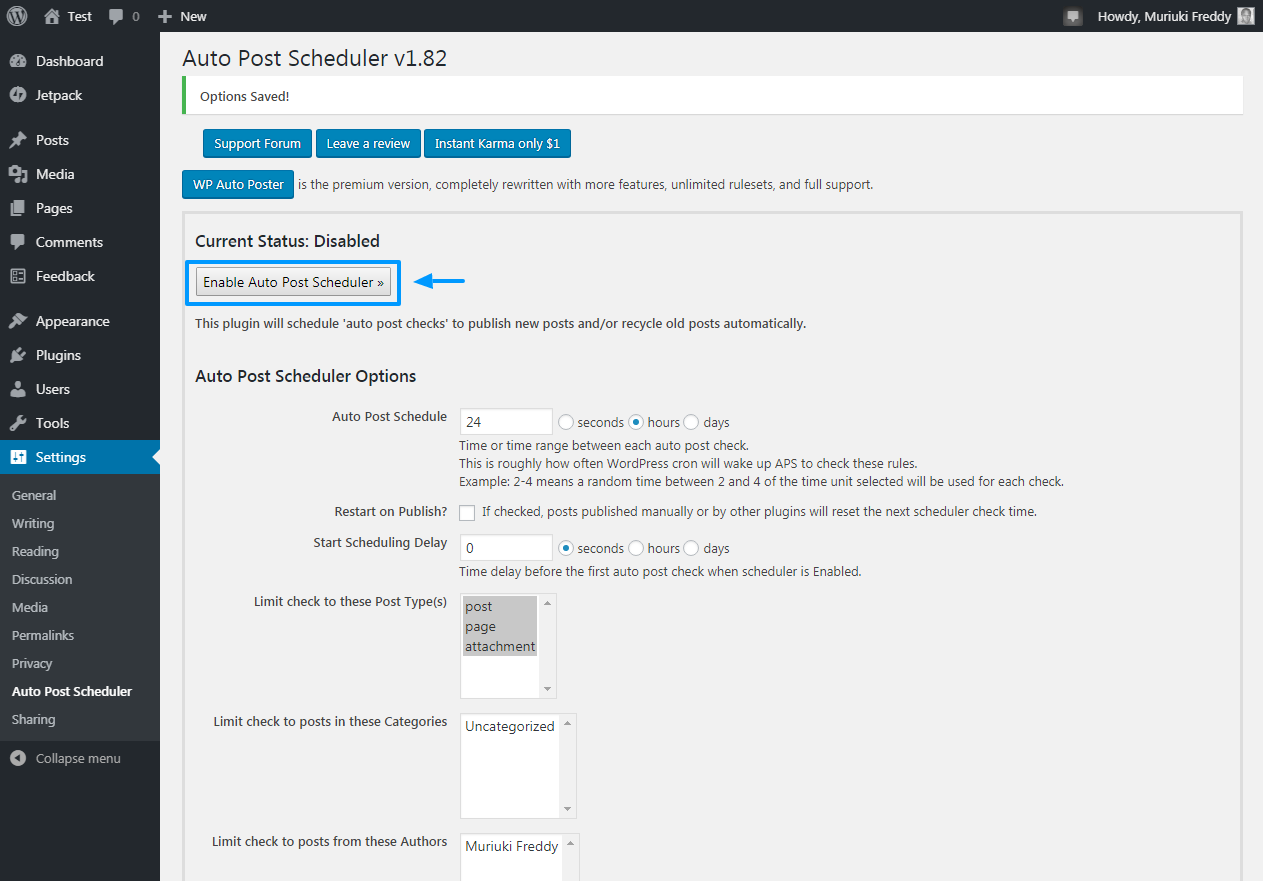
Enabling the Automatic Post Scheduler
In conclusion, and assuming you have not enabled the Automatic Post Scheduler, click on the Enable Automatic Post Scheduler button as shown below.
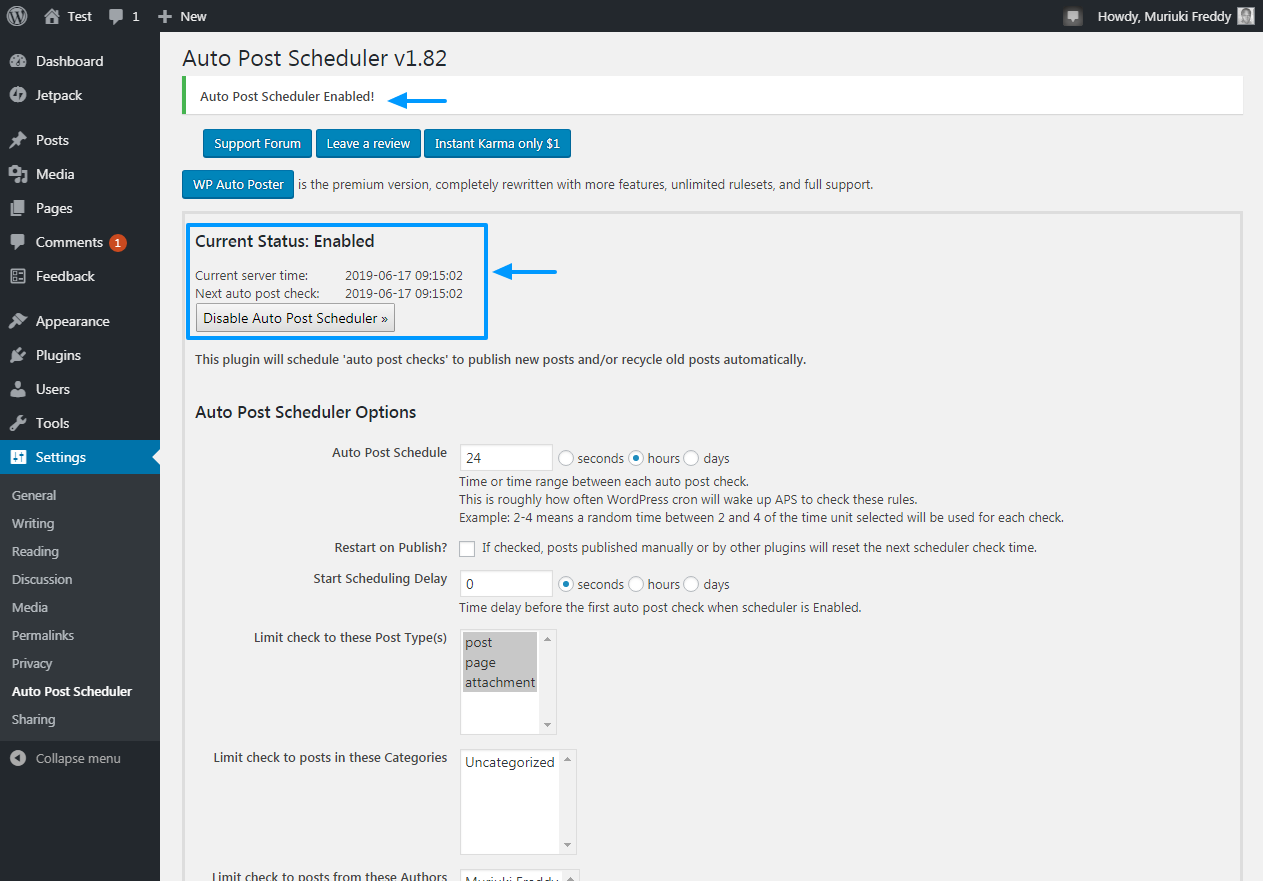
Once you enable the Auto Post Scheduler plugin, you should see the details that we highlighted in the screenshot below.
Como hemos aprendido aquí hoy, la programación masiva de publicaciones de WordPress es muy fácil. Cualquiera que pueda instalar un complemento de WordPress puede configurar el Programador de publicaciones automático y comenzar a programar publicaciones de WordPress de forma masiva como un profesional. ¡Ahora todo lo que tienes que hacer es recordar crear contents!
Bulk schedule your WordPress posts using a different method? Or do you have questions or suggestions? Share with us in the comment section below.
Note: This post has been updated to highlight the Auto Post Scheduler plugin. The original post from 2015 used the Drafts Scheduler plugin which is no longer supported.


