
En esta segunda parte vamos a indagar mas acerca de cómo podemos implementar Node.js con Heroku, para que así puedas realizar tu propia aplicación y llevar a cabo tus proyectos usando estas poderosas herramientas. Si te perdiste la primera parte, checa esto: ¿Cómo implementar Node.js con Heroku o Docker? Parte 1
Declaring application dependencies
Heroku recognizes an application like Node.js by the existence of a file called package.json at root directoryUn directorio raíz (en inglés root directory), es el directorio del nivel más alto de una jerarquía. Además se conoce como documento raíz. Desde esta raíz todos los demás directorios se ramifican. En el caso de las webs, los archivos más necesarios, como las páginas HTML, se encuentran en el directorio raíz del servidor desde el que se solicitará su visualización mediante del navegador. Los directorios raíz además se usan plus.
For your own applications, you can create one by running the following command: npm init --yes.
The demo application you deployed already has a package.json, and it looks like this:
{
"name": "node-js-getting-started",
"version": "0.3.0",
...
"engines": {
"node": "8.11.1"
},
"dependencies": {
"ejs": "^2.5.6",
"express": "^4.15.2"
},
...
}
The file package.json determines both the version of Node.js that will be used to run your application on Heroku, such as the dependencies that need to be installed with your application.
When an application is deployed, Heroku reads this file and installs the appropriate Node version along with the dependencies using the command npm install.
Run this command in your local directory to install the dependencies, this goes to your system to run the application locally:
$ npm install
added 132 packages in 3.368s
Once the dependencies are installed, you are ready to run your application locally.
Running the application locally
Now you must start your application locally using the following command local heroku, which was installed as part of the Heroku CLI:
$ heroku local web
[OKAY] Loaded ENV .env File as KEY=VALUE Format
1:23:15 PM web.1 | Node app is running on port 5000
Like Heroku, local heroku examine the Procfile to determine what to run.
Then open the address httpEl HTTP (Hyper Text Transfer Protocol) es un protocolo que se usa para transmitir datos en redes. HTTP es un estándar técnico generalmente aceptado que establece cómo un cliente web se comunica con un servidor para que los datos solicitados por el cliente puedan ser cargados y mostrados. Información general Junto con el URL y el HTML, HTTP es uno de los conceptos más importantes de Internet (www). Fue desarrollado plus://localhost:5000 in you browserUn navegador (además: browser) es una herramienta informática que te permite ver documentos y datos y navegar por la red. Los navegadores pueden mostrar distintos tipos de recursos de información; principalmente documentos HTML, a pesar de todo, además son posibles otros tipos de archivos y contenido multimedia, como PDF, JPEG, MPEG, GIF o el lenguaje de meta marcado. A través el uso de complementos especiales y la configuración respectivo, los plus web de preferencia. Deberías ver tu aplicación ejecutándose de forma local.
If you want to prevent the application from running locally, in the CLI, press Ctrl + C to go out.
Make local changes
In this step, you will easily learn how to propagate a local change to your application through Heroku. As an example, you will modify the application to add an additional dependency and the code to use it.
Start by adding a dependency for cool-ascii-faces at package.json. To do this, run the following command:
$ npm install cool-ascii-faces
+ [email protected]
added 9 packages in 2.027s
You must modify indexUn index o índice es generalmente un directorio en un orden específico que se usa con fines de orientación. En términos de motores de búsqueda, un índice es la lista de páginas web que es emitido por el motor de búsqueda en respuesta a una solicitud de búsqueda del usuario. Información general La lista que se muestra posteriormente de introducir una solicitud de búsqueda específica se llama SERPs (Search Engine plus.js so that you require this module at startup. It also adds a new path (/ cool) that uses it. Your final code should look like this:
const cool = require('cool-ascii-faces')
const express = require('express')
const path = require('path')
const PORT = process.env.PORT || 5000

express()
.use(express.static(path.join(__dirname, 'public')))
.set('views', path.join(__dirname, 'views'))
.set('view engine', 'ejs')
.get('/', (req, res) => res.render('pages/index'))
.get('/cool', (req, res) => res.send(cool()))
.listen(PORT, () => console.log(`Listening on ${ PORT }`))
Now try locally:
$ npm install
$ heroku local
Visiting your application at http://localhost:5000/cool, you should see pretty faces in every update: (⚆ _ ⚆). 🤗
Now deploy. Almost all deployments on Heroku follow the same pattern. First, add the modified files to the local git repository:
$ git add .
Now commit the changes to the repository:
$ git commit -m "Add cool face API"
Now deploy, just like you did before:
$ git push heroku master
Finally, check that everything works:
$ heroku open cool
You should finally see another face. 😉
Provision supplements
Add-ons are third-party cloud services that provide additional out-of-the-box services for your application, from persistence, through logging, monitoring, and much more.
Por defecto, Heroku almacena 1500 líneas de registros de tu aplicación. Sin embargo, hace que el flujo de registro completo esté disponible como un servicio, y varios proveedores adicionales han escrito servicios de registro que proporcionan cosas como la persistencia de registros, búsqueda y alertas por correo electrónico y SMS¿Qué es SMS o Short Message Service?Servicio que permite el intercambio de mensajes de texto breves, de no más de 160 caracteres, entre terminales de telefonía teléfono celular, fija y otros dispositivos (su envío, por ejemplo, puede realizarse además mediante de algunas plataformas de Internet). Consiste en un sistema ampliamente consolidado, fundamentalmente entre usuarios jóvenes, quienes han desarrollado inclusive un lenguaje propio para su manejo.Acrónimo o abreviatura:SMS: Short Message Service plus.
In this step you will provide one of these registration plugins, called Papertrail.
This is the code for the provision of the plugin for Papertrail registration:
$ heroku addons:create papertrail
Adding papertrail on sharp-rain-871... done, v4 (free)
Welcome to Papertrail. Questions and ideas are welcome ([email protected]). Happy logging!
Use `heroku addons:docs papertrail` to view documentation.
To help prevent abuse, provisioning a plugin requires account verification. If your account has not been verified, you will be prompted to visit the verification site.
Now the plugin is implemented and configured for your application. You can make a list of plugins for your application like this:
$ heroku addons
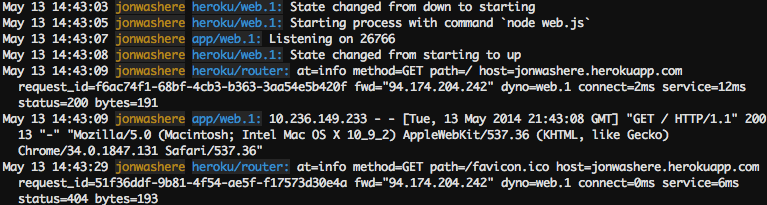
Para ver este complemento en acción, visita la UrlEl URL (Localizador Uniforme de Recursos), es una dirección definida que apunta a la posición de un archivo en un servidor y lo recupera. Las URL se introducen en un navegador web para ingresar a documentos en la web o se incrustan como hipervínculos dentro de un documento. Se puede usar un Permalink para que una URL esté disponible de forma permanente. Componentes de una URL • prefijo de protocolo plus de Heroku de tu aplicación unas cuantas veces. Cada visita generará más mensajes de registro, que ahora deberían ser enviados al complemento del Papertrail. Visita la consola del Papertrail para ver los mensajes de registro, este es el código:
$ heroku addons:open papertrail
Your browser will open a Papertrail web console, displaying the latest log events. The interface allows you to search and configure alerts:
Starting a console
To get a real idea of how power banks work, you can create another unique power bank and run the command bash, which opens a shell on that power bank.
You can then run commands there. Each powerbank has its own ephemeral file space, populated with its application and its dependencies - once the command completes (in this case, bash), the powerbank is removed.
$ heroku run bash
Running 'bash' attached to terminal... up, run.3052
~ $ ls
Procfile README.md composer.json composer.lock vendor views web
~ $ exit
exit
If you get an error, Error connecting to process, you may need to configure your firewall.
Do not forget to write exit to get out of the shell and finish the power bank.
Define configuration vars
Heroku allows you to outsource configuration, storing data such as encryption keys or external resource addresses in config vars.
At run time, configuration vars are exposed as environment variables to the application. For example, modify index.js for you to enter a new path, / times, which repeats an action based on the value of the environment variable TIMES:
app.get('/times', (req, res) => {
let result = ''
const times = process.env.TIMES || 5
for (i = 0; i < times; i++) {
result += i + ' '
}
res.send(result)
})
local heroku configurará automáticamente el entorno basado en el contentsEl contenido puede ser muy difícil de definir con precisión. Es una definición que se refiere a las declaraciones contenidas en un documento o publicación de cualquier tipo y puede incluir las tecnologías de la información y la comunicación. Esto cubre todos los tipos de medios como imágenes y texto. A parte de esto, en el campo de la optimización de motores de búsqueda, los términos duplicar contenido, contenido único, plus from the file .env in your local directory. A file already exists in the top directory of your project .env containing the following contents:
TIMES=2
If you run the application with local heroku, you will see that two numbers are generated each time.
To configure the config var on Heroku, run the following:
heroku config:set TIMES=2
Then you will see the config vars that are configured using heroku config:
$ heroku config
== sharp-rain-871 Config Vars
PAPERTRAIL_API_TOKEN: erdKhPeeeehIcdfY7ne
TIMES: 2
Deploy your modified application on Heroku and then visit it by running heroku open times.
Making the database
El mercado de complementos tiene una gran cantidad de almacenes de datos, desde los proveedores de Redis y MongoDB hasta Postgres y MySQLConcepto de MySQL¿Qué es el programa MySQL?MySQL es un sistema de administración de bases de datos que tiene una doble licencia. Por una parte es de código abierto, pero por otra, tiene una versión comercial gestionada por la compañía Oracle. En este momento, es la base de datos de código abierto más famosa y utilizada en el mundo entero.Como él, podemos hallar otras como la propia Oracle o Microsoft SQL plus. En este paso, agregará una base de datos de desarrollo gratuita de Heroku Postgres Starter Tier a su aplicación.
Add the database:
$ heroku addons:create heroku-postgresql:hobby-dev
Adding heroku-postgresql:hobby-dev... done, v3 (free)
This creates a database and sets an environment variable DATABASE_URL (you can verify this by running the command heroku config).
Use the command npm to install the module pg to your dependencies:
$ npm install pg
+ [email protected]
added 14 packages in 2.108s
"dependencies": {
"cool-ascii-faces": "^1.3.4",
"ejs": "^2.5.6",
"express": "^4.15.2",
"pg": "^7.4.3"
},
Now edit your file index.js to use this module to connect to the database specified in your environment variable DATABASE_URL. Add this near the top:
const { Pool } = require('pg');
const pool = new Pool({
connectionString: process.env.DATABASE_URL,
ssl: true
});
Now add another route, adding the following: / db just after the existing .get ('/',…) as shown in the example:
.get('/db', async (req, res) => {
try {
const client = await pool.connect()
const result = await client.query('SELECT * FROM test_table');
const results = { 'results': (result) ? result.rows : null};
res.render('pages/db', results );
client.release();
} catch (err) {
console.error(err);
res.send("Error " + err);
}
})
This ensures that when you access your application using the path / db, it will return all the rows in the table test_table.
Deploy this to Heroku. If you access / db, you will receive a error since there is no table in the database. Assuming you have Postgres installed locally, use the command heroku pg: psql To connect to the remote database, create a table and insert a row:
$ heroku pg:psql
psql (9.5.2, server 9.6.2)
SSL connection (cipher: DHE-RSA-AES256-SHA, bits: 256)
Type "help" for help.
=> create table test_table (id integer, name text);
CREATE TABLE
=> insert into test_table values (1, 'hello database');
INSERT 0 1
=> q
Congratulations on completing this lesson! 🏅🏆🥇