
Tener instalado un clon de tu Web en local con XAMPP it will help you to make tests and modifications without risk. Learn how install a clone from WordPress en local.
Why install a clone of your website locally with XAMPP?
As we told you in our first XAMPP tutorial:
With WordPress running on XAMPP you can do all kinds of experiments in a Test Environment completely offline (you don't need to pay hosting). If you're like us, we're on the WordPress training roll. And in a lot of projects. Every day we need to test different plugins, tools, alternative pages, or see how an image or text works. Sometimes at the same time it happens that we are in places where the internet is not a possibility. And work cannot be postponed. What do we do in those cases? Easy: We use WordPress running on XAMPP.
What do you need to install a clone of your website locally with XAMPP?
- A computer (we use a Windows PC, although XAMPP is available on all operating systems)
- XAMPP
- WordPress
- An active web hosted remotely, running with the best content manager in the world
- A plugin clonador: We use Duplicator.
What should I do to have a clone of my website locally
To have a clone of our WordPress-based website installed on our computer we need:
- Clone our website
- Install XAMPP on our computer
- Install our clone
In this way we go in parts.
1. How to clone our website
This step is useful not only for the purposes of installing a clone of a website. This is a good way to create backup.
We have already told you about it in:
Cómo crear un backup in WordPress
To clone our website we follow the following steps
- We install and activate Duplicator
- Once the Duplicator It will appear in a new tab on our WordPress dashboard.
- We follow the following route:
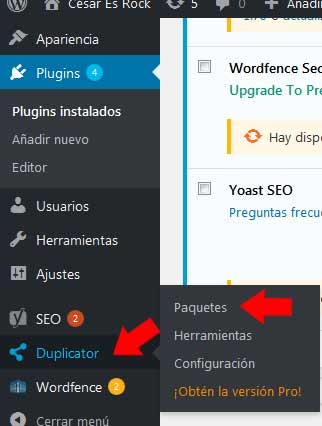
Duplicator> Packages
- We enter: packages
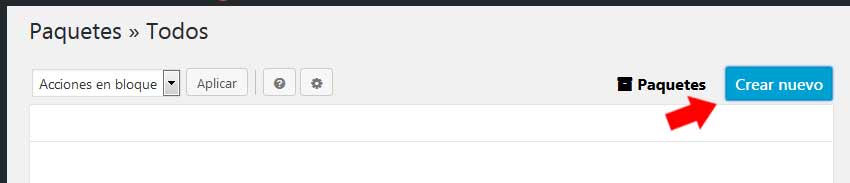
- We click on: Create new.
- In the next window we can rename that will have the files with which we will arm our web clone. We can give it a name like: laotraweb (or whatever we want). We push: Duplicator will begin to analyze our site.
- When the plugin completes the analysis, a window will be loaded where they will indicate that the scan was successful: We press the Build button (build or clone).
- We wait for the package to be built.
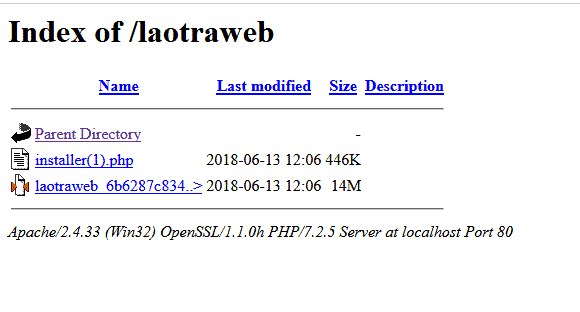
- Upon completion of the clone construction process we download the files: One called install and another with the name that we have chosen in the step 6.
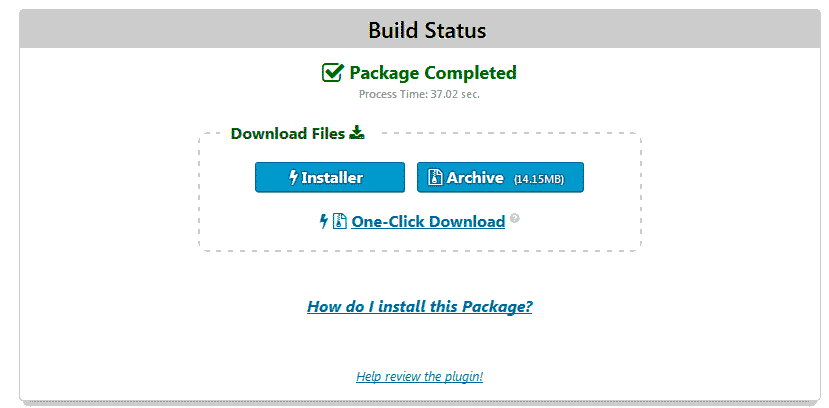
- We have our ready clone files. We can save them as back, we will use them shortly to install our website locally.
The next step is install and configure XAMPP.
Don't worry, it's very easy.
2. How to configure XAMPP?
In our tutorial How to use XAMPP to install WordPress locally we show you how you can install XAMPP, configure it and install WordPress.
The whole process takes 5 to 7 minutes.
The idea is that you create a new database and put it in the same name that you put the clone file of your website (step 6 of how to clone your website). We are using the name for this tutorial: laotraweb. Yes, very original.
3. How to install the clone of your website locally
So you have your website files downloaded from Duplicator ready?
Do you have the XAMPP installed and the database of your clone web created?
- Now we need to install the files for our clone.
To do this on our computer we follow the following route:
C: xampphtdocs
In htdocs we will create a folder where we will host our clone.
We will continue to use the name: laotraweb
http://localhost/laotraweb
- We look for the files that the Duplicator generated for us. One file is called installer and the other (in our case) laotraweb. We copy the files in:
C: xampphtdocslaotraweb
- Abre tú browser y ve a: http://localhost/laotraweb (or whatever name you used to create your database).
Or http: // localhost / your name
- Click on the file install
- You wait for me to analyze the packages, once the analysis is completed you accept the terms and conditions and click: Next.
- The next step is Install the Database. In the database we place the name of our database, en nuestro caso: En Username colocamos: root, we leave the password field blank.
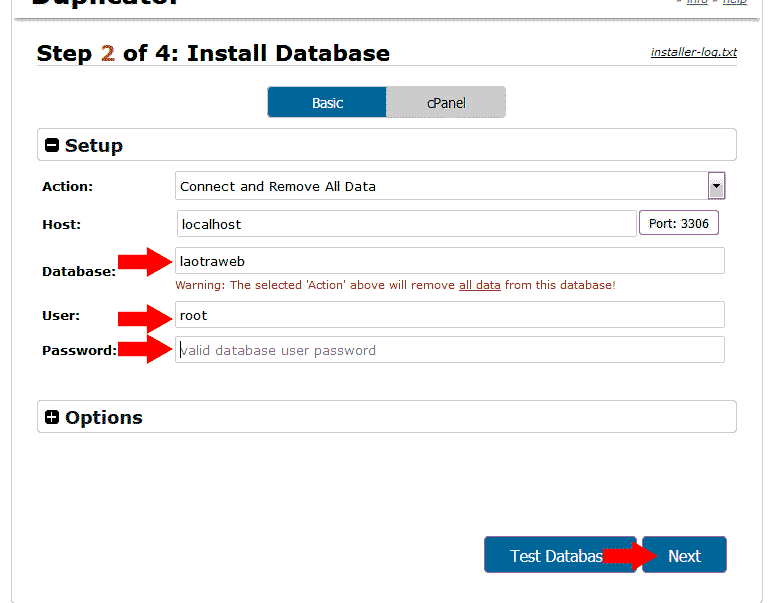
- We press next.
- A window will appear with two options. Take a test or Log in. We give you to log in (login).
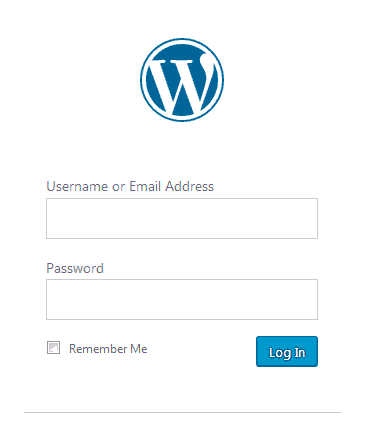
- Now the typical WordPress login window will open (the username and password correspond to the username and password of the website you cloned)
- You log in and you're done.
- You will come across a window that confirms that: your website has been successfully migrated.
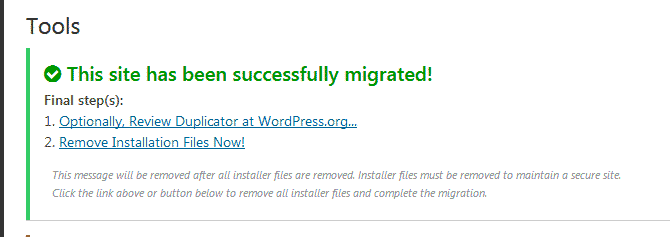
Now you can enjoy having a clone of your website installed locally with XAMPP.
If you want to continue learning you can sign up to the best online WordPress course in Spanish and become an expert.


