
Algunos conceptos básicos para prepararte para un espectro de experiencias inmersivas: virtual reality, realidad aumentada y todo lo demás.
Updated
Las experiencias inmersivas llegaron a la Web en Chrome 79. La API del dispositivo WebXR trae la realidad virtual traída la realidad virtual, mientras que el soporte para la realidad aumentada llega a Chrome 81. Mientras que una actualización de la API GamePad extiende el uso avanzado de controles a la realidad virtual. Otros browsers admitirán estas especificaciones pronto, incluidos Firefox Reality, Oculus Browser, Edge y el browser Helio de Magic Leap, entre otros.
This article begins a series on the immersive web. This installment covers the configuration of a basic WebXR application, as well as the entry and exit of an XR session. Subsequent articles will cover the frame loop (the WebXR experience course of work), the details of augmented reality, and the WebXR Success Test API, a means of detecting surfaces in an AR session. Unless otherwise stated, everything I cover in this article and the following articles applies equally to AR and VR.
What is the immersive web?
Although we use two terms to describe immersive experiences (augmented reality and virtual reality), many think of them on a spectrum from full to fully virtual reality, with degrees of immersion in between. The 'X' in XR is meant to reflect that thought by being a kind of algebraic variable that represents anything on the spectrum of immersive experiences.
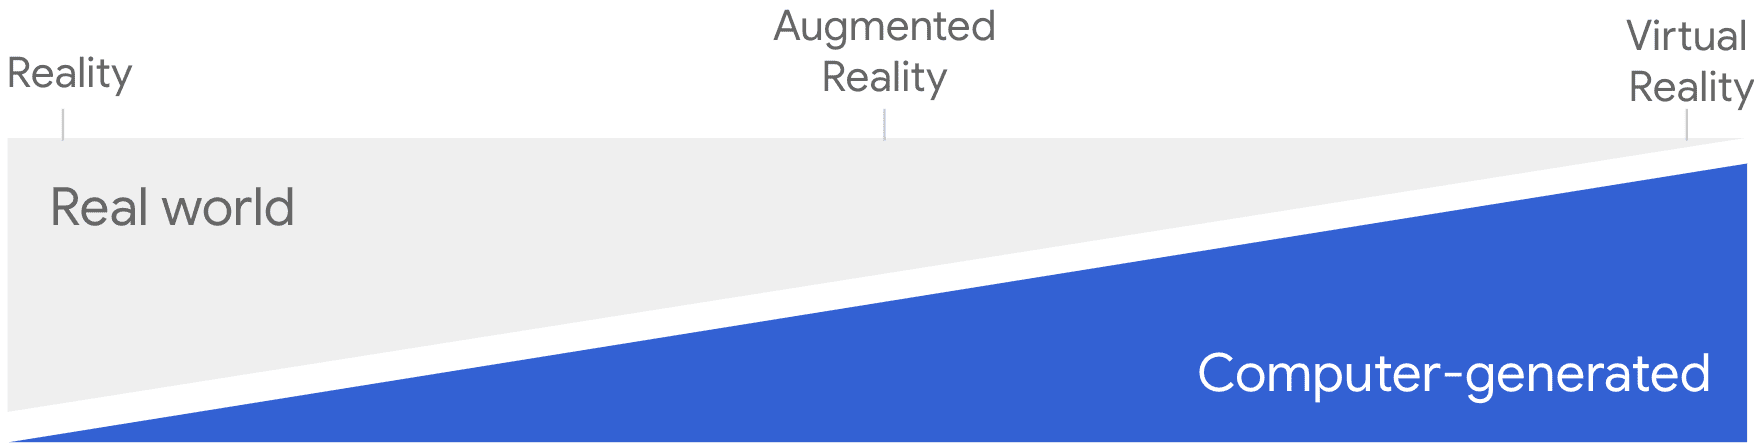
The spectrum of immersive experiences
Examples of immersive experiences include:
- Games
- 360 ° videos
- Traditional 2D (or 3D) videos presented in immersive environments
- Homebuying
- See products in your home before you buy
- Immersive art
- Something cool that no one has thought of yet
Concepts and usage
I will explain some basics of using the WebXR device API. If you need more depth than I have provided, check out the Immersive Web working group WebXR samples or MDN Growing Reference Materials. If you are familiar with the early versions of the WebXR Device API, you should review all of this material. There have been changes.
The code in this article is based on the basic example of the Immersive Web Working Group (manifestation,
source), but is edited for clarity and simplicity.
Parte de la creación de la especificación WebXR ha consistido en desarrollar medidas de seguridad y privacidad para proteger a los usuarios. En consecuencia, las implementaciones deben cumplir con ciertos requisitos. Una página web o aplicación debe estar activa y enfocada antes de que pueda solicitar algo sensible al espectador. Las páginas web o aplicaciones deben servirse a través de HTTPS. La API en sí está diseñada para proteger la información obtenida de sensores y cámaras, que necesita para funcionar.
Request a session
Entrar en una sesión XR requiere un gesto de Username. Para conseguirlo, utilice la detección de funciones para probar XRSystem (via navigator.xr) and make a call to
XRSystem.isSessionSupported (). Note that in Chrome versions 79 and 80,
XRSystem the object was called XR.
In the example below, I indicated that I want a virtual reality session with the 'immersive-vr' type of session. the
other types of sessions
are 'immersive-ar' and 'inline'. Una sesión en línea es para presentar contents within HTML y se usa principalmente para contenido teaser. los Immersive augmented reality session
sample demonstrates this. I will explain it in a later article.
Once I know that VR sessions are supported, I enable a button that allows me to acquire a user gesture.
if (navigator.xr) {
const supported = await navigator.xr.isSessionSupported('immersive-vr');
if (supported) {
xrButton.addEventListener('click', onButtonClicked);
xrButton.textContent = 'Enter VR';
xrButton.enabled = supported;
}
}
Después de habilitar el botón, espero un event de clic y luego solicito una sesión.
let xrSession = null;
function onButtonClicked() {
if (!xrSession) {
navigator.xr.requestSession('immersive-vr')
.then((session) => {
xrSession = session;
xrButton.textContent = 'Exit XR';
onSessionStarted(xrSession);
});
} else {
xrSession.end();
}
}
Notice the hierarchy of objects in this code. It moves from navigator to xr to a XRSession example. In early versions of the API, a script had to request a device before requesting a session. Now the device is acquired implicitly.
Enter a session
After getting a session, I need to start and enter it. But first, I need to configure a few things. A session needs a onend event handler so that the application or web page can be reset when the user exits.
I will also need a element on which to draw my scene. Must be XR compatible
WebGLRenderingContext
or
WebGL2RenderingContext. All drawing is done with them or with a WebGL-based framework like
Three.js.
Now that I have a place to draw, I need a source of content to draw. For that, I create an instance of XRWebGLLayer. I associate it with the canvas calling XRSession.updateRenderState ().
Once I'm in a session, I need a way to determine where things are in VR. I will need a reference space. A 'local-floor' The reference space is one in which the origin is close to the viewer and the y-axis is 0 at ground level and is not expected to move. exist other types of reference spaces, but that's a more complicated topic than I can tackle here. I save the reference space in a variable because I will need it when I draw on the screen.
function onSessionStarted(xrSession) {
xrSession.addEventListener('end', onSessionEnded);let canvas = document.createElement('canvas');
webGLRenContext = canvas.getContext('webgl', { xrCompatible: true });
xrSession.updateRenderState({
baseLayer: new XRWebGLLayer(xrSession, webGLRenContext)
});
xrSession.requestReferenceSpace('local-floor')
.then((refSpace) => {
xrRefSpace = refSpace;
xrSession.requestAnimationFrame(onXRFrame);
});
}
After getting a referral space, I call XRSession.requestAnimationFrame (). This is the beginning of the virtual content presentation, which takes place in the frame loop.
Run a frame loop
The raster loop is an infinite user-agent controlled loop in which content is repeatedly drawn on the screen. Content is drawn in discrete blocks called frames. The succession of frames creates the illusion of movement. For VR applications, the frames per second can range from 60 to 144. AR for Android runs at 30 frames per second. Your code shouldn't assume any particular frame rate.
The basic process for the frame loop is:
- Call
XRSession.requestAnimationFrame (). En respuesta, el user agent invoca elXRFrameRequestCallback, which you define. - Inside your callback function:
- Call
XRSession.requestAnimationFrame ()again. - Get the pose of the viewer.
- Pass ('link') the
WebGLFramebufferfrom theXRWebGLLayerto theWebGLRenderingContext. - Iterate over each
XRViewobject, retrieving itsXRViewportfrom theXRWebGLLayerand pass it on toWebGLRenderingContext. - Draw something in the framebuffer.
- Call
The remainder of this article describes step 1 and part of step 2, configuring and calling the XRFrameRequestCallback. The remaining items from Step 2 are covered in Part II.
The XRFrameRequestCallback
the XRFrameRequestCallback it is defined by you. It takes two parameters: a
DOMHighResTimeStamp and a XRFrame example. the XRFrame The object provides the information necessary to render a single frame on the screen. the
DOMHighResTimeStamp The argument is for future use.
Antes de hacer cualquier otra cosa, voy a solicitar el siguiente cuadro de animación. Como se indicó anteriormente, el agente de usuario determina la sincronización de las tramas en función del hardware subyacente. Solicitar el siguiente marco primero asegura que el bucle del marco continúa si algo durante la devolución de llamada arroja un error.
function onXRFrame(hrTime, xrFrame) {
let xrSession = xrFrame.session;
xrSession.requestAnimationFrame(onXRFrame);
}
At this point, it is time to draw something for the viewer. That's a discussion for part II. Before going there, let me show you how to end a session.
Log out
An immersive session can end for a number of reasons, including ending with your own code by calling XRSession.end (). Other causes include the headset being disconnected or being taken over by another app. This is why a well-behaved application should monitor end event. When it happens, drop the session and its related render objects. A finished immersive session cannot be resumed. To re-enter the immersive experience, my application must start a new session.
Remember to have entered a session that during setup, I added a onend event handler.
function onSessionStarted(xrSession) {
xrSession.addEventListener('end', onSessionEnded);
}
Inside the event handler, restore the state of the application before the user entered a session.
function onSessionEnded(event) {
xrSession = null;
xrButton.textContent = 'Enter VR';
}
conclusion
I have not explained everything you need to write an XR or AR Web application. Hopefully, I've given you enough to start to understand the code for yourself and enough to start experimenting. In the next article, I will explain the frame cycle, which is where content is drawn on the screen.
Photo by JESHOOTS.COM in Unsplash