With the Posts Widget you can display a list of any post types, including custom post types, in various layouts and ways. This practical widget can be used to display posts from a particular category or other taxonomy, recent posts, and more.
Classic Skin
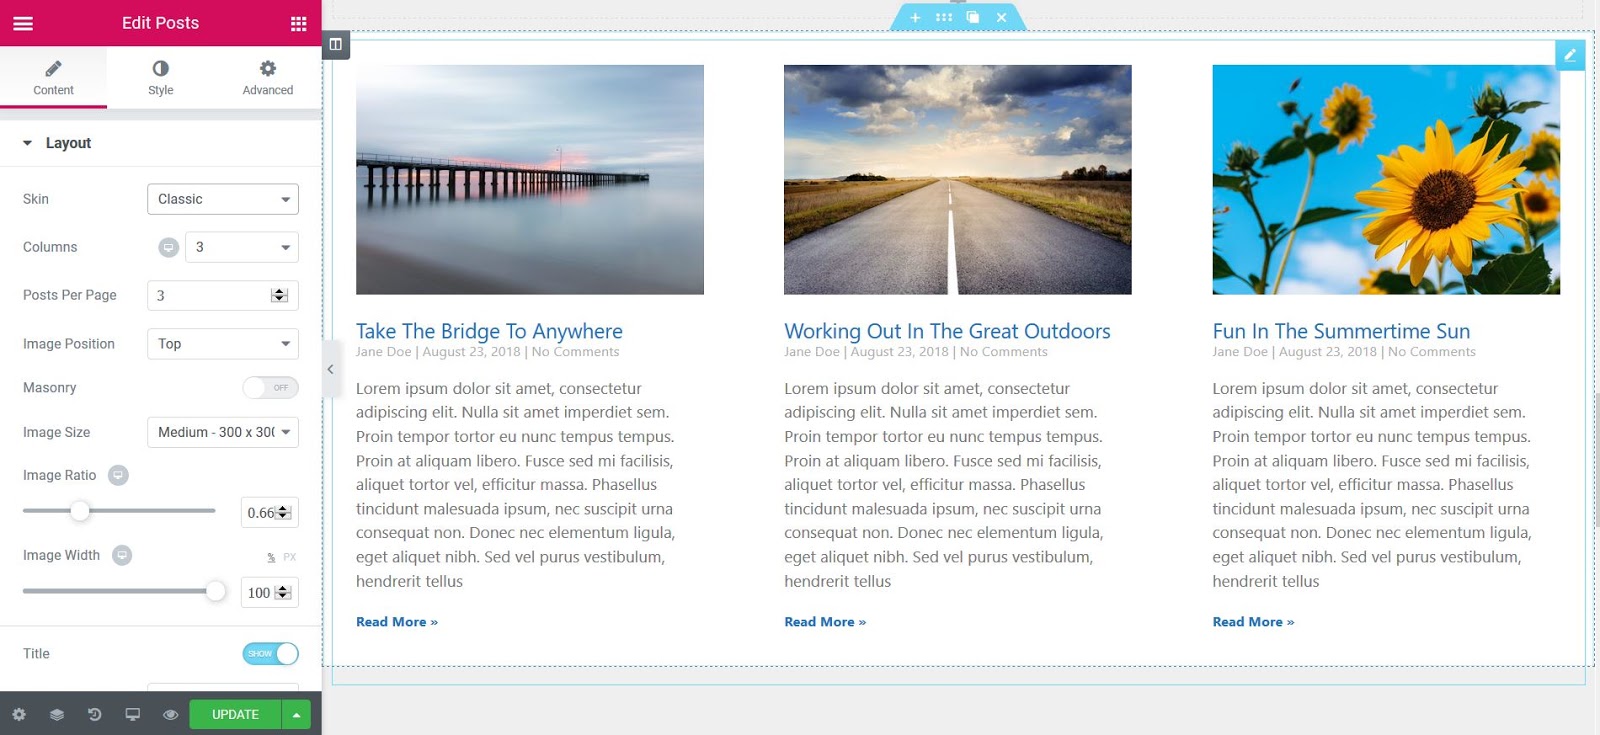
The Classic skin is a fully customizable layer template that gets applied to the Posts widget, giving your posts a traditional design style.

Content
Layout
- Skin: Select a pre-designed skin, either Classic, Cards, or Full Content
- Columns: Set how many columns will be displayed, from 1 to 6
- Posts Per Page: Set the exact amount of posts displayed
- Image Position: Set the image position, relative to the content. Options include: Top / left / right / none. *See Note below for instructions to set image position on mobile.
- Masonry: Slide on or off
- Image Size: Set the size of the image, from thumbnail to full
- Image Ratio: Set the exact ratio of the images
- Image Width: Set the exact width of the images
- Title: Choose to show or hide the title
- Title HTML Tag: Select the HTML tag to use for the title, from H1 to H6, or div, span, or p
- Excerpt: Choose to show or hide the excerpt
- Excerpt Length: Choose the length of the excerpt, setting the exact amount of words displayed
- Meta Data: Select the meta data to be displayed in the widget. A click on the field opens the list of options. The options include author, date, time and comments
- Separator Between: Choose the separator you want to use between the meta data
- Read More: Show or hide the Read More button
- Read More Text: Customize the Read More text
- Open in New Window: Choose Yes to open posts in a new tab.
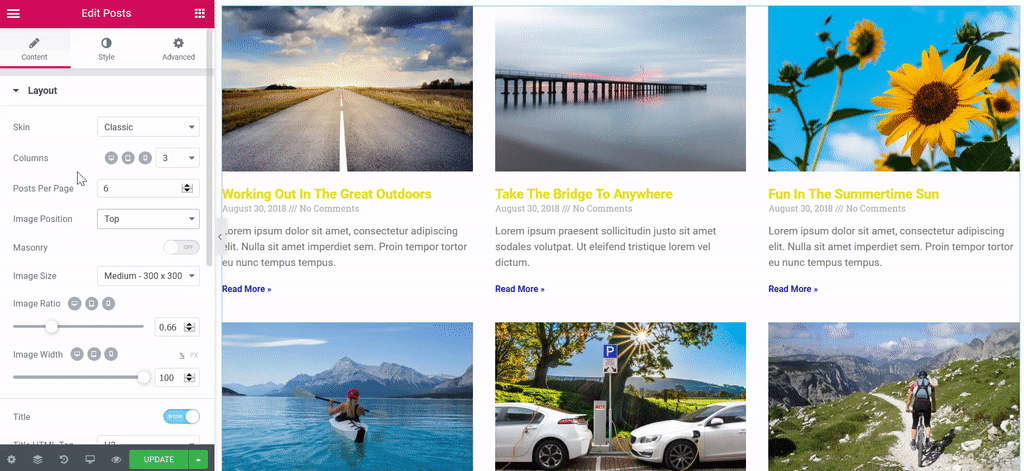
Note: Adjust Image Width and Image Ratio in desktop and mobile view as shown below.
Note: In regards to the Posts Per Page option, please be aware that the Posts widget will load all sticky posts + the number of posts per page that you set in the Posts Per Page option. This is how WordPress fundamentally treats sticky posts. For example, if you set Posts Per Page = 1 but you have 5 sticky posts, then the total number of posts loaded on the front end would be 6 (1+5=6}.
Note: When Elementor displays a post, if it has no excerpt, Elementor automatically generates an excerpt from the post’s content. The Excerpt Length option allows you to control the length of this auto-generated excerpt. However, the excerpt length only applies to posts in which no manual excerpt has been entered. The length specified in the Elementor widget is ignored if a manually-generated excerpt exists for a post.
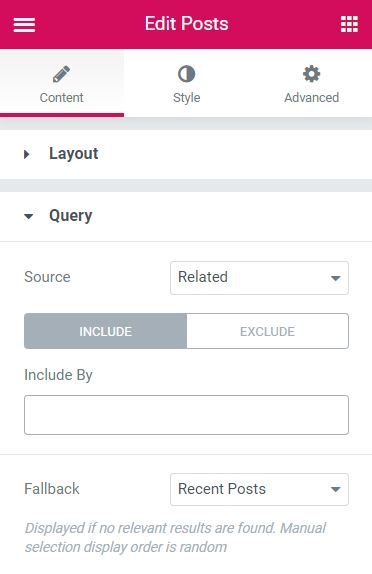
Query
Source: Select the source from which the widget will display the content. Options include Posts, Pages, Custom post types if available, Manual Selection, Current Query, and Related. Depending upon which source you’ve chosen for the query, you’ll be given options which allow you to filter the results.
Include
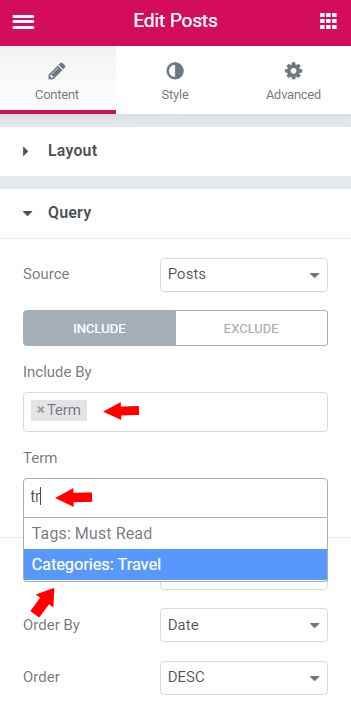
- Include By: Term or Author, then use Search and Select to choose which ones to use. Terms include all of the items in a taxonomy. The available taxonomies are: categories, tags, formats and custom taxonomies.
- Date: Select from All, Past Day, Past Week, Past Month, Past Quarter, Past Year, Custom (Choose Before or After dates)
- Order By: Set the order in which the posts will be displayed. Options include: Date, Title, Menu Order, or Random
- Order: DESC (descending) or ASC (ascending)
- Ignore Sticky Posts: Yes or No (Sticky Posts option works only if zero terms have been selected)
- Query ID: Give your Query a custom unique ID to allow server side filtering
Note: Choosing Related as the Source and Category as the Include By term will display posts related to the category assigned to the current post being displayed. So if the user is viewing a post in the Travel category, for example, the page will show Related posts which are also in the Travel category. If the post currently displayed has multiple categories assigned to it, the Related posts will pull posts from the FIRST category (alphabetically) assigned to the post. Important Exception: Keep in mind that if you set a Fallback for Related Posts, it will not take the query into account. Once you select a fallback as shown below, it will pull and display all the latest posts.
Exclude
These settings become available once you select Exclude
- Exclude By: Current Post, Manual Selection, Term, or Author, then use Search and Select for Manual,Term, or Author choices
- Avoid Duplicates: Yes or No – Choose Yes to avoid displaying duplicate posts on the frontend only. Elementor looks for duplicates at the page level (not at the widget level) given that there cannot be duplicates in a Posts widget.
- Offset: Use this setting to skip over posts (e.g. «2» to skip over 2 posts).
- Date: All, Past Day, Past Week, Past Month, Past Quarter, Past Year, Custom (Choose Before or After dates)
- Order By: Date, Title, Menu Order, or Random
- Order: DESC (descending) or ASC (ascending)
- Ignore Sticky Posts: Yes or No (Sticky Posts option works only if zero terms have been selected)
- Query ID: Give your Query a custom unique ID to allow server side filtering. See the developer docs for more information on how to use this advanced feature.
Pagination
Pagination: Choose how you wish to paginate the results. Options include None, Numbers, Previous/Next, or Numbers + Previous/Next.
Style
Layout
- Columns Gap: Set the exact gap between the columns
- Rows Gap: set the exact gap between the rows
- Alignment: Set the alignment of the content in the widget as left, center or right
Box
- Border Width: Set the thickness of the border around the post’s box
- Border Radius: Set the roundness of the border corners of the post’s box
- Padding: Set the padding within the border of the post box
- Content Padding: Add additional padding around just the content of the post box
- Box Shadow: Set the box shadow options around the post box for both normal and hover modes
- Background Color: Choose the background color of the post box for both normal and hover modes
- Border Color: Choose the border color of the post box for both normal and hover modes
Image
- Border Radius: Set the roundness of the edges of the images
- Spacing: Set the exact spacing between the image and the content
- CSS Filters: Adjust the image style by changing the CSS Filter scales for Blur, Brightness, Contrast, Saturation, and Hue settings
Content
Title
- Color: Set the color of the titles
- Typography: Set the typography of the titles
- Spacing: Set the spacing between the title and the content
Meta
- Color: Set the color of the meta data
- Separator Color: Set the color of the meta data separator
- Typography: Set the typography for the meta data
- Spacing: Set the spacing between the meta data and the excerpt
Excerpt
- Color: Set the color of the excerpt
- Typography: Set the typography of the excerpt
- Spacing: Set the spacing between the excerpt and the read more
Read More
- Color: Set the color of the read more
- Typography: Set the typography for the read more text
- Spacing: Set the spacing between the read more text and the bottom of the post box
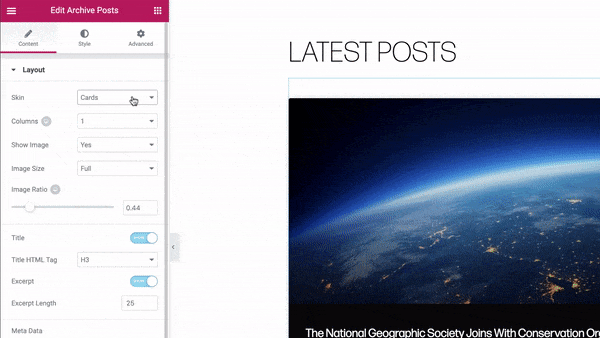
Cards Skin
The Cards Skin is a customizable pre-designed layer template that gets applied to the Posts widget, giving your posts a trendy material design style.

Read more about the Cards skin
Content
Layout
- Skin: Select a pre-designed skin, either Classic, Cards, or Full Content
- Columns: Set how many columns will be displayed, from 1 to 6
- Posts Per Page: Set the exact amount of posts displayed
- Show Image: Choose to show or hide the featured image
- Masonry: Slide on or off
- Image Size: Set the size of the image, from thumbnail to full
- Image Ratio: Set the exact ratio of the images
- Title: Choose to show or hide the title
- Title HTML Tag: Select the HTML tag to use for the title, from H1 to H6, or div, span, or p
- Excerpt: Choose to show or hide the excerpt
- Excerpt Length: Choose the length of the excerpt, setting the exact amount of words displayed
- Meta Data: Select the meta data to be displayed in the widget. A click on the field opens the list of options. The options include author, date, time and comments
- Separator Between: Choose the separator you want to use between the meta data
- Read More: Show or hide the Read More button
- Read More Text: Customize the Read More text
- Badge: Show or hide the Badge. The badge lets you show the category, tag or other taxonomy inside the card
- Avatar: Show or hide the user avatar of the post’s author
Note: In regards to the Posts Per Page option, please be aware that the Posts widget will load all sticky posts + the number of posts per page that you set in the Posts Per Page option. This is how WordPress fundamentally treats sticky posts. For example, if you set Posts Per Page = 1 but you have 5 sticky posts, then the total number of posts loaded on the frontend would be 6 (1+5=6}.
Note: When Elementor displays a post, if it has no excerpt, Elementor automatically generates an excerpt from the post’s content. The Excerpt Length option allows you to control the length of this auto-generated excerpt. However, the excerpt length only applies to posts in which no manual excerpt has been entered. The length specified in the Elementor widget is ignored if a manually-generated excerpt exists for a post.
Query
Source: Select the source from which the widget will display the content. Options include Posts, Pages, Custom post types if available, Manual Selection, Current Query, and Related. Depending upon which source you’ve chosen for the query, you’ll be given options which allow you to filter the results.
Include
- Include By: Term or Author, then use Search and Select to choose which ones to use. Terms include all of the items in a taxonomy. The available taxonomies are: categories, tags, formats and custom taxonomies.
- Date: Select from All, Past Day, Past Week, Past Month, Past Quarter, Past Year, Custom (Choose Before or After dates)
- Order By: Set the order in which the posts will be displayed. Options include: Date, Title, Menu Order, or Random
- Order: DESC (descending) or ASC (ascending)
- Ignore Sticky Posts: Yes or No (Sticky Posts option works only if zero terms have been selected)
- Query ID: Give your Query a custom unique ID to allow server side filtering
Note: Choosing Related as the Source and Category as the Include By term will display posts related to the category assigned to the current post being displayed. So if the user is viewing a post in the Travel category, for example, the page will show Related posts which are also in the Travel category. If the post currently displayed has multiple categories assigned to it, the Related posts will pull posts from the FIRST category (alphabetically) assigned to the post. Important Exception: Keep in mind that if you set a Fallback for Related Posts, it will not take the query into account. Once you select a fallback as shown below, it will pull and display all the latest posts.
Exclude
These settings become available once you select Exclude
- Exclude By: Current Post, Manual Selection, Term, or Author, then use Search and Select for Manual,Term, or Author choices
- Avoid Duplicates: Yes or No – Choose Yes to avoid displaying duplicate posts on the frontend only. Elementor looks for duplicates at the page level (not at the widget level) given that there cannot be duplicates in a Posts widget.
- Offset: Use this setting to skip over posts (e.g. «2» to skip over 2 posts)
- Date: Select from All, Past Day, Past Week, Past Month, Past Quarter, Past Year, Custom (Choose Before or After dates)
- Order By: Date, Title, Menu Order, or Random
- Order: DESC (descending) or ASC (ascending)
- Ignore Sticky Posts: Yes or No (Sticky Posts option works only if zero terms have been selected)
- Query ID: Give your Query a custom unique ID to allow server side filtering. See the developer docs for more information on how to use this advanced feature.
Pagination
Pagination: Choose how you wish to paginate the results. Options include None, Numbers, Previous/Next, or Numbers + Previous/Next.
Style
Layout
- Columns Gap: Set the exact gap between the columns
- Rows Gap: set the exact gap between the rows
- Alignment: Set the alignment of the content in the widget as left, center or right
Card
- Background Color: Choose the background color of the card
- Border Color: Choose the border color of the card
- Border Width: Set the thickness of the border around the card
- Border Radius: Set the roundness of the border corners of the card
- Horizontal Padding: Set the horizontal padding of the card’s content
- Vertical Padding: Set the vertical padding of the card’s content
- Box Shadow: Choose Yes to apply a pre-defined box shadow to the card
- Hover Effect: Select a hover effect, either None or Gradient
- Meta Border Color: Choose the border color above the meta data
Image
- Spacing: Set the exact spacing between the image and the content
- CSS Filters: Adjust the image style by changing the CSS Filter scales for Blur, Brightness, Contrast, Saturation, and Hue settings
Badge
- Badge Position: Align badge to the left or right of the card
- Background Color: Choose the background color of the badge
- Text Color: Choose the text color of the badge
- Border Radius: Set the border radius to control corner roundness
- Size: Set the size of the badge
- Margin: Control the distance of the badge from the top and side of the card
- Typography: Set the typography of the badge text
Avatar
Size: Set the size of the avatar.
Content
Title
- Color: Set the color of the titles
- Typography: Set the typography of the titles
- Spacing: Set the spacing between the title and the content
Meta
- Color: Set the color of the meta data
- Separator Color: Set the color of the meta data separator
- Typography: Set the typography for the
meta data
- Spacing: Set the spacing between the
meta data
Excerpt
- Color: Set the color of the excerpt
- Typography: Set the typography of the excerpt
- Spacing: Set the spacing between the excerpt and the read more
Read More
- Color: Set the color of the read more
- Typography: Set the typography for the read more text
- Spacing: Set the spacing between the read more text and the bottom of the post box
Full Content Skin
The Full Content Skin allows you to display the entire post’s content on your post list pages.
Content
Layout
- Skin: Select a pre-designed skin, either Classic, Cards, or Full Content
- Posts Per Page: Set the exact amount of posts displayed
- Show Thumbnail: Choose Yes or No to show or hide the featured image
- Image Size: Set the size of the featured image, from thumbnail to full
- Image Ratio: Set the exact ratio of the featured image
- Image Width: Set the width of the featured image
- Title: Choose to show or hide the title
- Title HTML Tag: Select the HTML tag to use for the title, from H1 to H6, or div, span, or p
- Meta Data: Select the meta data to be displayed in the widget. A click on the field opens the list of options. The options include author, date, time and comments
- Separator Between: Enter the separator character(s) you wish to use between the meta data
Note: In regards to the Posts Per Page option, please be aware that the Posts widget will load all sticky posts + the number of posts per page that you set in the Posts Per Page option. This is how WordPress fundamentally treats sticky posts. For example, if you set Posts Per Page = 1 but you have 5 sticky posts, then the total number of posts loaded on the frontend would be 6 (1+5=6}.
Query
Source: Select the source from which the widget will display the content. Options include Posts, Pages, Custom post types if available, Manual Selection, Current Query, and Related. Depending upon which source you’ve chosen for the query, you’ll be given options which allow you to filter the results.
Include
- Include By: Term or Author, then use Search and Select to choose which ones to use. Terms include all of the items in a taxonomy. The available taxonomies are: categories, tags, formats and custom taxonomies.
- Date: Select from All, Past Day, Past Week, Past Month, Past Quarter, Past Year, Custom (Choose Before or After dates)
- Order By: Set the order in which the posts will be displayed. Options include: Date, Title, Menu Order, or Random
- Order: DESC (descending) or ASC (ascending)
- Ignore Sticky Posts: Yes or No (Sticky Posts option works only if zero terms have been selected)
- Query ID: Give your Query a custom unique ID to allow server side filtering
Note: Choosing Related as the Source and Category as the Include By term will display posts related to the category assigned to the current post being displayed. So if the user is viewing a post in the Travel category, for example, the page will show Related posts which are also in the Travel category. If the post currently displayed has multiple categories assigned to it, the Related posts will pull posts from the FIRST category (alphabetically) assigned to the post. Important Exception: Keep in mind that if you set a Fallback for Related Posts, it will not take the query into account. Once you select a fallback as shown below, it will pull and display all the latest posts.
Exclude
These settings become available once you select Exclude
- Exclude By: Current Post, Manual Selection, Term, or Author, then use Search and Select for Manual,Term, or Author choices
- Avoid Duplicates: Yes or No – Choose Yes to avoid displaying duplicate posts on the frontend only. Elementor looks for duplicates at the page level (not at the widget level) given that there cannot be duplicates in a Posts widget.
- Offset: Use this setting to skip over posts (e.g. «2» to skip over 2 posts)
- Date: Select from All, Past Day, Past Week, Past Month, Past Quarter, Past Year, Custom (Choose Before or After dates)
- Order By: Date, Title, Menu Order, or Random
- Order: DESC (descending) or ASC (ascending)
- Ignore Sticky Posts: Yes or No (Sticky Posts option works only if zero terms have been selected)
- Query ID: Give your Query a custom unique ID to allow server side filtering. See the developer docs for more information on how to use this advanced feature.
Pagination
Pagination: Choose how you wish to paginate the results. Options include None, Numbers, Previous/Next, or Numbers + Previous/Next.
Style
Box
- Border Width: Set the thickness of the border around the box
- Border Radius: Set the roundness of the border corners of the box
- Padding: Set the padding of the entire box
- Content Padding: Set the padding of just the box’s content
- Box Shadow: Choose Yes to apply a pre-defined box shadow to the box
- Background Color: Select a box color, for Normal and Hover states
- Border Color: Choose the border color of the box for Normal and Hover states
Image
- Border Radius: Set the roundness of the corners for the featured image
- Spacing: Set the exact spacing between the featured image and the content
- CSS Filters: Adjust the featured image style by changing the CSS Filter scales for Blur, Brightness, Contrast, Saturation, and Hue settings
Content
Title
- Color: Set the color of the titles
- Typography: Set the typography of the titles
- Spacing: Set the spacing between the title and the content
Meta
- Color: Set the color of the meta data
- Separator Color: Set the color of the meta data separator
- Typography: Set the typography for the
meta data
- Spacing: Set the spacing between the
meta data