

WordPress was initially built to be a simple blogging system that made it easy to post content online. Over time, it has morphed into a complete content management system (CMS). Users now have complete control over the design and functionality of their WordPress websites. Regardless, without content, design and function mean nothing, and in that sense, WordPress stays true to its roots: content creation and management.
Although many functions have been integrated into the WordPress base software, content creation is still its main driving force. With that in mind, let's take a closer look at the WordPress visual editor in this post and how you can best use it.
WYSIWYG
WordPress allows you to create and manage content visually rather than directly encoding it in your files. Thus, it is called a WYSIWYG editor or "What you see is what you get" for the uninitiated. The editing tool has three parts:
- Visual editor
- Text editor (where you can enter code)
- Media Uploader (to upload image files)
By default, the Visual Editor is active when you are creating a new post or page (pages > Add new or Publications > Add new). If by any chance it is not active, click on it:
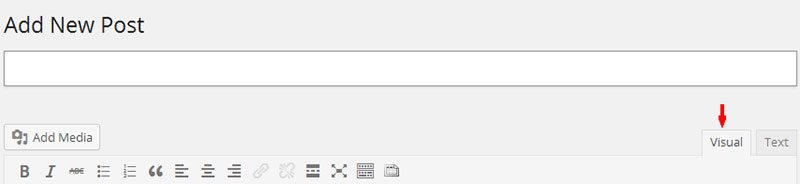
WYSIWYG means that what you see in the Visual Editor while editing your post is what will appear in the published post. The Text Editor allows you to enter plain text and also allows you to enter code (HTML markup) directly as if you were working with the actual HTML file. You activate it by clicking on the Text tab at the far right of the editor:

Media Uploader does exactly that - it uploads media files to Media Library so you can insert them into your posts however you want:

With this short introduction to WordPress' powerful visual editor, let's now see how you can use a few key buttons to create and edit content. I'm using the Blogger theme from our gift collection for illustrations.
Add text
The first thing is to open a new page or post and open the visual editor: Go to Publications > Add new. By default, you will see a condensed toolbar when creating a new post:

Click on the Kitchen Sink icon to reveal other formatting options on the toolbar:

For basic content creation and management, the above format alternatives will work fine. Even if you are new to WordPress, most of the icons will be familiar to other text editors like Microsoft Word. Actually all icons on the visual editor toolbar perform the same function as identical icons in Microsoft Word, therefore I have chosen the less familiar ones to discuss.
To add text, you basically write your content in the editor window. Regardless, sometimes it is feasible that your content has already been typed somewhere, and in that case, you can basically paste it as plain or Word-formatted text using these buttons on the toolbar:

Using this path is quick and the visual editor does a good job of preserving much of your Word formatting, better than standard copy and paste, at least. Regardless, as you will soon discover, it is not a flawless job and can sometimes end up with shredded text. I find it much easier to paste as plain text and then format within the visual editor.
Clear your text formatting
As we have seen or as you will see when you experiment with these formatting buttons, the visual editor has weaknesses when it comes to handling formatted text imported from other text editors. In this way, you may find that working with plain old text is the best thing to do. This is the button you should use to clear the formatting of the imported text:

Highlight your text and click that button. Your text will now have the default format of your theme. Note that this button does not work for some types of formatting, such as block quotes and headings. There are other formatting buttons that take care of those types.
Change the type of text
You will have various types of text in your document, including paragraphs and headings. To change your text type, highlight the portion of text you want to modify and click the formatting drop-down menu at the far left of the editor toolbar. Select the format you want and you're done:
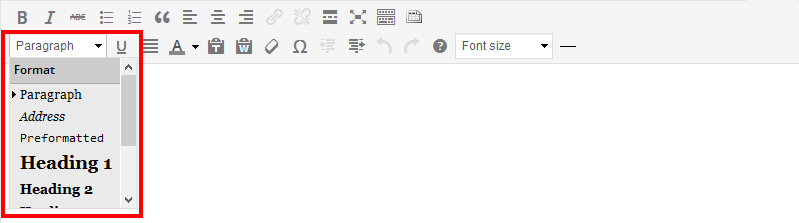
You can of course format your posts any way you like, but make sure there is some structure in place for consistency. Section headings, for example, should have the same heading format, such as Title 2, while the main header is usually Title 1. At the same time, the standard paragraph text should be formatted by default, as well as the pre-formatted text and addresses.
Remember: the default formats for different types of text depend on your theme. Each theme comes with its own default style for the types you see in the format drop-down box.
Use the Paragraph type in the drop-down box to clear the formatting of the headers, since Clear format The button does not work for headings and bulk citations.
Use the Blockquote To format or delete the bulk citation format:

Full screen editing

If you like to work with minimal distractions, you will find the ideal full screen mode for you and this is the button that activates it. It basically closes all the nonessential stuff on the screen and leaves you with just the content box and a condensed toolbar that automatically hides and appears when you hover over the page.
Insert more label

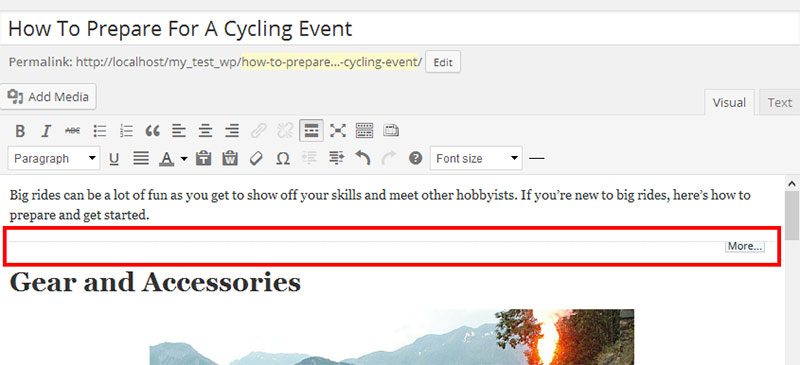
Although this is an often overlooked visual editor feature, it comes in handy when it comes to displaying excerpts from your blog posts. As you already know, if you have published posts on your blog, WordPress displays excerpts from these posts on the home pages and archives. Regardless, WordPress truncates excerpts randomly and this could be in the middle of a sentence.
This is where the ingenious Insert more The tag function is useful. It allows you to specify precisely where the statement will end up. A link will be inserted pointing to the full post where you specified the excerpt to end. There are many ways to format this tag, but remember that by default it only works for posts (not pages):
Note: Using the Insert more tag is based on the support of the chosen theme. Most of the carefully developed themes support it, but some do not.
Add and remove links

Inserting and deleting links is also easy with these buttons. They are inactive by default until you highlight the text you want to convert into the link. The button on the left adds a link, while the button on the right removes the links.
Special characters

If you've ever used the special characters button in Word, this should also be familiar to you. Despite everything, this one is more intuitive since it shows the HTML and NUM codes of a character when hovering over it:

If you're a regular WordPress user, you're probably already familiar with most of the things we've seen above, but for new WordPress users, this should be a useful starter guide to the visual WordPress editor; its capabilities as well as its limitations.
Also, I would like to hear from you how you use the visual editor. Do you have any tips or tricks you would like to share?


