

One of the advantages of using WordPress is that it allows you to have everything you need for your business, online store or personal blog in a simple way.
For this you don't need to know how to program and you don't have to mess with hours and hours with complicated lines of code.
WordPress se integrates with the best tools and service providers online and one of those tools is Mailchimp.
If you need to implement a strategy of email marketing on your website, blog or ecommerce in this post we show you —in depth— how to use Mailchimp in WordPress.
What is Mailchimp?
Mailchimp is a supplier automated marketing services and email marketing quite powerful.
It is easy to recognize this brand by its yellow colors and by its peculiar mascot that is ...
Naturally:
A chimpanzee.

But we don't recommend Mailchimp just for an image issue.
This is a robust tool extremely easy to use which at the same time integrates quite well with our website, blog or WordPress store.
Why use Mailchimp?
Mailchimp is the tool for email marketing Favorite of thousands of bloggers, companies and online entrepreneurs around the world for various reasons.
They say that it is the most used email marketing tool in the world and it does not surprise us at all. If you need to know the reason, here are some of the reasons:
- Are Easy to use that in a few minutes you will be an expert
- Have a quite interesting price –And offers package options with different prices for you to choose according to your needs.
- You can use it and enjoy its best features for an unlimited time without paying anything, yes free.
- It has a high deliverability –That means that the emails you send from Mailchimp reach the main inbox of your customers. Your emails will not reach the spam folder of your recipients.
- It even allows you to create landing pages or landing pages from the same tool so that you can implement certain conversion strategies without taking up space in your WordPress.
- It has different automation options for you to implement certain more complex email sending strategies.
Ok, there are more reasons to use Mailchimp in WordPress, but with those you can get an idea.
Now if you are looking to know how to use Mailchimp in WordPress, then I will explain everything step by step.
Let's go there.
How to use Mailchimp in WordPress?
The first thing you should know is that there is no single way to use mailchimp in wordpress, there are many possibilities to integrate it.
Once you know both tools and their potential, the possibilities are almost limitless.
We start with the basics.
What is needed to use Mailchimp in WordPress?
To use Mailchimp in WordPress you need:
- A blog, ecommerce, page or forum created on WordPress.org
- An account at Mailchimp (you can even start with a free account)
Additionally, we recommend that you have a lead magnet so that your website visitors subscribe to your mailing list.
If you don't know what a leadmagnet and you want to create one, we share with you an entry where we show you the whole process - we even show you how to send it with Mailchimp.
https://www.cursowpress.com/como-crear-y-enviar-lead-magnet-con-mailchimp/
1. Create your account in Mailchimp
This is the first step and it is easy.
Go into: https://mailchimp.com
Press the blue button - in case you don't see the button you can go directly to:
https://login.mailchimp.com/signup/

You will have to enter your data:
- Full name
- Company or organization - you can put the name of your website
- Domain of your website
Later you will have to confirm your email and you will have your account created in mailchimp.
2. Integrating your WordPress website with Mailchimp
This step is crucial let's say this is where the real magic happens.
Although this step is where we begin to to integrate your website with Mailchimp is actually very simple, pay attention.
In the setting from your account follow the following route (although it varies slightly as updates are made, you will always find it extremely simple):
Account> Settings> Domains
Mailchimp is in English that's why you might come across something very identical to this:
Account> Settings> Domains
Enter the Domains / Domains section.
A tab will open that says:
Verified Domains
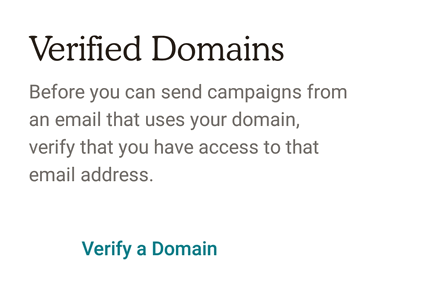
You will have to click on the option:
Verify a domain / Verify a Domain
Later you will have to enter your email account (the one you used to create your Mailchimp account, which is recommended is the same one you use to manage your website),
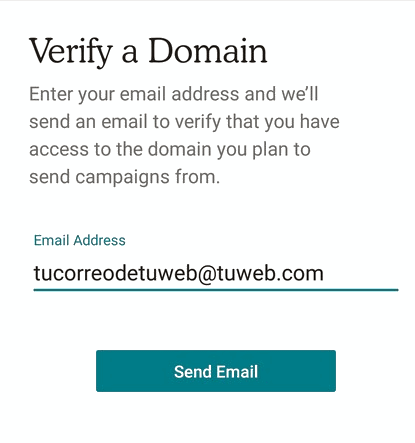
And ready.
3. Installing Mailchimp in WordPress
In this next step we will have to go to the desktop of our website in WordPress.
YourDomain.com/wp-admin/ >
YourDomain.com/wp-admin/plugin-install.php
A screen will open with some of the different plugin options that WordPress offers you for free.
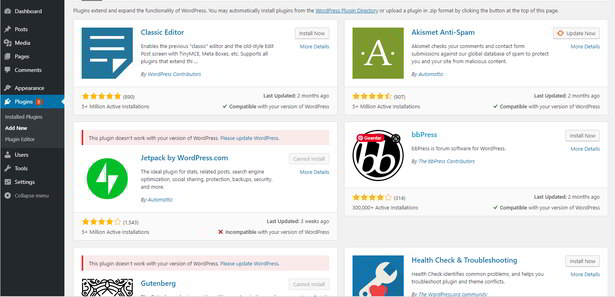
What you should do is write MailChimp in the search bar:
You will see all the plugin options that exist to work with Mailchimp in WordPress:
Yes, there are many options, but we only need a single tool that allows us to make the connection / bridge between WordPress and MailChimp.
4. Activating the Mailchimp integrator plugin in WordPress
Although there are hundreds of options, most plugins work quite similarly.
In any case, you will have to follow similar steps.
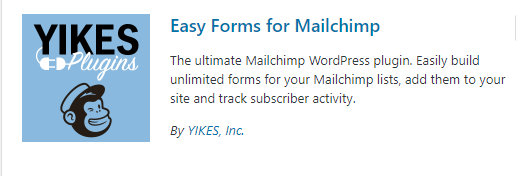
Let's install the plugin as an example:
Easy Forms for Mailchimp by YIKES
We activate it.
And once it is active and installed we go to the general plugin options.
You should see something like this:
Now all we have to do is go back to the Mailchimp website.
On the Mailchimp page - with your session active - you must follow the following route:
Account> Extras> API keys
In APU Keys you must copy the API code and return to WordPress
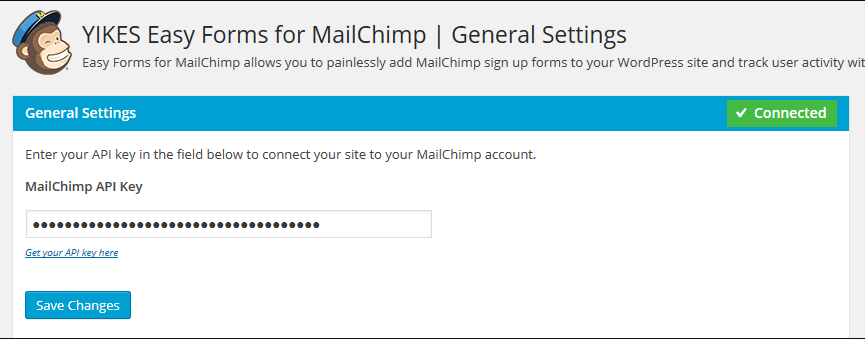
Plugins> Easy Forms for Mailchimp by YIKES> General Settings
In General Settings you just have to copy your API code and voila:
You already have MailChimp integrated into WordPress, but this is just the beginning.
5. How to display Mailchimp in WordPress
If you are an observer, you will quickly realize that once you have completed the incorporation you still Nothing happens.
This is because you must make the tool that will be responsible for capturing the emails of your audience appear.
In previous versions of WordPress (before Gutenberg) the incorporation was done with code, but now you can do it in a simple way directly from Gutenberg using a block.
That will allow you to show the optin form of the onboarding plugin between WordPress and Mailchimp.
What things can be done with Mailchimp and WordPress?
As we told you at the beginning:
There are many possibilities to work with these two tools.
And this is just the beginning.
If you need to know more, you can sign up for the best online course in Spanish from the best web content manager: WordPress.


