

Social networks consume our lives. Even if not in a bad way. Personally, I love being able to keep up to date on what friends, family and especially brands are doing minute by minute. Which may not be so great for my own productivity, but it's great news for your brand or online business.
Your followers want to know what you are tweeting, clicking, liking, sharing, posting, etc. So why not make it easier for them by adding your social feed to WordPress?
Flow Flow, WordPress Social Streaming made easy
The absolute best way to add social feeds to your WordPress blog or web portal is with Flow Flow. As with any feature you want to add to WordPress, there are tons of plugin alternatives, but let us explain why we think Flow Flow is the best.
Quick feeds
Adding feeds is even easier with Flow Flow. It can get tricky when you have to create, locate, and figure out what is required to authorize each social media feed. And this procedure can be even more complicated if you are forced to use a different plug-in for each network. Lucky for your Flow Flow includes support for the most popular networks (Facebook, Twitter, Instagram, Pinterest, etc.) and facilitates the authorization of your feeds with integrated fields for the required information (as well as detailed documentation if at any time you need help ).
Easy customizations
The technical characteristics are definitely important, but also the appearance of the plugin. You don't want an ugly or mismatched feed to be displayed on your web portal. Flow Flow includes options for grid style, columns, custom column spacing, flow background (make it match or stand out on your main site or page row background), animation, font colors, social icon styles and more. . And if you want to modify an element that doesn't have a built-in option, you can always add a little custom CSS.
Incorporation of Visual Composer
Add your streams to pages as you build them with Flow Flow's full Visual Composer embedding. The plugin is fully compatible with the Visual Composer UI editor, so you can easily insert your streams while using other page building options for rows and layouts.
Fully compatible with the theme
And definitely, Flow Flow is compatible with the Total WordPress theme. Actually, we are honored to say that Flow Flow is using the Total theme in its live preview today. When you pair Total's robust code, quick demo imports, almost limitless styling alternatives, and decidedly the included visual page builder with the social flow power of Flow Flow, there's nothing you can't build.
But now that you know why we love Flow Flow, let's see how you can implement this amazing plugin on your WordPress web portal.
Flow Flow Quick Start Guide
Looks Awesome (the team behind Flow Flow) have done an excellent job documenting their plugin. To get started in a jiffy, you can basically watch their video guide:
But for those of you who want to take an old school tour, read on to see how we set up Flow Flow.
Step 1: buy, download and install the plugin
You first require your own copy of the plugin, so head over to CodeCanyon and purchase a personal use license.
Get Flow Flow Social Streams
If you're a developer, you might also want to consider the extended license - it's a great way to add value to your client's work by offering social streaming as a feature on all of your clients' sites. Just an idea.
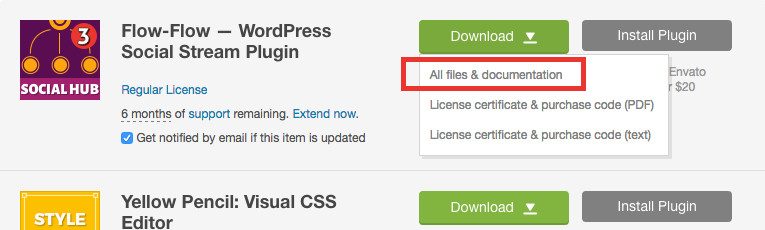
Once you have a license, go to its download page to download the plugin file. If you choose the "All files and documentation" option, remember that this will download a zip file that includes more than just the plug-in, so you will need to unzip it before attempting to install the plug-in (usually double-clicking the file will the trick).
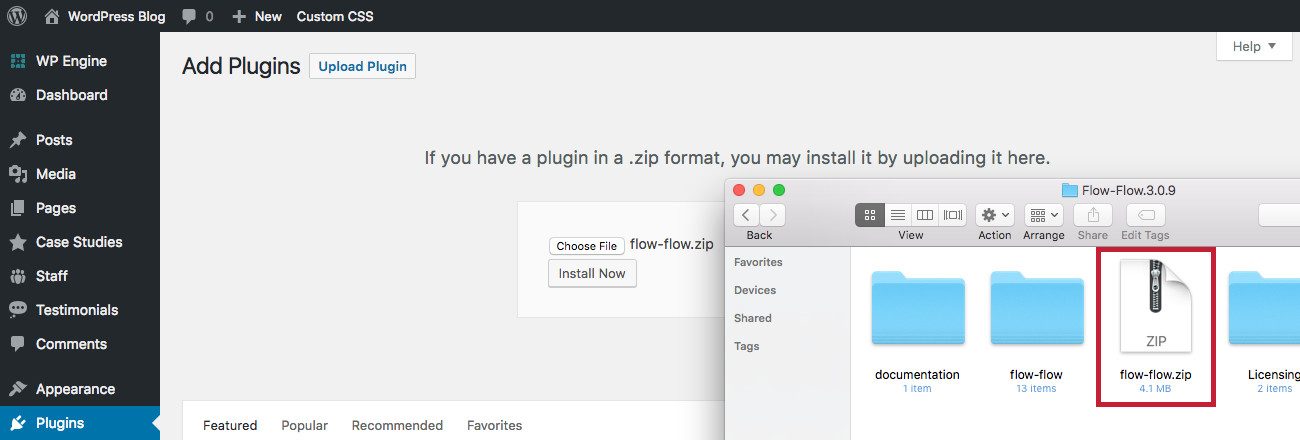
Next, log into your WordPress installation and go to your Accessories section. Click on the button at the top of the screen to "Add New" and then again on "Load Plugin".
Click the option in the middle of your screen to "Select File." Find the folder you just downloaded and unzipped from CodeCanyon, it should have a name similar to Flow-Flow 3.0.9 (with that last change based on its version number). Select the compressed file (flow-flow.zip) within that folder and follow the WordPress on-screen instructions to complete the plugin installation. Then click on the option to activate.
Step 2: edit the flow-flow settings
Before you start collecting, we suggest you take a quick look at the plugin settings. If you go to Flow Flow> Settings You can see the built-in alternatives for the plugin.
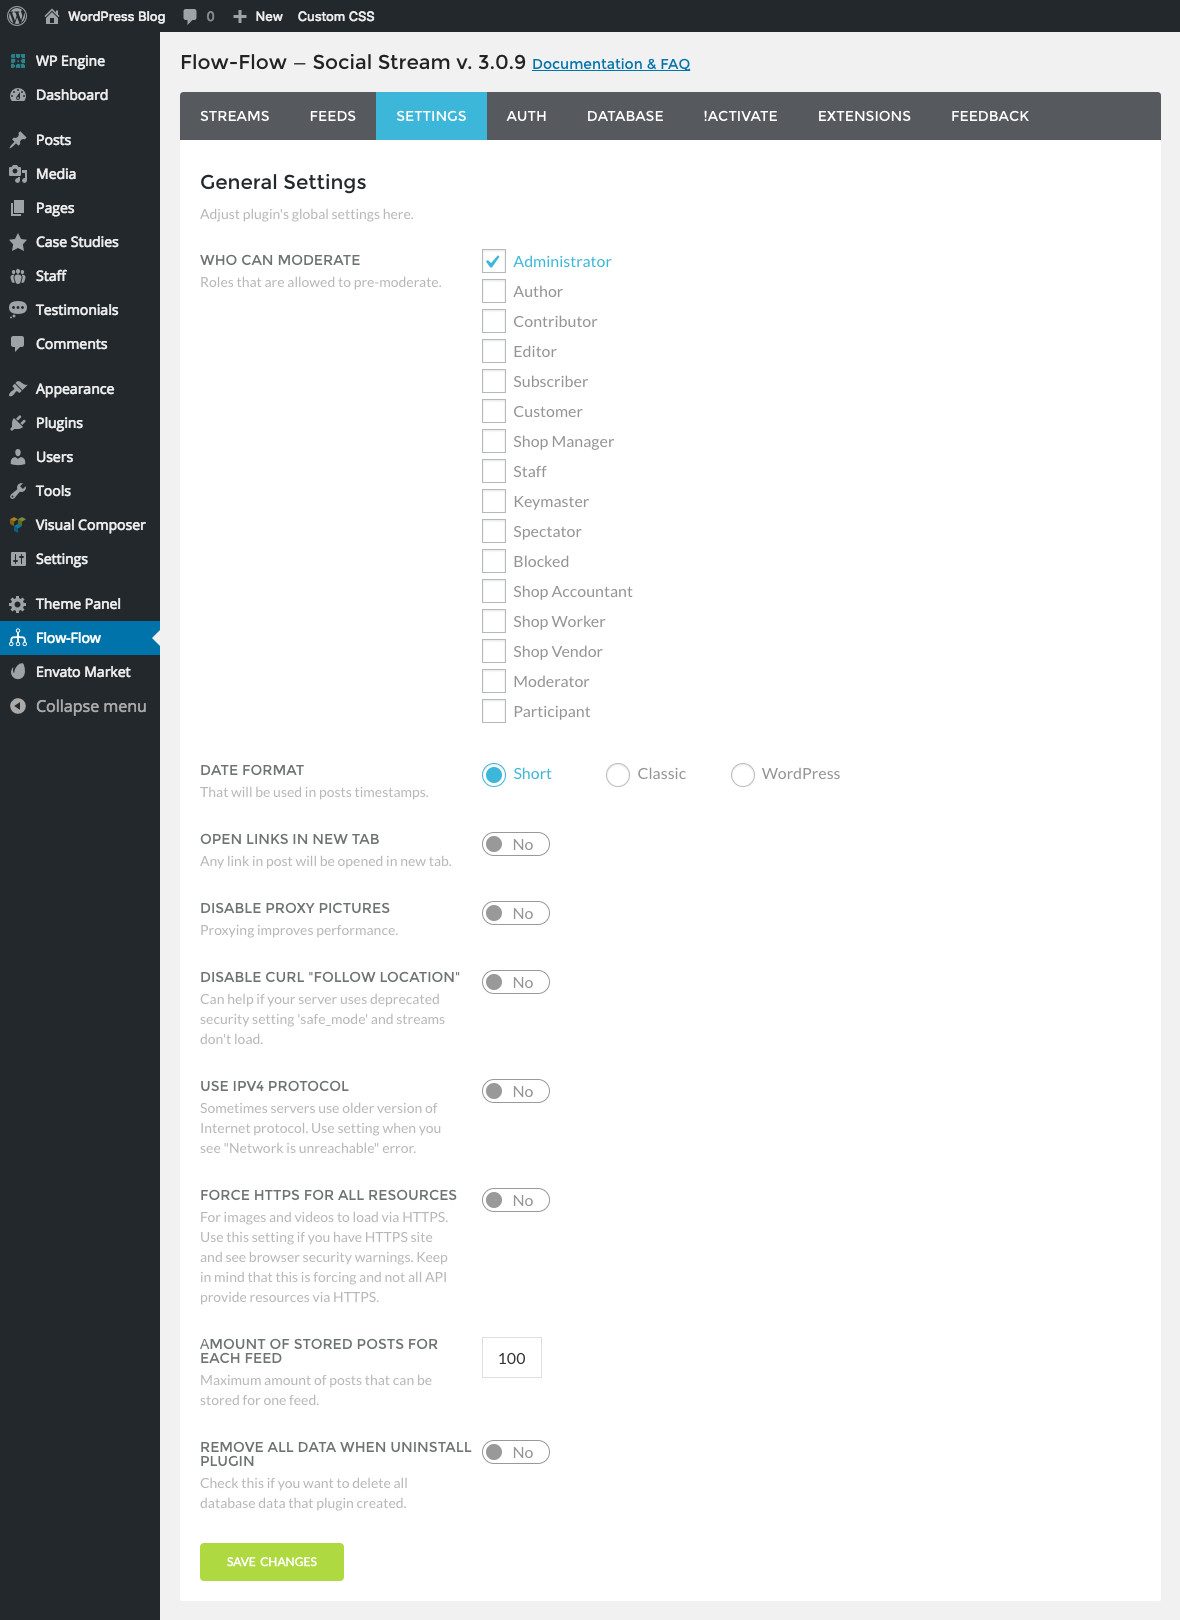
In our opinion, you don't want to miss out on the moderator user role alternatives, date format, and number of posts stored for your feeds. But take a look at the other options before saving.
Step 3: add your social feeds
With your plugin installed, active, and configured, you can start adding your social feeds. Each social network is different and some will require access tokens or apps before you can add a feed. But don't worry: Flow Flow makes everything a breeze.
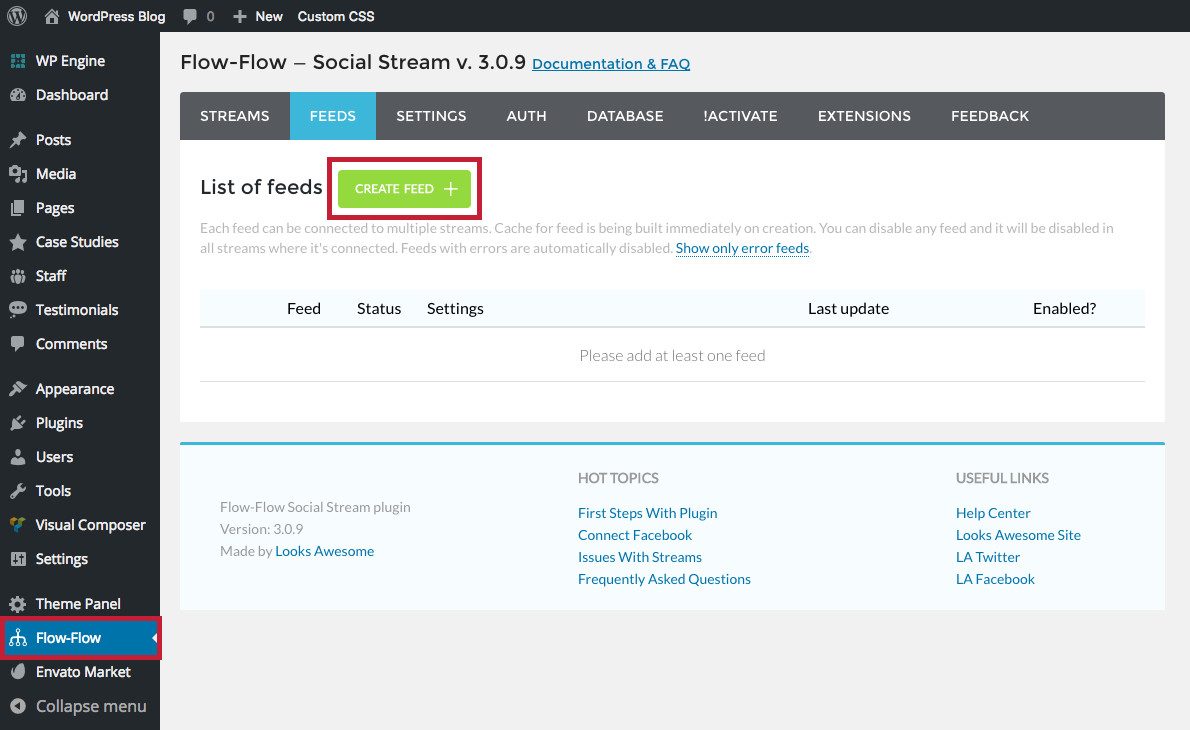
Basically go to Flow Flow> Feeds and click the green button for "Create Feed +" to get started. This will open a pop-up window.
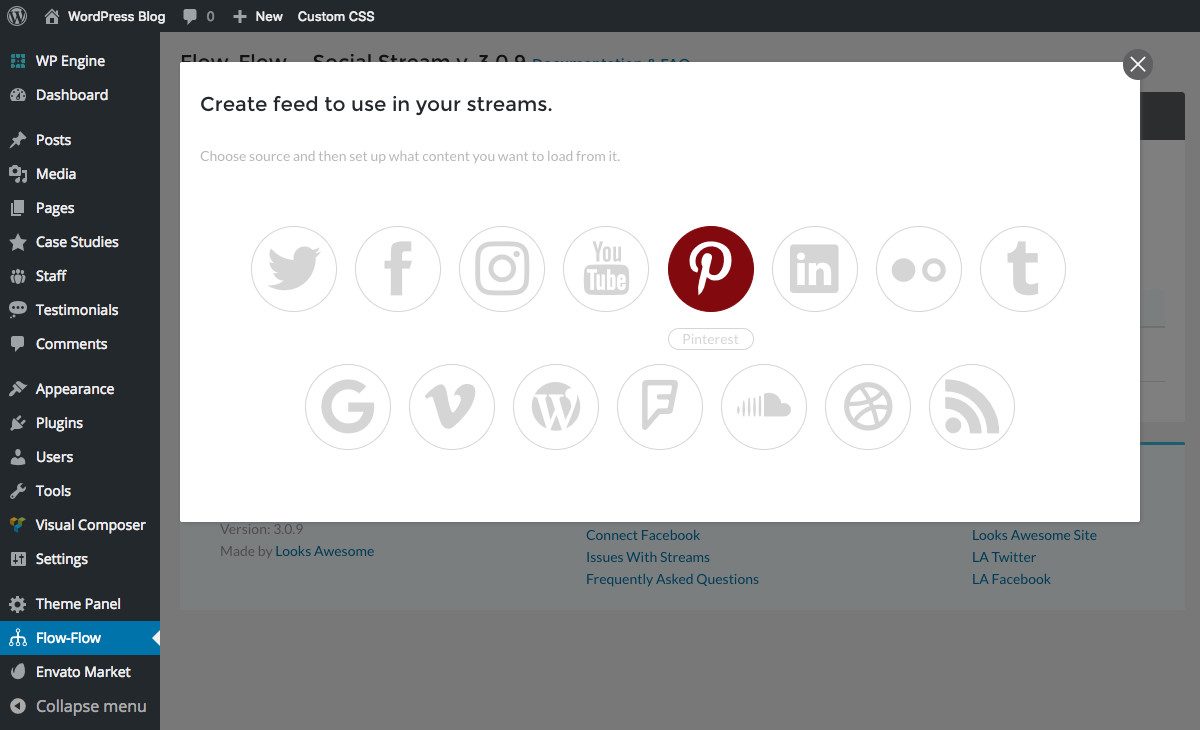
From here, select the social feed you want to add. We chose to start with Pinterest because it is so easy to add.
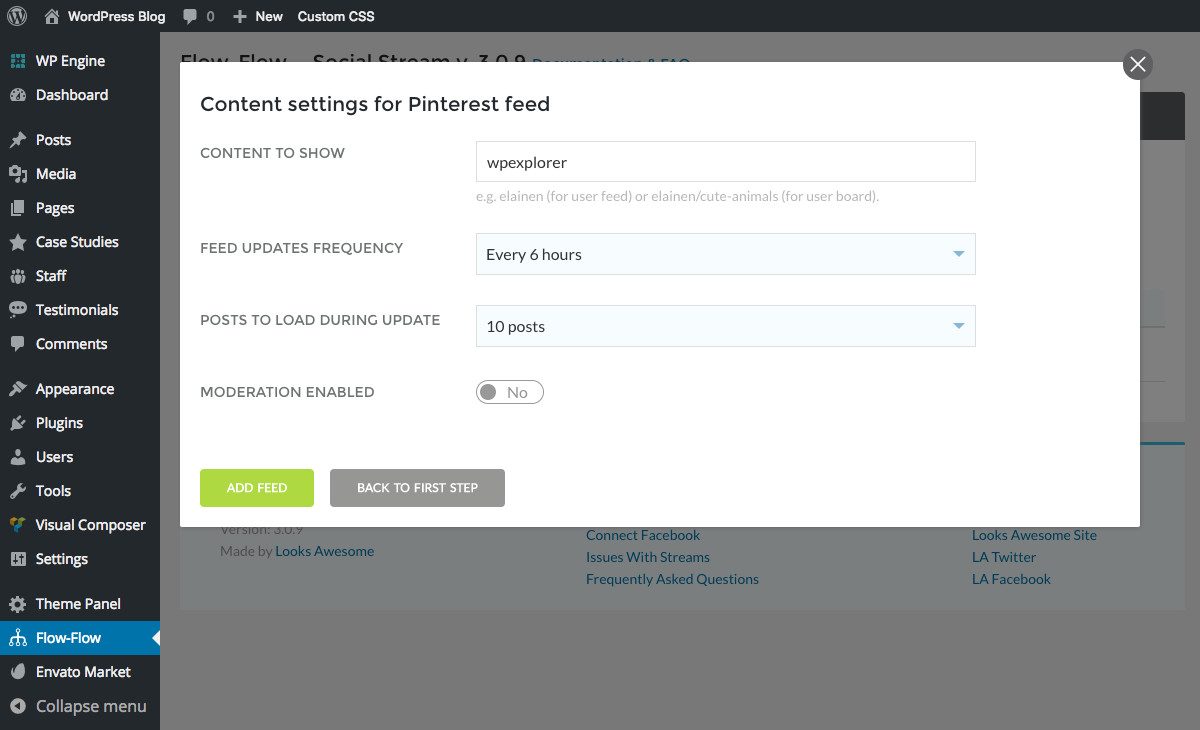
Once you select a font, you will be prompted to enter the font settings. These options will vary depending on the feed you selected. Pinterest only needs the username or username / admin panel, your preferred frequency to update (from 5 minutes to once a week), the number of posts to upload (1, 5, 10 or 20), so on as the option to moderate what is displayed. Once you are done, click on "Add Feed".
Now repeat the procedure for each social network you want to add! Just remember that you may need to add authorization information before you can add a feed, but Flow Flow makes it easy by offering an "Auth" section.

From here you can add the required authorization information for Twitter, Facebook, Instagram, Google+, YouTube, Foursquare, LinkedIn, SoundCloud and Dribble in one go (Pinterest, Flicker, Vimeo, WordPress and RSS do not require any additional authorization when added) . Each social settings section includes a link to the official Flow Flow documentation if you need help. We strongly suggest that you follow their instructions if you are not sure how to configure your apps and / or access tokens.
Once you have added and saved your authorizations, you can create and activate feeds for these social networks.
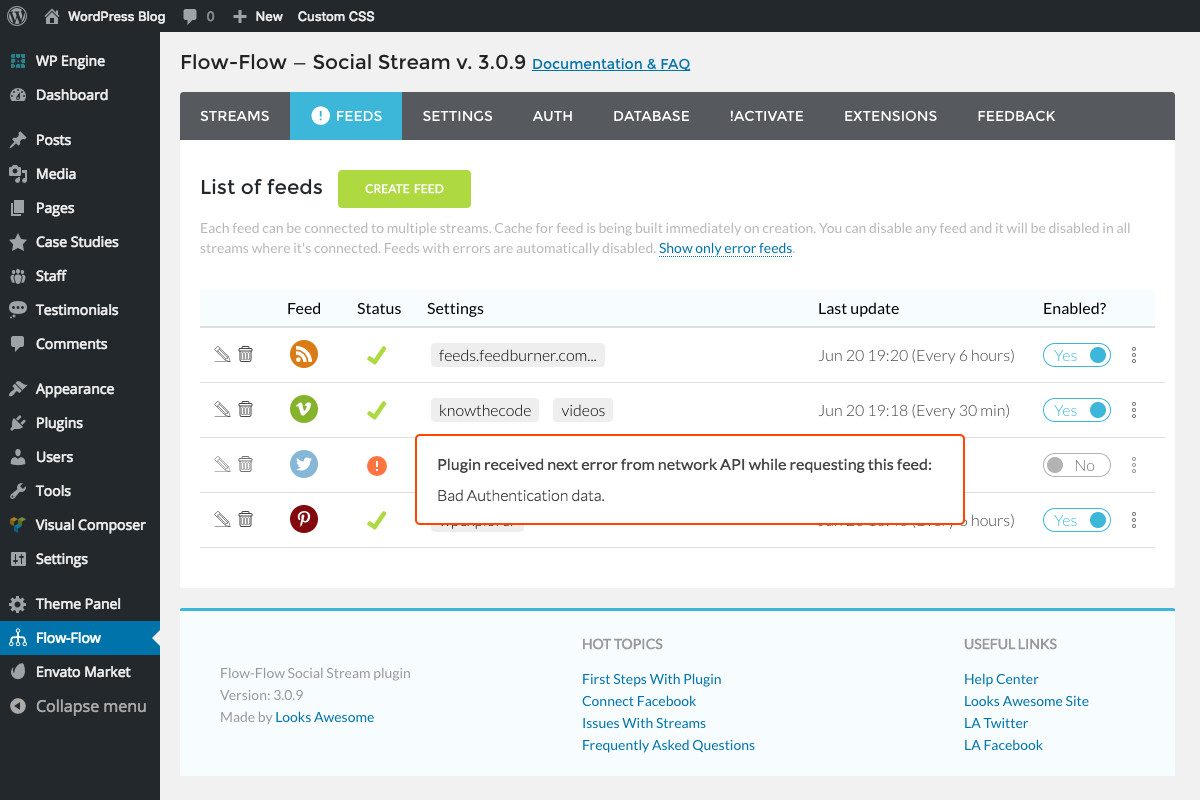
If you accidentally enter the wrong information when creating a feed or forget to add feed authorization, you will see an orange exclamation mark (!) Icon as the status of the feed. Basically hover over the icon to see the power error. Once you successfully edit the feed or authorization information, you will have the option to enable your feed.
Step 4: create social broadcasts
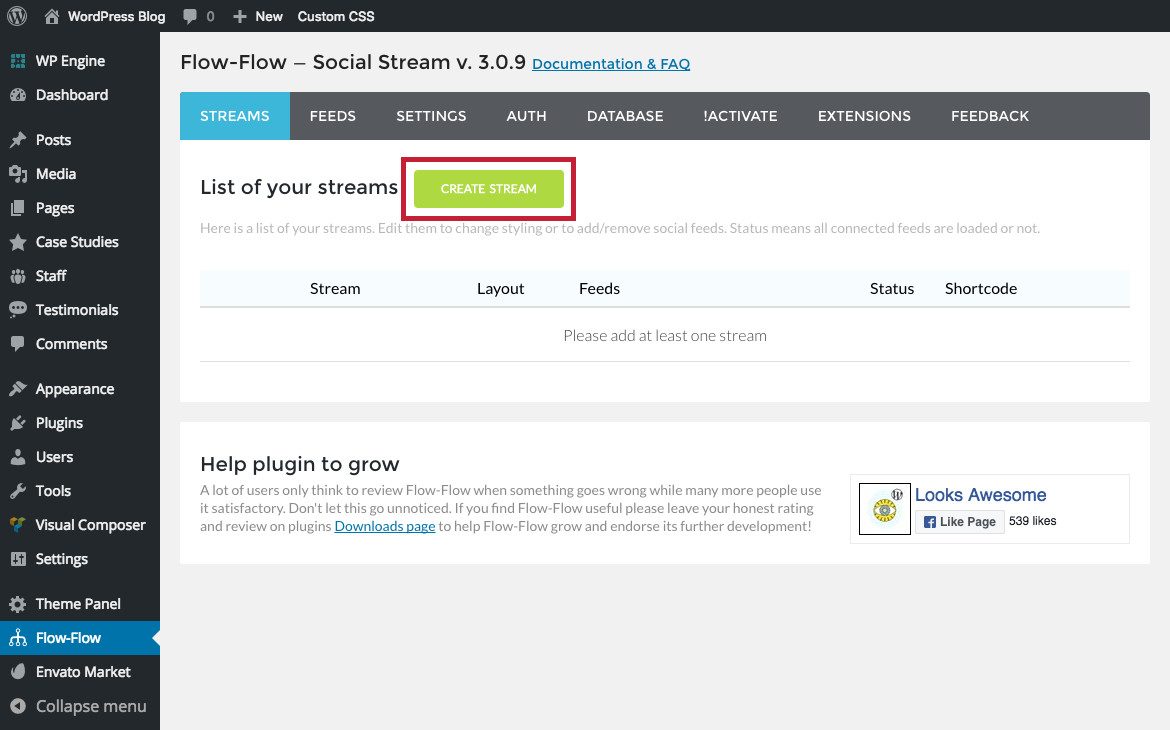
Once you've added all of your social feeds, you can compile them into social streams. This is quick and easy. Basically go to the "Broadcasts" tab and click the green button for "Create Broadcast"
Add social feed sources
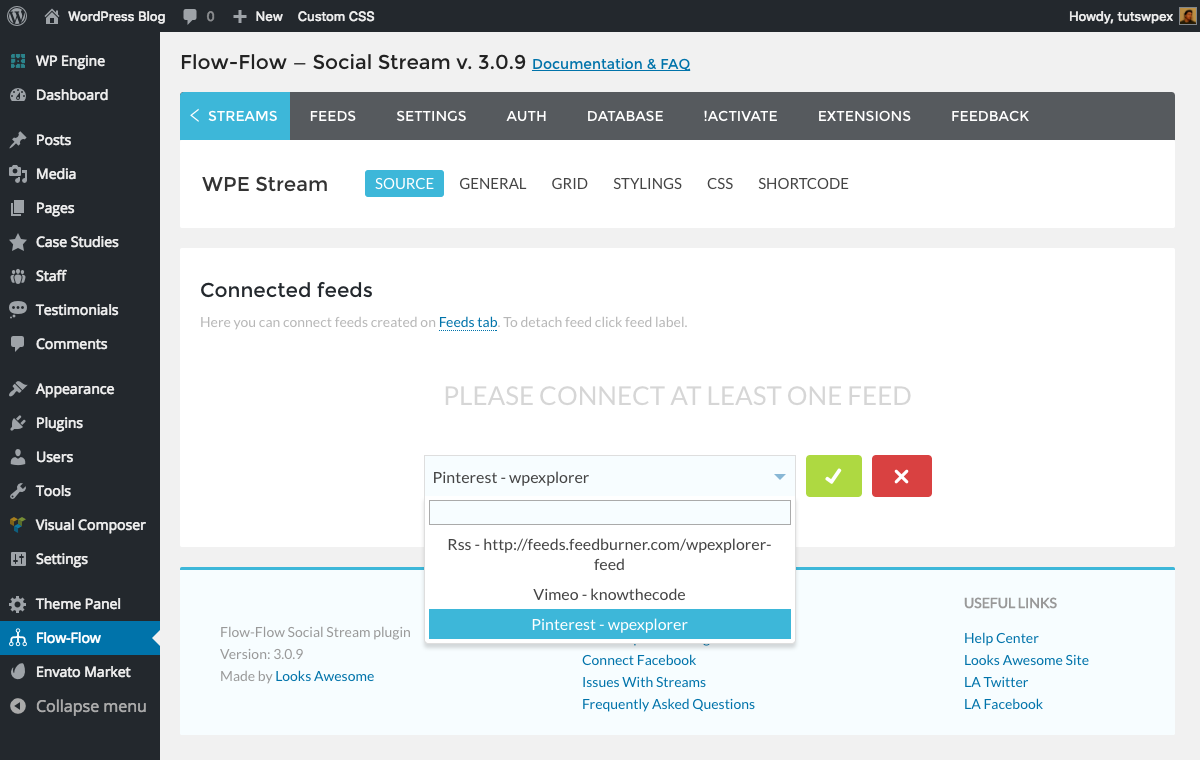
Give your stream a name and start adding your feeds. Basically use the drop down field to choose and then add each of your preferred power supplies.
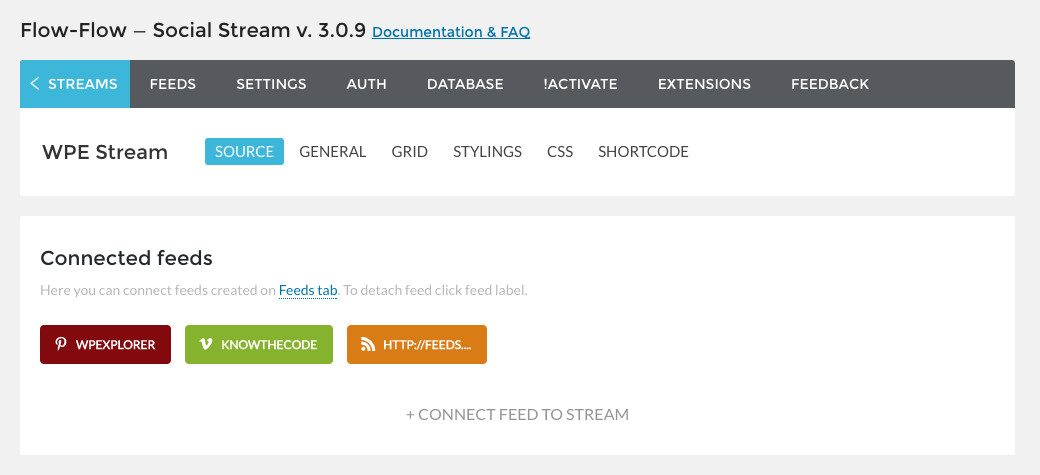
As you add feeds, you will see them in the "Connected Feeds" section.
general
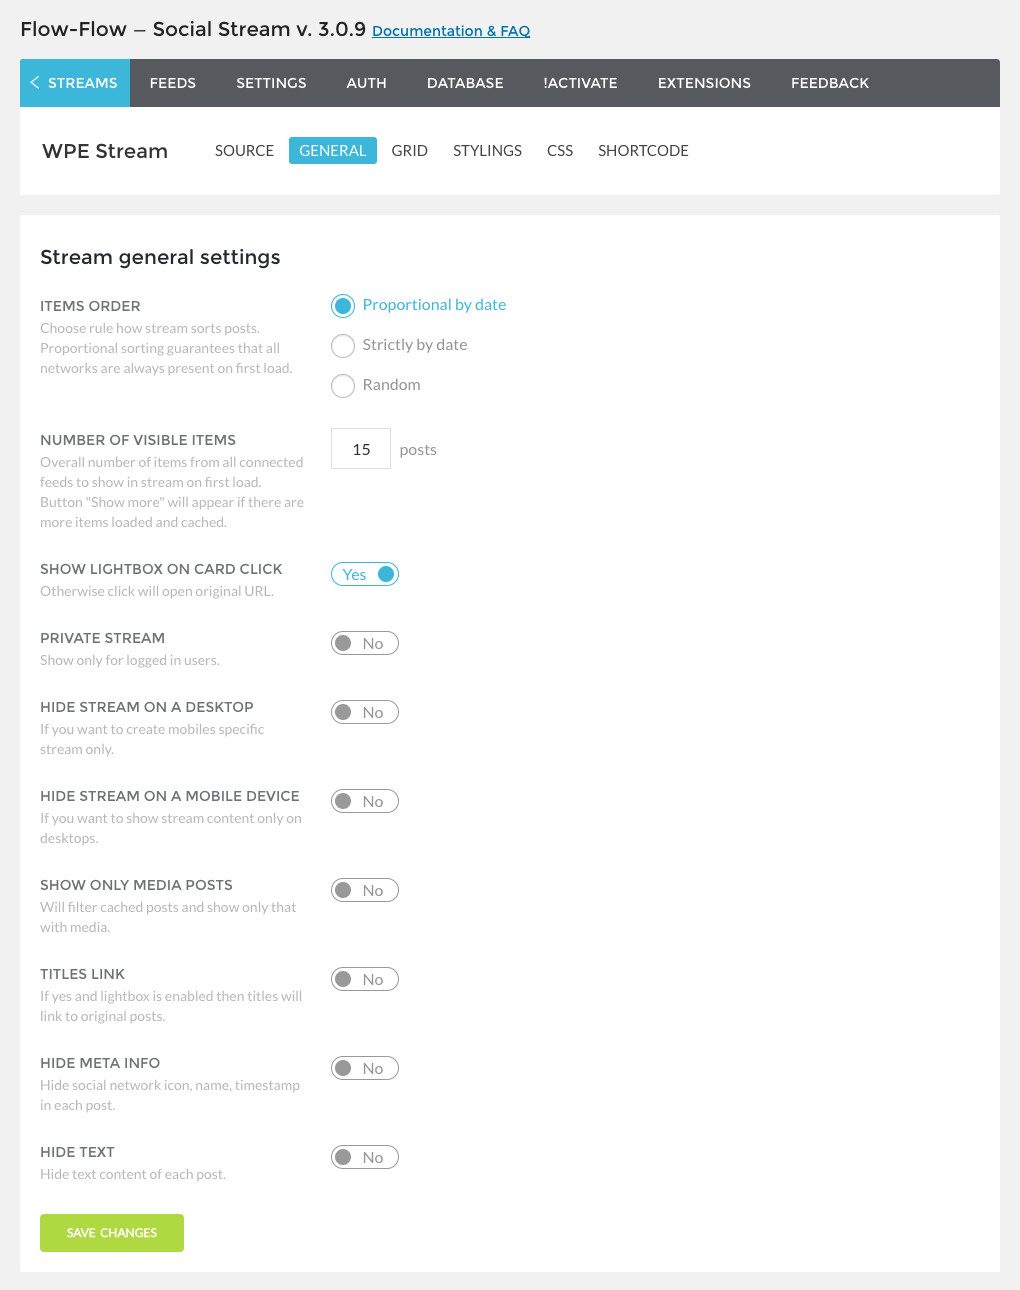
Then click on the "General" tab to determine important options for ordering, counting posts, lightbox, privacy, device display and more.
Grid

Don't skip these options! You'll want to go to the "Grid" tab to change the layout settings for the grid (masonry, equal or justified grid), columns and spacing, heading, and more.
Social broadcast style
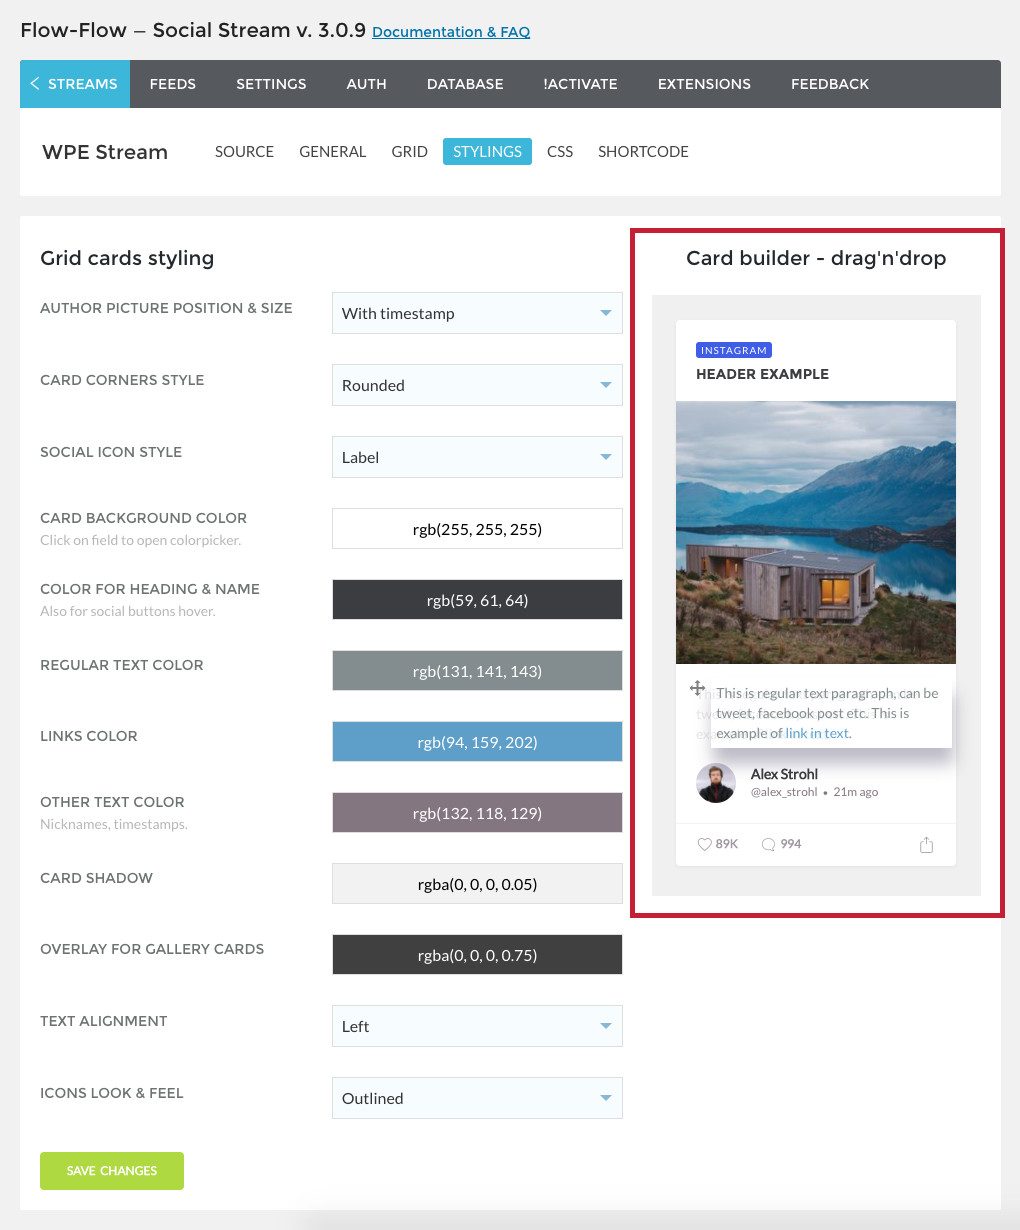
Flow Flow makes it easy to create a custom-looking flow. Use the alternatives for designing cards and the drag and drop card maker to change the color and rearrange your social media posts.
Custom css
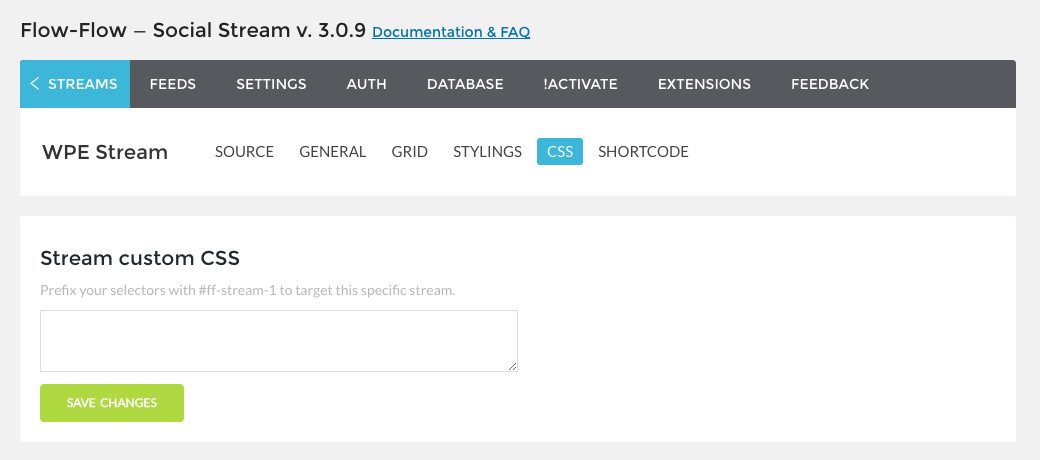
If you are a developer or if you are well versed in CSS, there is a built-in section to add your custom code. This is a great way to adjust the visual display of your broadcast to truly match your customer's web portal.
Short code
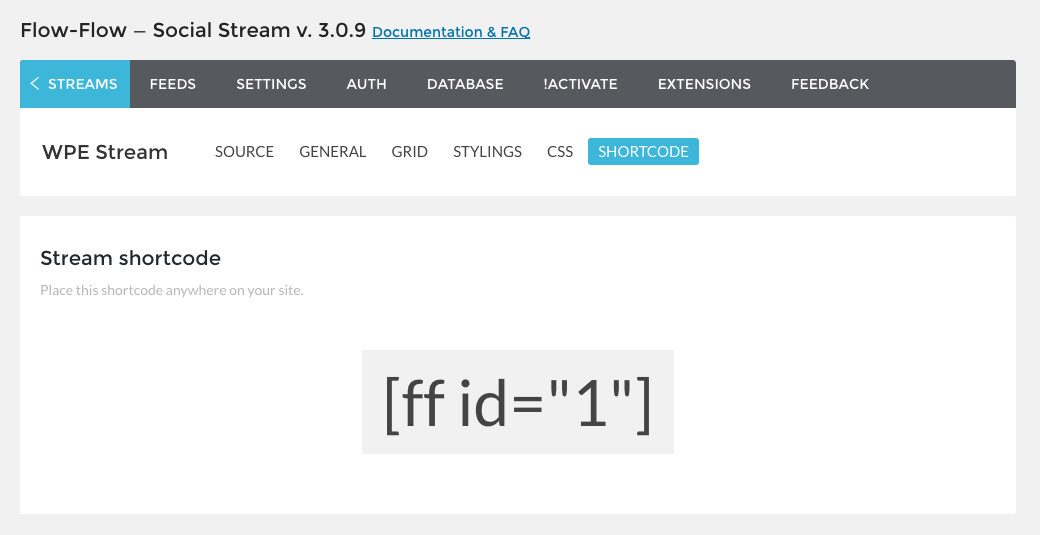
The last tab of your stream contains the short code for the stream. This can be copied and pasted into a post or page to instantly display your broadcast.
Step 5: add your broadcast to your web portal
The last step is to make your broadcast visible by embedding it on a page. One option is to copy the shortcode and paste it into your page's text editor. But if you're using a page builder theme like our Total WordPress theme, it's as simple as clicking a few buttons.
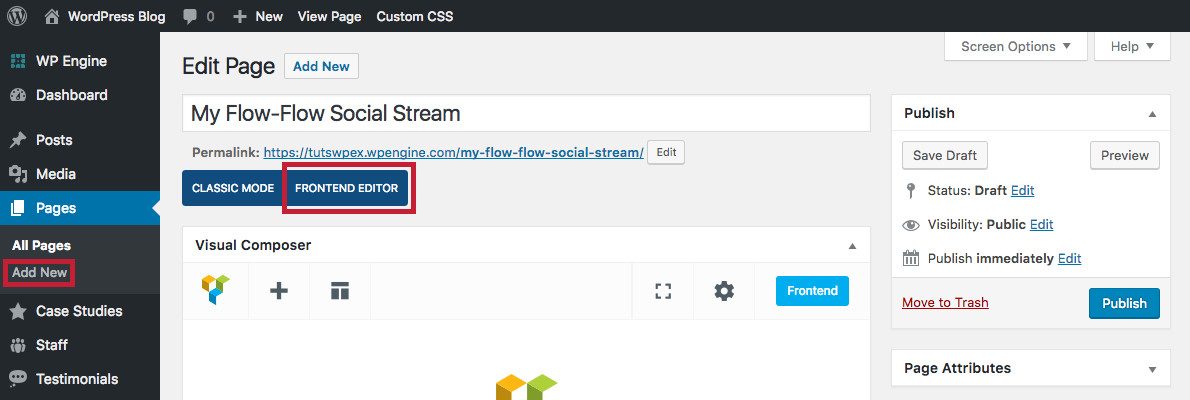
First create a new page, name it, and choose your page layout, featured image, etc. Once you're done with setting up your page, click on the Visual Composer backend or frontend editor (we like to see what we're doing, so we always use the frontend editor with Total).
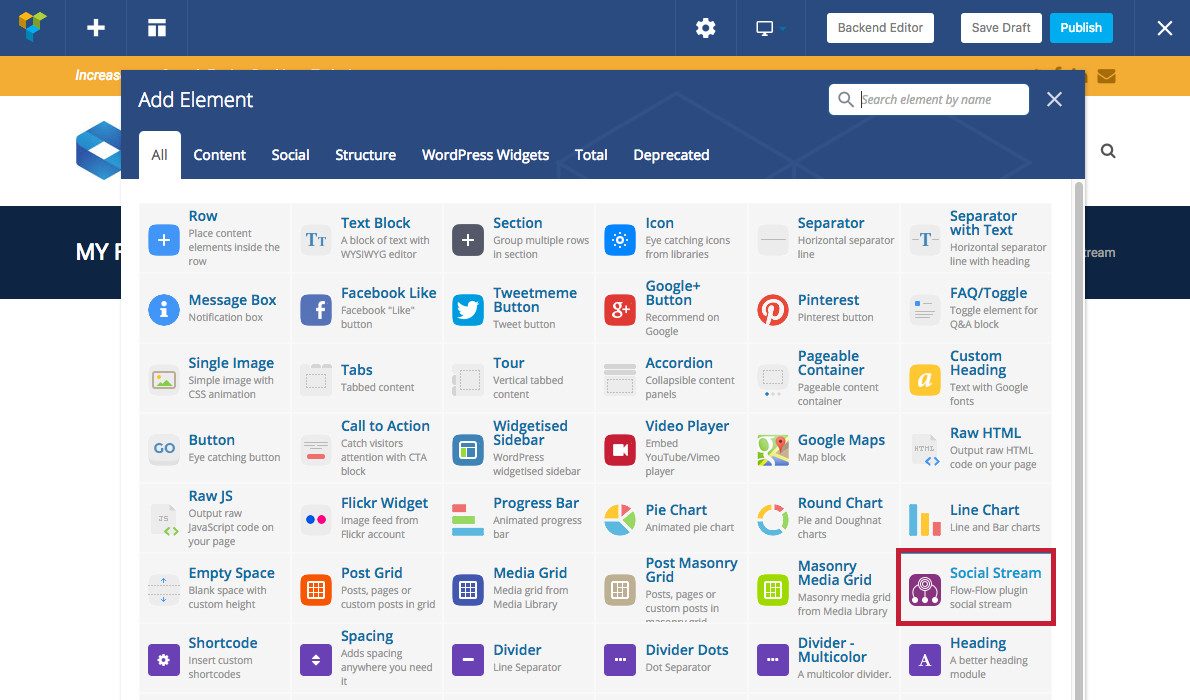
Then click the plus icon (+) to add a new page element and then select Flow Flow Social Stream.
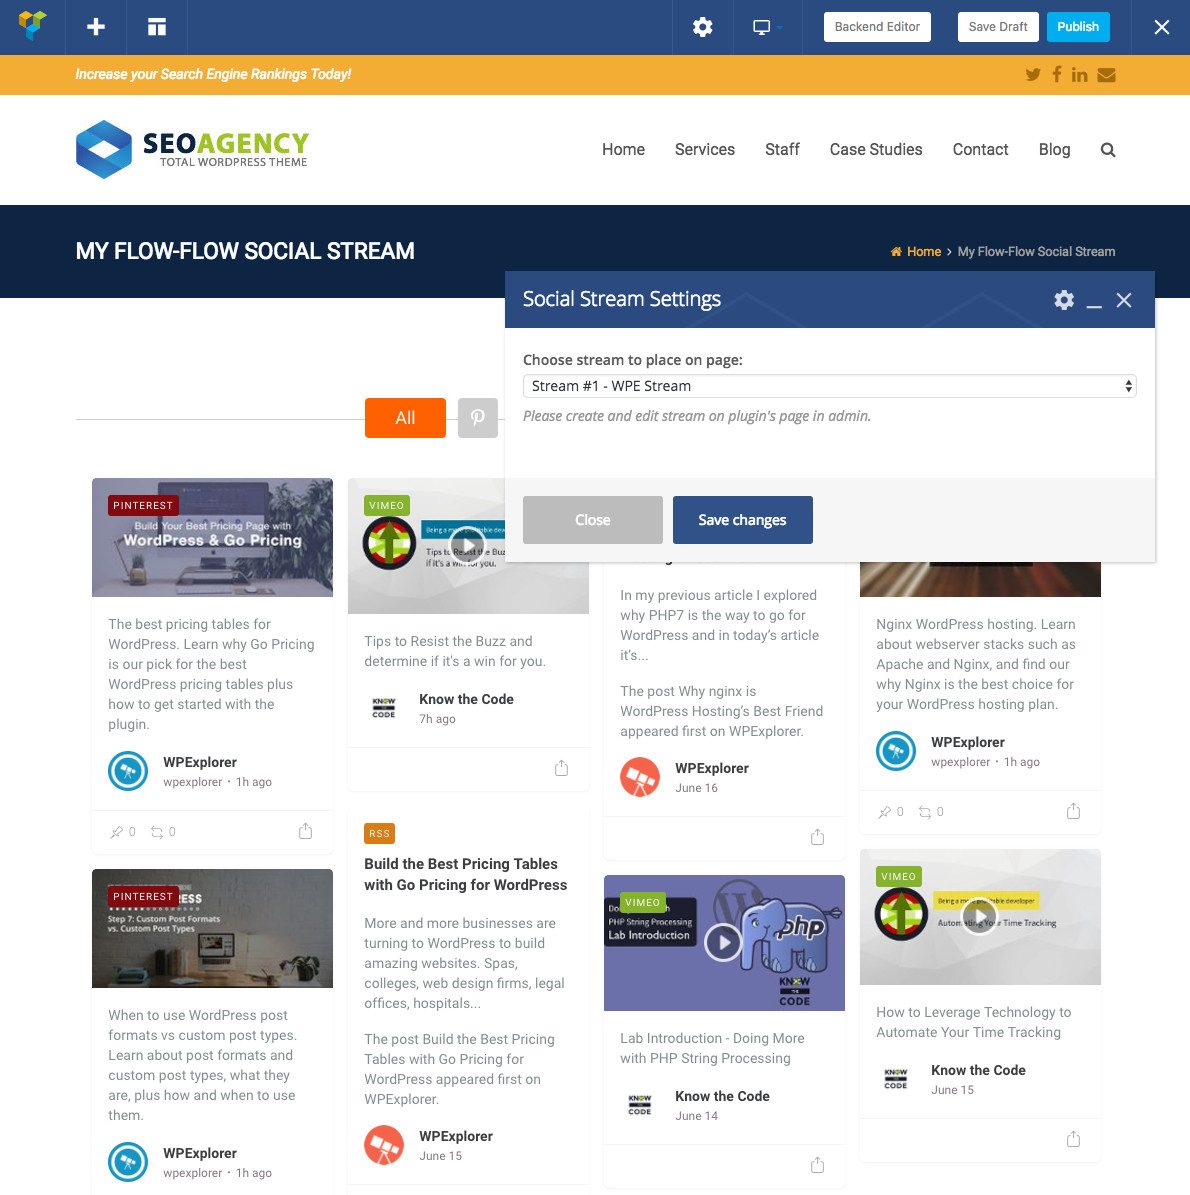
Then select the social broadcast you want to add and save the changes. That's it! Basically publish your page so that it is visible to the visitors of your web portal.
More Flow Flow Features
The power behind Flow Flow doesn't stop there! The developers have also released a couple of useful plugins for the plugin to bring you even more added value through your social streams.
Commercial promotion and branding: Monetize your social flows with the Flow Flow brand and trade promotion plugin. With this installed, you can market featured places in your social stream, insert ads, or even create hero cards for your social media campaigns.
Transmission duration: Do you have a lobby in your office? Or maybe your company is hosting or attending a conference? Flow Flow Broadcasting Extension is just what you need. Use it to display your live social broadcast on a big screen (TV, projector, etc.) and instantly draw attention to your posts, tweets, announcements, etc. most relevant.
Final thoughts
In closing, Flow Flow is a feature-rich plugin that provides all WordPress users with an easy way to collectively display social feeds (either on their web portal or on a big screen TV). Personally, we love the easy alternatives, the great documentation, the Visual Composer (and Total) onboarding, and the helpful extensions. You can get more information about Flow Flow on the plugin page, and we hope you will try it on your next customer project or on your own personal web portal.
Have a question about Flow Flow? Or maybe you've used the plugin and want to share some tips and tricks? Just leave a comment, we'd love to hear from you!


