general
- Post types: Choose where Elementor It can be used. If checked, the Edit with Elementor will be available for that post type. If not checked, post type cannot be edited with Elementor.
- Disable Default Colors - Choose whether to use your theme's color settings or leave Elementor control it
- Disable Default fonts: choose whether you want to use your theme's typography settings or leave Elementor control it
- To get better Elementor > Usage data tracking: By enabling this, it will help us to know the way you are using Elementor and help us improve
Style
- Default generic fonts: Choose a default alternate font
- Content width: Set a default width for your content area
- Space between widgets: Sets the space between widgets
- Stretched section fit to: Choose the parent element to which the stretched elements will wrap
- Page title selector: If you want to hide your page title, enter your CSS selector here
- Tablet breakpoint: Sets the breakpoint between desktop and tablet devices. Below this breakpoint, the tablet layout will appear (default: 1025px)
- Mobile breakpoint: Sets the breakpoint between tablet and mobile devices. Below this breakpoint, the mobile layout will appear (default: 768px)
- Image Light box: Check to open all image links that have been set Media file as the "link to" in a lightbox popup
Integrations
The Integrations settings allow you to optionally connect Elementor with third-party APIs as needed.
- reCAPTCHA: reCAPTCHA is a free service from Google that protects your website from spam and abuse. Paste the site key and reCAPTCHA secret key here
- reCAPTCHA v3: reCAPTCHA v3 is a free service from Google that protects your website from spam and abuse. Paste the site key and reCAPTCHA secret key here and enter your score threshold. The scoring threshold must have a value between 0 and 1. The default value is 0.5.
- Facebook SDK: Facebook SDK allows you to connect to your dedicated app so you can track Facebook Widgets analysis on your site. Enter your App ID here
- Mailchimp: Enter your API key and then click the Validate API key button to integrate Mailchimp with Elementor Form widget
- Drip: Enter your API Token and then click the Validate API Token button to integrate Drip with Elementor To form widget
- ActiveCampaign: Enter your API key and API URL and then click the Validate API key button to integrate ActiveCampaign with Elementor To form widget
- Get an answer: Enter your API key and then click the Validate API key button to integrate GetResponse with Elementor To form widget
- ConvertKit: Enter your API key and then click the Validate API key button to integrate ConvertKit with Elementor To form widget
- MailerLite: Enter your API key and then click the Validate API key button to integrate MailerLite with Elementor To form widget
- Woocommerce Mini Cart Template: Adjusted to Disable to use your theme or WooCommerce mini cart template instead of Elementor's
- TypeKit: Integrate thousands of TypeKit fonts into Elementor. Enter your TypeKit Project ID and then click the Get Project ID button
- Font Awesome Pro- Enter your Font Awesome Pro kit ID and then click the Validate Kit ID button
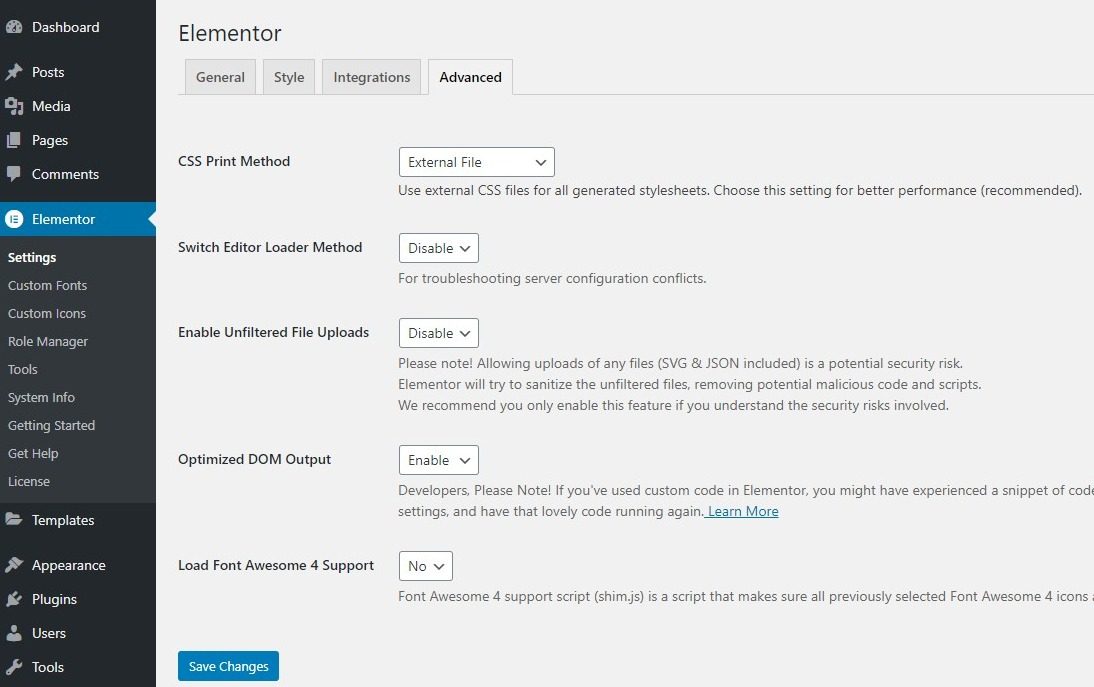
Advanced
- CSS printing method: Choose whether your CSS will be included as a separate stylesheet (recommended) or on every page
- Switch editor loader method: In cases of server configuration conflicts, enable this option *
- Editing handles: Shows or hides the edit controls when hovering over the element's edit button
- Enable unfiltered file uploads: Enables or disables the ability to load SVG, JSON, and other unfiltered files. Keep in mind! Allowing any file to upload (including SVG and JSON) is a potential security risk. Elementor will attempt to sanitize unfiltered files, removing potential malicious code and scripts, however we recommend that you enable this feature only if you understand the security risks involved.
- Optimized DOM output: Select Enable to use optimized DOM output, which removes multiple HTML containers from the output. By default, this is only enabled on new sites created with Elementor 3.0+. Sites upgraded to 3.0 from a previous version should be set to Disable by default to prevent site layouts from breaking.
- Load support for Font Awesome 4: Choose Yes or no. The Font Awesome 4 support script (shim.js) is a script that ensures that all previously selected Font Awesome 4 icons are displayed correctly while using the Font Awesome 5 library.
* The switch editor loader method is useful for solving "err_content_decoding_failed" and err_empty_response "problems that sometimes occur. Enabling this option helps users to run sites on resource-poor servers that have difficulty reading long JSON code. When enabled, the tool splits the lines so that these servers can read the JSON code without problems. Switching to this method will not adversely affect performance. Instead, it will probably improve performance. This tool can also come in handy at times to solve the white screen of death.