
Ha habido muchos cambios en este complemento desde que hicimos esta revisión, ¡por ende hemos creado uno completamente nuevo! Consulte nuestra nueva revisión de iThemes Exchange, ¡una de las formas más rápidas de comenzar a vender en línea con WordPress!
Exchange es el complemento de comercio electrónico completamente nuevo (y completamente gratuito) creado por iThemes para vender digital products por medio de de su sitio Web de WordPress. Vamos a explicarle cómo utilizar el complemento y tal vez convencer a algunos de ustedes para que lo prueben. Eche un vistazo a nuestra descripción general en video o, si lo prefiere, simplemente lea el texto a continuación.
Installation and configuration
Install on pc
Exchange is a plugin, just grab it from the plugin repository and install it directly from your control panel. Or you can download the zip file from the iThemes website and upload it by selecting “Add New” under Plugins in your dashboard, click upload and select the zip file. Easy!
Download iThemes Exchange
Es hora de configurar su tienda. Haga clic en el botón «Configuración rápida» en la barra de notificaciones en la parte de arriba de su panel. Si no tiene la barra de notificaciones, vaya a Complementos> Complementos instalados y busque «iThemes Exchange». Verifique que haya activado el complemento, luego haga clic en el link «Configuración rápida» para abrir el asistente de configuración.
General information
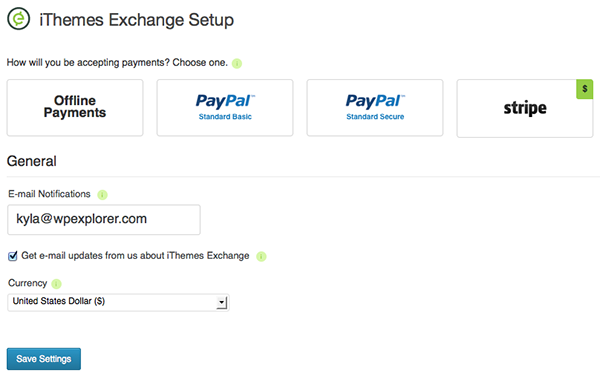
Exchange lo ha facilitado. Simplemente seleccione el método de pago que utilizará su tienda. Elija entre fuera de línea (cheques o efectivo), PayPal o Stripe. Asegúrese de que ya se ha registrado en PayPal o Stripe si va a usar una de estas dos opciones, y para usar Stripe hay un complemento obligatorio (pero puede comprarlo por el precio de lanzamiento de solo $ 10 – que ascenderá a $ 97, por lo que sugiero que lo obtenga ahora si cree que este podría ser el método que usará). Si elige utilizar los pagos fuera de línea, hay una sección que puede completar con más instrucciones de pago para los clientes (como dónde enviar el pago). Después actualice su dirección de correo electrónico de notificación si no desea utilizar el correo electrónico del administrador de forma predeterminada, seleccione su moneda y guarde los cambios.
Configurations
You can add a little more information by clicking this menu item within Exchange.
The first tab covers your company's basic information. Name, tax ID, primary email and address. At the same time you can choose a currency symbol, its position and the separators of your currency (as an example, in the US we use a decimal point between dollars and change, but many Latin countries use a comma instead: Exchange allows you to add your currency as it should be). Finally, on this tab, you can choose how you want users to sign up (using Exchange to sign up through the plugin or using the main WordPress function to sign up through your website).
En la segunda pestaña, puede personalizar el correo electrónico que recibe cuando realiza ventas, así como el correo electrónico que los clientes reciben como recibo de su compra. Usando los códigos cortos de iThemes Exchange, puede agregar información como el nombre de Username of client, la fecha de compra o el monto total de la compra al correo electrónico. Agregue información que crea que es relevante para usted y / o sus clientes.
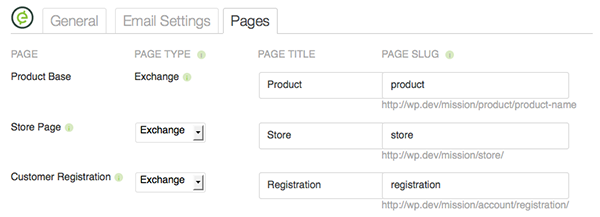
The third and final tab allows you to organize your online store however you want. For the various pages associated with the store (such as the store page, customer registration, customer shopping cart, purchase confirmation, etc.), you can choose to use the default Exchange page, use codes shortcuts to insert related information into a WordPress page or disable the page completely. This is also where you can add custom page titles and slugs.
Accessories
From here, you can verify that you have all the features enabled that you want and disable those that you don't. Some of the options included are a product category dashboard or widget product tags and the option for multi-item carts.
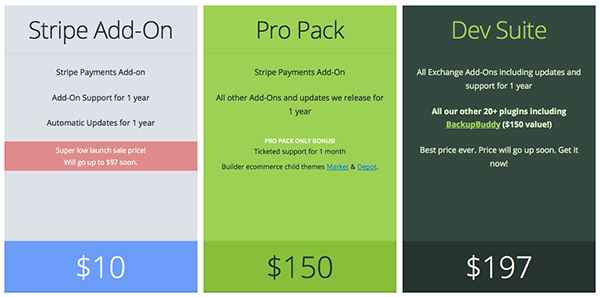
After purchasing, you will simultaneously see the Stripe plugin or any other premium plugin you have access to.
Get Exchange Add-ons
Add products
To add products, go to Exchange > Add Product.
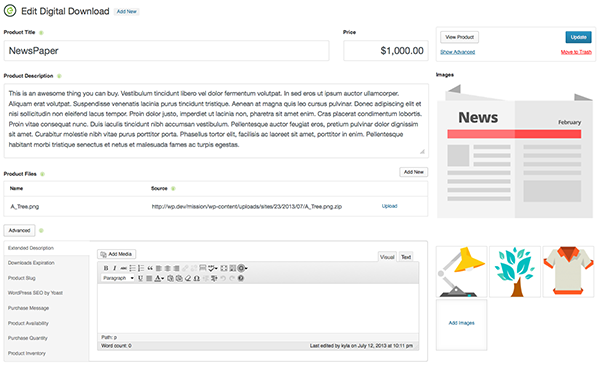
Give your product a name, price and description. You can upload as many product images as you like, as well as upload digital files themselves (check that the Digital Downloads plugin is enabled by navigating to Exchange > Plugins). At the same time, there are advanced options such as an extended description, categories, tags, product-specific purchase message, availability dates or quantity and limit per person. Be sure to post your product and it will be instantly added to your store.
Create coupons
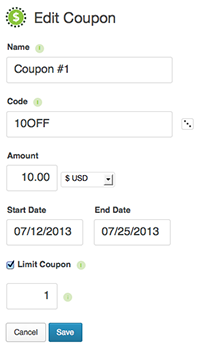 Who doesn't love a lot? With Exchange you can create all types of coupons for your clientele. Go to Exchange > Add-ons and make sure the Coupons add-on is activated. Once active, the Coupons menu item should appear within the Exchange menu in your WordPress Dashboard. Now go to Exchange > Coupons. Give your coupon a name (like Grand Opening), add a coupon code (like 10OFF or random), set the amount (like $10 or 10 percent), and add the usage period. With coupons you can run a range of holiday or consumer-specific sales, email campaigns, or even giveaways.
Payments
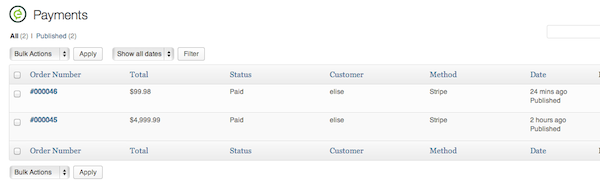
Take a look at what your customers have purchased. Go to Exchange > Payments; You can see each and every transaction in your store here. To see who bought what, simply hover over a transaction and click the “Payment Details” link.
View customer information
In the “Payment Details” of a transaction, you will see a link to “View Customer Data.” This will take you to a screen that shows a specific customer's purchase history, a list of all transactions (a useful tab if you ever need to issue a refund or resend a confirmation email), and a section where you can take notes about the customer (perhaps billing information or a record of coupons you issued them).
Dashboard report
Exchange at the same time includes a great dashboard widget to give you a snapshot of how your online store is doing. To enable the add-on, go to Exchange > Add-ons and activate the basic reporting dashboard widget.
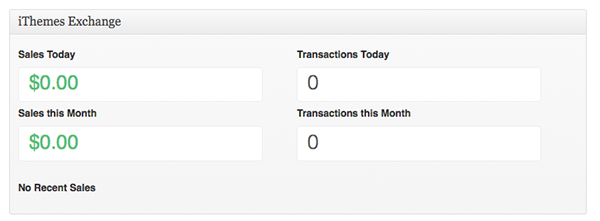
From now on, when you log in to the website, you will see a summary of today, this month, and a list of recent transactions. This is a quick and easy way to see if your products are selling and if your daily sales are on track.
Help and documentation
To learn more about all the features of Exchange, click the Help item in the menu, or take a look at the impressive documentation on the iThemes website. It covers each and every feature of Exchange often with helpful images so you can better understand how the plugin works. At the same time there are plenty of great video tutorials if ours didn't give you enough information on a particular Exchange topic.
Overall, this is a great plugin that you should definitely check out, or even try it on your localhost like we did. It's very easy to use, quick to set up, and has all the key features any eCommerce plugin should have. But if you can think of something that Exchange is missing, just fill out the Feature Request form in iThemes. They are open to suggestions and want feedback!
Let us know what you think of Exchange, or what your suggestions are for the plugin, in the comments section below.
More about iThemes

Nos encantan los iThemes y no podríamos estar más emocionados con el reciente lanzamiento de su complemento gratuito. Hogar del renombrado complemento BackupBuddy y del todopoderoso Builder WordPress Theme Framework, sabes que cualquier cosa que provenga de iThemes seguramente será un código de alta calidad con características y soporte increíbles. Si desea ver algunos de los otros productos geniales de iThemes, simplemente haga clic en el botón.
Visit iThemes


