

Sometimes it happens that for one reason or another you must change the name of your website in WordPress.
Many do it for a strategic issue: Mark o SEO (maybe the other domain is penalized) or they want to move from a domain .TOP or .ON-LINE to one easier to remember as a .COM of those of a lifetime.
But others webmasters change domain name for other reasons.
Well, no matter what the motive behind the change is: in this article You will learn step by step to change the domain of your website in WordPress.
To take into account before changing the domain of your website in WordPress
Before making the domain change, it is convenient that you take this into account:
It is advisable to keep the structure
When we talk about structure we refer to the structure of the URLs of your site in WordPress, I give you an example so that you can see it easier:
- YouOldTOP/services
- YouNewCOM/services
As you can see in the previous example, in both cases we work with an identical URL structure.
Now look at this example:
- YouOldTOP /? Page = 123
- YouNewCOM/services
In this case old url structure not being adhered to And even when the change is positive because it has gone from an ugly URL and without SEO potential to a beautiful and friendly URL with Web Positioning and especially with users:
It is not recommended to make such a drastic change for a tracking issue.
That brings us to the next point that we need to keep in mind.
You must bear in mind that the tracking is not automatic
Even though here in this article you will see how to change the domain of your website in WordPress without suffering positioning problems you should bear in mind that:
Crawling and indexing are not automatic and instantaneous matters.
Even if you take all the precautions and follow this tutorial to the letter at the beginning it is very likely that you will lose some positions in the Google search engine and the other web search engines.
It is because of that do not be alarmed If in Analytics and Search Console you see a drop in traffic, it is normal to happen.
Must be patient and wait for Google and other search engines to crawl your website and index it (again).
That is why it is important keep URL structure that we had at the beginning (as we explained in the previous point) that will make the search engine spiders follow the usual route.
It is always convenient to make a backup
As you already know: we usually recommend making a full backup before executing any type of modification on our website.
Domain change can be a change important That can be done without major setbacks, but to avoid any inconvenience a good option is to do a full backup.
If you want to know how to make a backup in WordPress here we show you in detail:
How to backup in WordPress.
How to change the domain of your WordPress website step by step
In this section we show you how you can change the domain of your website in WordPress in detail, pay attention:
Buy the domain
Ok, it may seem a bit obvious, but we promised to explain everything without leaving us anything, therefore this is the first step natural:
Get a good domain at your favorite registrar.
Clever?
Change domain settings in WordPress
Okay, now we go to our WordPress dashboard:
YourViejoDomain.TOP/wp-admin
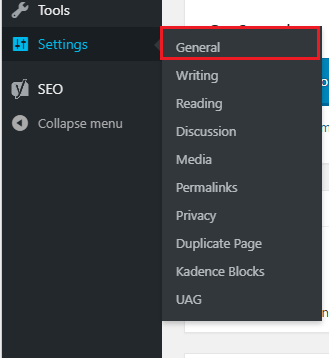
Login as you always have, now follow this path:
WordPress dashboard> settings> general (it is the first option that appears).
In the image below you can see it clearly:
You will see several options and some of them put:
- URL of your web address
- Site address (URL)
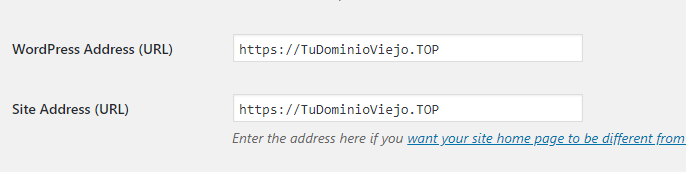
All you have to do here is, as you well suppose is:
Rename of your old domain by… the name of your new domain.
This step is as easy as write the new address in both fields and press save to save the changes.
You should see something like this in your WordPress dashboard:

Update wp-config.php
It is feasible that update wp-config.php sounds like a delicate, tedious, super technical and complex task.
The truth is that, despite the name, it does not require any special technical skills, you'll see.
You only have to access in the administration panel of your hosting (like cPanel).
Then access the file manager or file manager.
The path is something like this:
cPanel> Files> File Manager> Public_html
In public_html you must locate a file called:
wp-config.php
The next step is to edit that file, to do that right click, select the option Edit.
You will come across a snippet that looks like this:
define('WP_HOME', 'https: //YourOldDomain.TOP');
define('WP_SITEURL', 'http: //YourOldDomain.TOP);
define('WP_HOME', 'http: // YourOldDomain.TOP');
define('WP_SITEURL', 'http: // YourOldDomain.TOP');
Naturally, you will have to change YourOldDomain.TOP for YourNewDomain.COM
And save the changes.
Update the database
Another step that may sound complicated but is quite simple if you follow everything to the letter and the following route and the following steps:
- cPanel> Database> phpMyAdmin
- Locate the database of your WordPress website
- Locate the wp_options file
- Open the wp_options file for editing
- Find the lines where your old web address appears and replace TOP for YourNewDomain.COM
- Save changes
Yes, as promised it is quite simple: now there is only one last step left.
Apply a permanent redirect
This is the final step, all we have to do is apply a 301 redirect as follows:
Locate the .htaccess file found in public_html.
You can see more about the .htaccess file in this dedicated tutorial:
WordPress .htaccess file: everything you need to know
Now all you have to do is open the file and paste the following lines:
#Options + FollowSymLinks
RewriteEngine on
RewriteRule ^ (. *) $ https://YourNewDomain.COM/$1 [R = 301, L]
#Options + FollowSymLinks
RewriteEngine on
RewriteRule ^ (. *) $ https://YourNewDomain.COM/$1 [R = 301, L]
Save the changes and that's it.
If you have followed the tutorial you have changed the domain of your WordPress website.
Now you just have to update the Google Analytics and Google Search Console data and wait a few days.
Ok, this is just the beginning and if you want to continue learning more about WordPress you can sign up for best online WordPress course in Spanish on the web.


