
![El puerto HDMI no funciona en Windows 10 [SOLVED]](https://rmarketingdigital.com/wp-content/uploads/2021/04/Fix-HDMI-Port-Not-Working-in-Windows-10-4439203.jpg)
Fix HDMI port not working in Windows 10: HDMI is a standard video and audio cabling interface used to transmit uncompressed video data, as well as compressed and uncompressed (digital) audio data from HDMI-compatible source devices to a computer monitor, televisions and projectors. compatible video. Using these HDMI cables, users can connect various components, such as a home theater setup that includes televisions or projectors, record players, media streamers, or even cable or satellite boxes. When there is an obstacle with the HDMI connection, you can solve the problem yourself to fix things, which will fix the problem in most cases.
Many computer users have reported problems related to the HDMI port. Some common problems that users encounter most of the time are no picture, sound comes out of devices even when the cable is properly connected to the port, etc. Simply, the purpose of HDMI is to connect different components together easily using this generic HDMI connector where one cable is intended for both audio and video. However, there is an additional HDMI function to implement 'copy protection' (also called HDCP or HDCP 2.2 for 4K). This copy protection regularly requires HDMI connected components to be able to search and communicate with each other. This feature of recognizing and subsequently communicating is commonly called the HDMI link protocol. In case the "handshake" does not work well at any time, the HDCP encryption (built into the HDMI signal) will not be recognized by one or more connected components. This often leads to you not being able to see anything on your TV screen.
HDMI port does not work in Windows 10 [SOLVED]
Make sure to create a restore point in case something goes wrong.
There are different alternatives to solve HDMI connection problems, some of the techniques are explained below:
Method 1: check the HDMI cable connections
For Windows 10, unplug the power cord and then plug it back in again - If there is a case for Windows 10 users when all HDMI ports stopped working, you can solve this issue of HDMI port not working by first unplugging the power cord and later plugging in again. Then perform the following steps: -
Step 1. Try disconnecting all of your HDMI cables from their respective inputs.
Step 2. For 10 minutes, keep unplugging the power cord from the TV.
Step 3. Then reconnect the TV to the power source and turn it off.
Step 4. Now take the HDMI cable to your computer to connect it.
Step 5. Turn on the computer.
Método 2: ejecutar el solucionador de problemas de hardware y dispositivos
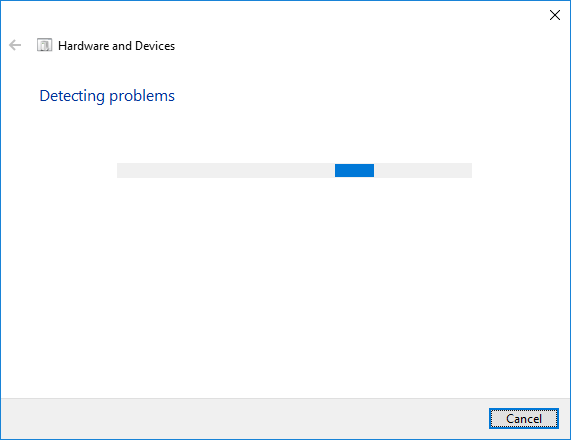
Run Windows 10 Troubleshooter - Generally, Windows 10's built-in troubleshooter will look for any HDMI ports related issues and fix them automatically. For this, you need to follow the steps mentioned below:
1.Press Windows key + I to open Settings and then click Update and security icon.
![]()
2.In the menu on the left, be sure to choose Solve problems.
3. Now, in the "Find and solve other problems" section, click on "Hardware and Devices".
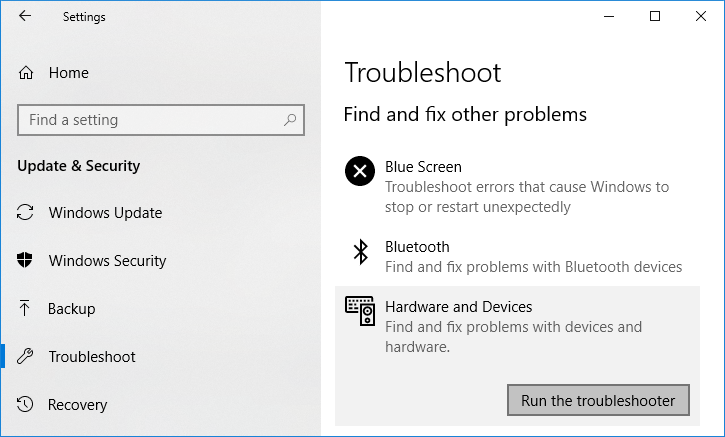
4.Then click Run the troubleshooter and follow the onscreen instructions to Fix HDMI port not working in Windows 10.
Method 3: reset your TV to factory settings
There is an option to restore factory settings on your TV to remove the HDMI port problem or any equivalent problem on machines running Windows 10. As soon as you run the factory reset, all settings will revert to factory defaults . You can reset your TV to factory settings using the 'Menu' key on your remote control. And later again check if the HDMI port not working in Windows 10 The problem is solved or not.
Method 4: update the graphics driver for Windows 10
Additionally, HDMI related issues can arise if the graphics driver is out of date and not updated for a long time. This can cause glitches such as HDMI not working. Thus, it is recommended to use a driver update that will automatically detect the status of your graphics driver and update it accordingly.
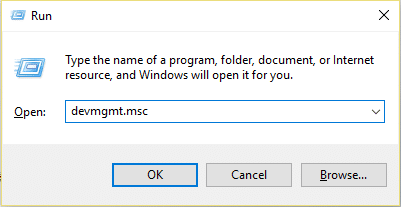
Manually update graphics drivers through Device Manager
1.Press Windows Key + R and then type devmgmt.msc and hit enter to open Device administrator.
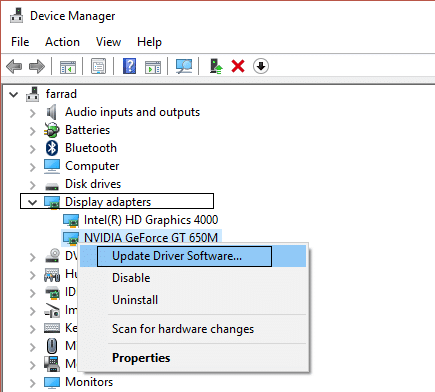
2.Then expand Display adapters and right click on your graphics card and select Let.
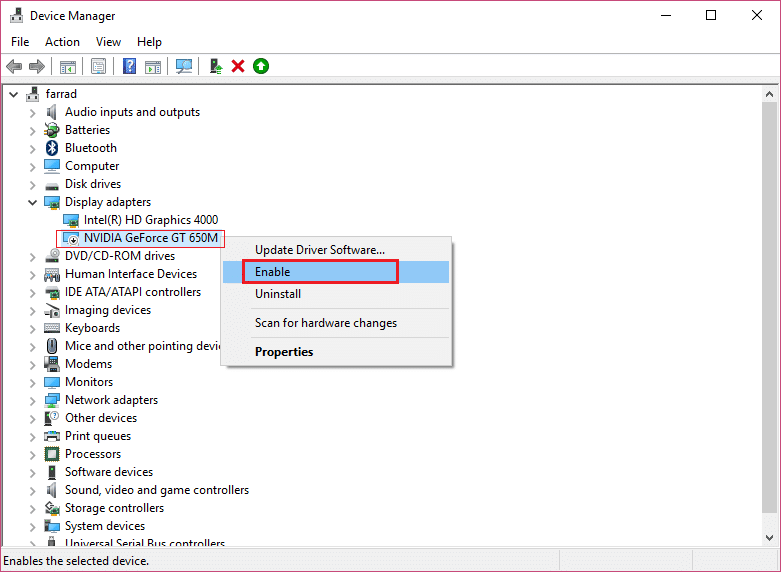
3. Once you have done this again, right click on your graphics card and select «Update driver".
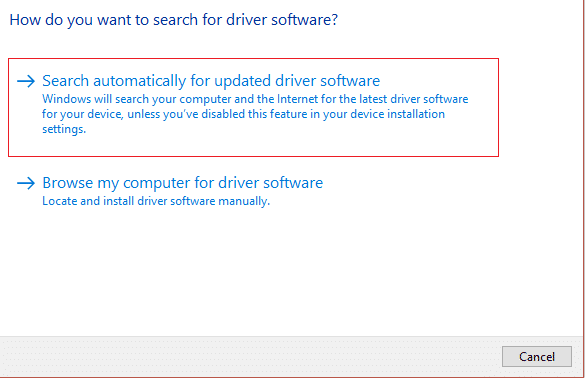
4.Select «Busque de forma automática el software del controlador actualizadoAnd let the procedure finish.
5.If the above steps were helpful in solving the problem, great, if not then continue.
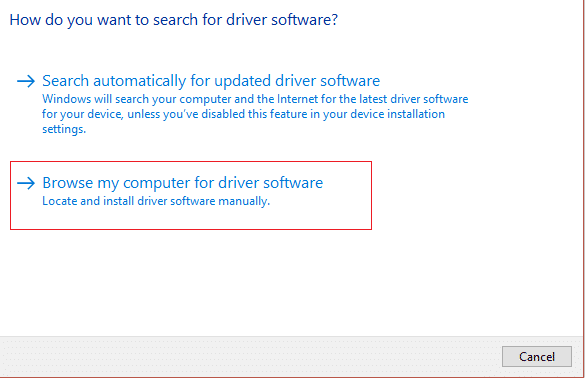
6.Right click on your graphics card again and select «Update driver"But this time on the next screen select"Search my computer for driver software.«
7.Now select «Let me select from a list of drivers available on my computer. «
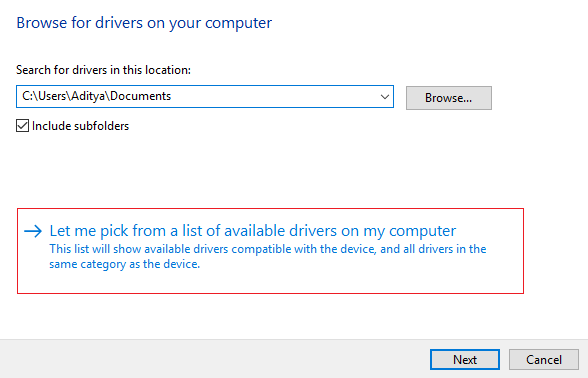
8. To finish, select the latest driver from the listing and click Next.
9. Allow the above procedure to finish and restart your computer to store the changes.
Follow the same steps for the integrated graphics card (which is Intel in this case) to update its drivers. See if you can Fix the problem of HDMI port not working in Windows 10, if not, continue with the next step.
Actualizar de forma automática los controladores de gráficos desde el portal Web del fabricante
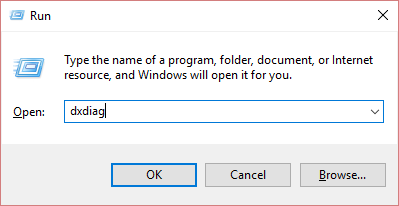
1.Press Windows Key + R and in the dialog box type “dxdiagAnd hit enter.
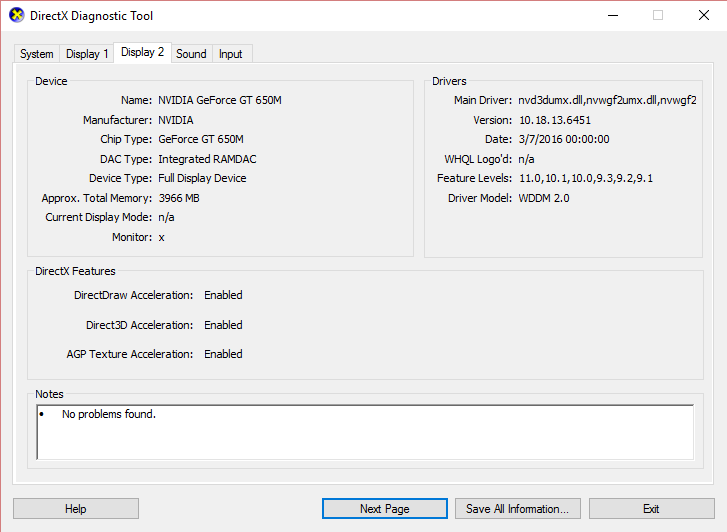
2.After that, find the display tab (there will be two display tabs, one for the integrated graphics card and one will be from Nvidia) click on the display tab and find your graphics card.
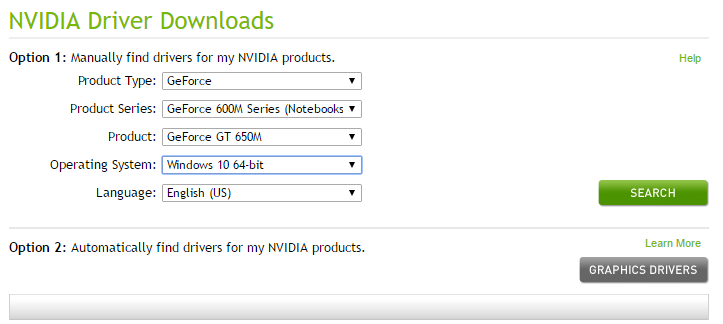
3.Now go to the Nvidia driver download web portal and enter the details of the product we just discovered.
4. Search for your drivers after accessing the information, click OK and download the drivers.
5. After a successful download, install the driver and you have successfully updated your Nvidia drivers manually.
Method 5: configure system display settings
The problem of the HDMI port not working can also arise if there are multiple monitors connected to your system. The problem may appear if you are using the wrong display settings. In this way, it is recommended to verify the settings so that your displays have the correct settings. To do this, you must press Windows key + P.
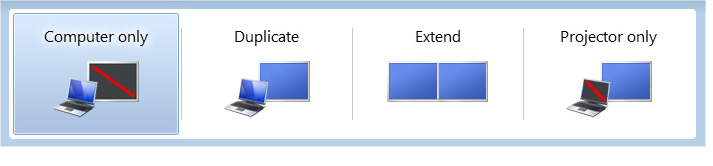
- Computer display / Computer only: to use the 1S t
- Duplicar: para mostrar el mismo contents en ambos monitores conectados.
- Stretch - to use both monitors to display the screen in stretched mode.
- Second Screen / Projector Only - Used for the second monitor.
(*10*)
Recommended:
Hope the above steps were helpful and now I can Fix HDMI port not working in Windows 10, but if you still have any questions regarding this tutorial, feel free to ask in the comments section.


