

<>

Yesterday te enseñamos que es un server DLNA y para qué sirve, como puedes leer en este post. En él te enseñamos que podemos configurarlo en nuestro PC con Windows 10. Esto es lo que te vamos a aclarar a continuación, los pasos que tenemos que seguir para poder configurar nuestro servidor DLNA en nuestro PC.
As we already taught you, we have one on the PC. In this way, the procedure that we have to perform in Windows 10 is configuration. No tendremos que instalar nada, algo que indudablemente hace que el procedimiento be mucho más rápido y sencillo en todo momento.
As is common in this type of situation, we must go to the configuration of Windows 10 first. We can do it by opening the start menu and clicking on the gear icon, or we have another way. You can use a combination of keys, Win + I, which allows us to open the configuration directly in a simple way.

(*10*)
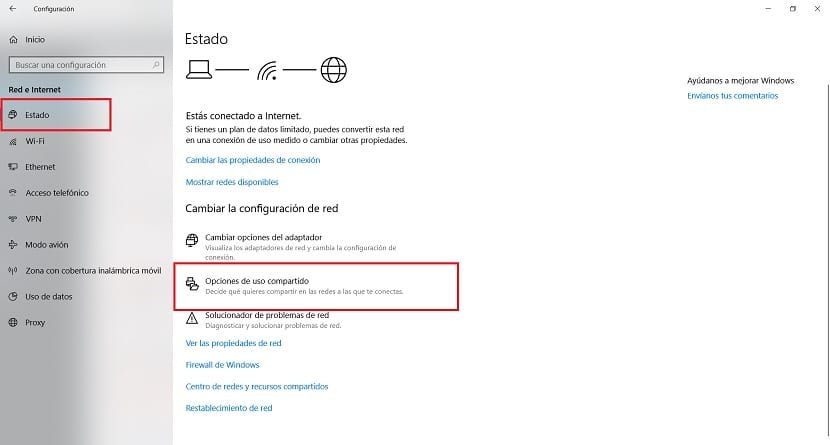
Within the configuration we have to go to the networks and Internet section. When it opens on the screen, we will have to go directly to the chapter called Changing the connection properties that appears on the screen. It does not matter if we are connected to WiFi or a cable. We have to have access in this section.
The first thing they ask us is the profile of the network. We only have two options in this case. By default, Windows 10 marks it as a public profile, but the one that what interests us at this time is the private or the domestic. Then we select the private profile and then we move on to the next step.
In it we have to go back to network and internet settings. In the state section, where we were before. We have to go down towards the end, where we will find the section of alternatives to share. We are going to click on it to choose the items that we are going to share with the rest of the PCs that are connected to that network with DLNA.

Next, a new window will open in which we find the advanced sharing settings. We have to complete a couple of alternatives on it. The first is that the computer will automatically detect this home network. This will allow us not to have to do anything to configure it. We also have to activate the option called "Enable file and printer sharing." From this dynamic, the printer will also be part of this network that we are creating with DLNA in Windows 10.
Then you must display the options in the All networks section. Here we have the most important items to consider. Thus we will be able to configure aspects to our whim. One of those that we have to choose is the multimedia transmission alternatives. As this is the first time we log in, a notice will appear saying that we are allowing other devices to access multimedia files on our Windows 10 computer. Basically press the activation option to continue.
In the next step we can name the computer and other devices that we have connected to the other DLNA network. It is something that you must configure to your liking. When you have done it, you must give it to accept it. Later, we go down to the end, where we find the password protection option. There we will have to turn on the Turn off sharing option with password protection. From this dynamic, we will not have to enter a password when using these items. When you've set everything up, click save changes.

With these steps we have already carried out the necessary steps for the DLNA Server Settings on our Windows 10 computer. As you can see, it is not complicated, but it is a somewhat long procedure. But you won't have a problem with that.


