
(*10*)
<>

One of the characteristics that arrived last year on Windows 10 was the Concentration Assistant. Puede que a muchos de ustedes no les suene familiar. Es una herramienta con la que mejorar la productividad del Username. O para asegurarnos de que en el trabajo o básicamente en el tiempo libre, tengamos menos distracciones. Entonces, a lo largo de ese tiempo, no recibiremos ninguna notificación molesta.
If you pretend make use of this Windows 10 concentration wizardBelow we explain the steps to follow in order to configure it in a simple way. Thus, for those users who do not know it, they will be able to learn a little more about this interesting function in the operating system.
The target de la misma es put an end to these annoying pop-up notifications, especially if you are working or if you need to enjoy a moment of leisure. Therefore, the Concentration Assistant allows us to determine a series of rules with which to choose when we are going to receive a notification and when not. So that we can have moments when we won't have any.


This Concentration Assistant can even prevent us from receiving any notification. for a specific period of time or even definitely, and configure only those notifications that we want to receive in Windows 10, because they are important. Therefore, it is a tool that can give us many uses.
Set up the concentration assistant
As usual in this type of situation, we must first go to the Windows 10 configuration. we have to enter the System section, which is usually the first one displayed on the screen. A series of alternatives are shown in the column on the left of the screen. One of the alternatives that appear in the column, or at least it should, is the Concentration Wizard.
We click on this option and the menu of this Concentration Assistant will appear in the center of the screen. Here we go to be able to select between three options in total, with which we will be able to configure it at will in Windows 10. The alternatives that appear on the screen are:
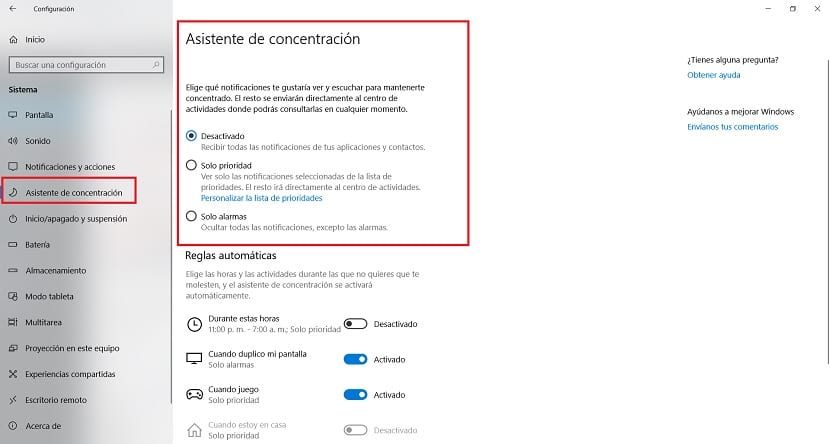

- disabled: Concentration Assist is disabled by default on the system. Therefore, we will receive all the notifications of all the applications that are in Windows 10. Both the pop-up notifications and those that come out within the Activity Center.
- Priority only: In this case we will only see the notifications of the applications that we have decided that are priority. The others will not popup, but will appear in the Action Center. In this case, we have to choose which applications have priority to show these notifications.
- Alarms only: All notifications that pop up in Windows 10 are disabled. In the case of wanting to be able to see them, we will have to resort to the Activity Center of the system. It is the most extreme mode, which leaves us free of any notification, as if it were a Do Not Disturb mode.
In case you choose the second option, it is necessary to establish which applications will have priority on Windows 10, so they keep showing notifications. This is something that each user can set individually. Since within this option, you see that there is a button that says Customize the priority list.
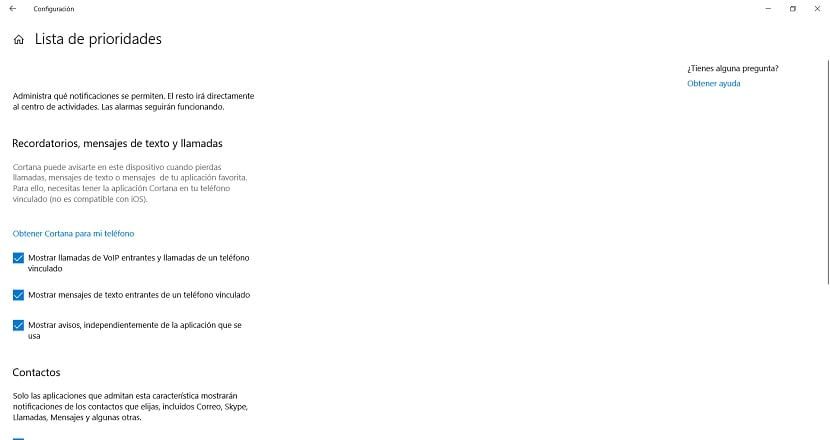

So that you can select whether there are applications that will display these notifications on your computer. Puedes seleccionar las que desees, las que ves son importantes, como Gmail o alguna aplicación de correo. Además puede elegir contactos que disponen prioridad. Esto va a depender de cada usuario. Una vez configurado, cuando use este modo específico del Asistente de concentración de Windows 10, solo recibirá estas notificaciones. El resto solo se mostrará en el centro de actividades del sistema operativo. What do you think of this feature?


