Siempre hemos pensado que la temática de este Blog debería estar más enfocada a informar sobre el buen uso de la plataforma Instagram y su aplicación, pero fundamentalmente intentando darte consejos acerca de cómo usar esta social network como herramienta promocional. Nunca nos habíamos planteado dar consejos sobre fotografía, principalmente debido a que no somos fotógrafos, pero tras ver los resultados de nuestra encuesta, queda claro que es un tema que nos interesa mucho. Es por ello que, en este post anhelamos mostrarte 3 tips to improve your dark photos on Instagram without having to discard them on the first trade.
These tips are based on our own experience with the app, which means that they are not universal rules that work for all cases, but rather simple tricks that have worked for us to significantly improve image quality when we wanted to post photos. Taken in low light on Instagram.
Give your dark Instagram photos another take with these simple tips.
Needless to say, these tips are geared towards mobile device photography, in other words, photos taken from a phone. If you capture your photos with a decent compact camera or DSLR (reflex), you shouldn't have a problem with low-light scenes.
Assuming that the 99% of smartphone cameras has its weak point in low light scenes and that there is little that can be done to avoid it, the most logical thing is that you use the editing applications and the application's own options. of the camera to substantially improve the quality so you don't have to give up posting your dark photos on Instagram. Thus, our tips to help you achieve this are:
- Use the exposure and focus tool of the camera app. This would be the first aspect to take into account in any photo that we are going to publish on Instagram.
In order to manually adjust the exposure and focus, you need to take the photo from the camera application and not directly from Instagram. The camera application will allow you to adjust these 2 parameters by basically pressing and holding your finger on the subject of the image, in other words, the area of the image that you would like to point to.
Regularly the exposure and focus function of the camera application is set by default to snap to the center of the image, so when the area to focus is not in the center, it is very important that you press your finger on the object that you want to point The image result will be much better and even more when there is little light.
FV-5 camera (for Android) and camera + (for iPhone) are probably the top 2 camera apps out there right now, allowing you to even separate focus point and exposure point.
Below is an example of the image without the correct exposure and the same image with the correct settings.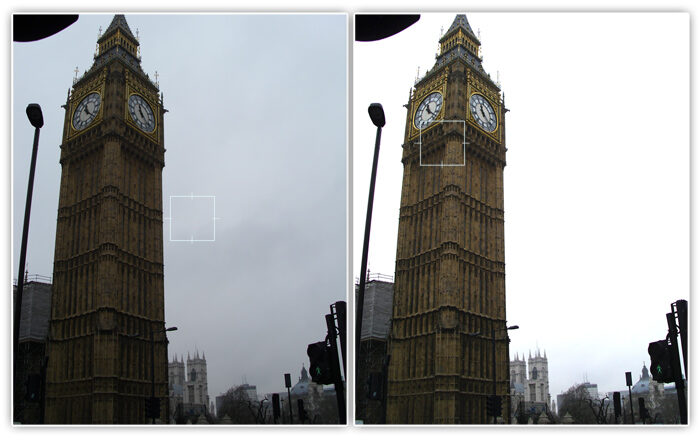 <>
<> - delete the noise with an editing application. Sometimes, not only by adjusting the exposure and focus well, you can get a quality image, especially in low light. It is in these cases where it is worth helping us with applications such as Pixlr express and its function to erase the noise in the image or what most will know as grain.
Care should be taken when using the denoise tool because it de-sharpens the image. If you abuse it, you can lose a lot of image detail and decrease the contrast a lot.
(*3*) - Do not apply the effect LUX from instagram. The effect LUX Instagram is used to enhance the colors of the image and the result is quite good when the photo was taken outdoors or in bright situations. However, it is not recommended to use this function on dark photos taken indoors or at night, the result is quite unpleasant, mainly due to the fact that it makes a lot of noise.
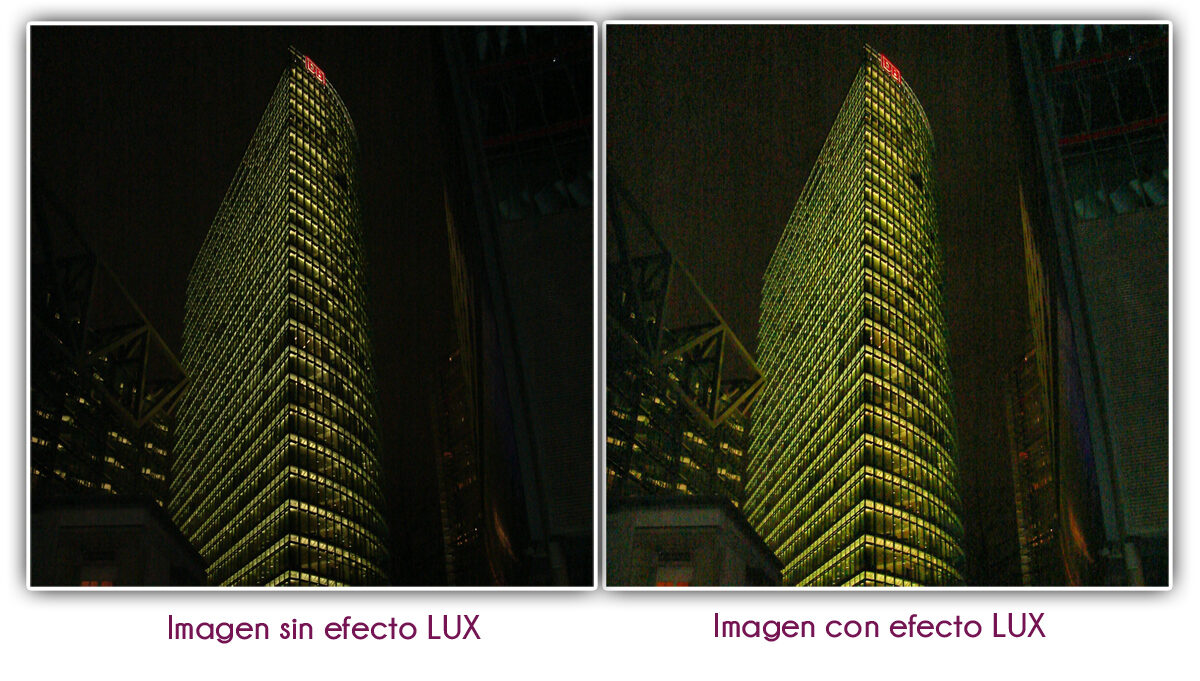 If you click on the image, you will be able to better appreciate the noise we are talking about.
As you can check, it is enough that you check these well 3 tips to improve your dark photos on Instagram. With practice, you will realize that many photos that you previously ruled out posting on Instagram due to their poor quality due to lack of light, can now be given a second chance by basically applying these simple techniques.
And you, what other tricks do you use to improve the quality of your photos taken with a cell phone in low light conditions?


