RECOMMENDED: Click here to fix Windows errors and get the most out of your system performance
Muchos de ustedes conocen lo difícil que es que las compañías impongan su software cuando no quieren instalarlo. Nvidia además es culpable de eso. Si es Username de la GPU de Nivida, sabe que cuando instala drivers para su GPU, además se instala un programa adicional llamado Geforce Experience con los controladores. Si buscas este programa, está bien, pero muchas persons lo encuentran inútil, dado que existen varios programas de arranque para todos los juegos en línea en estos días. Todos estos programas que se ejecutan en segundo plano pueden ralentizar su ordenador, fundamentalmente si sus especificaciones no son de primera clase. No obstante, gracias a la última Nvidia driver, you can now install the GeForce driver even without any experience with GeForce.
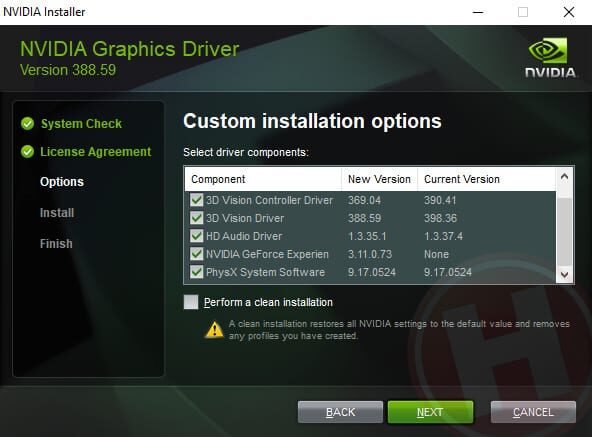
Previously, there was a way to bypass the installation of the Geforce Experience program, but you had to select custom installation throughout the installation procedure to manually choose Geforce Experience from the list of services to be installed on your computer.
Esto no significa que Geforce Experience be un programa redundante, al contrario, puede ser útil si buscas que tus juegos se optimicen de forma automática para el hardware que tienes instalado en tu ordenador. Además es el programa de nivel de entrada para muchos usuarios que buscan registrar sus juegos. Al mismo tiempo, además tiene otras características sofisticadas. De este modo, es factible que desee probarlo antes de elegir si lo desea o no.
How to install NVIDIA drivers without GeForce Experience
Once you have verified the above listing, you can install your NVIDIA drivers. This procedure is simple, as long as you make sure you make the right decisions.
To get started, go to the NVIDIA driver download page. Here you will find a series of drop-down lists where you will be able to indicate the product you have. Next, we will review each of these drop-down lists:
- Product Type: If you've bought a graphics card for gaming or general use, it's most likely a "GeForce."
- Product Series: If you purchased a recently manufactured card, it is most likely a “GeForce 10 Series”, “GeForce 16 Series” or “GeForce RTX 20 Series”. If you are using a notebook, be sure to choose the selection with the "(notebooks)" suffix.
- Product: Here you select the actual model of your graphics card.
- Operating system: Here you indicate which operating system your computer uses.
- Windows Driver Type – We suggest choosing “Standard” here. Once you have installed the GeForce Experience software with its driver, it will automatically update to DCH if it requires this type of software.
- Download Type: Requires Game Ready Driver (GRD).
Once you have made your selection, click 'Search' and you will be directed to the respective page. From here, click "Download" and then install the software.
To understand which NVIDIA graphics processor you have

- To check which NVIDIA GPU you have on your Windows 10 computer, open Task Manager. You can do this by pressing Ctrl + Shift + Esc or by right-clicking on the taskbar and selecting "Task Manager".
- Click on the "Performance" tab at the top of the Task Manager window. If necessary, click "More details" at the bottom of the Task Manager window to expand Task Manager and display the tabs.
- Select the "GPU" entry in the sidebar. Look for your GPU name in the top right corner of the Task Manager window.
- If you have multiple GPUs on your system, click on each one and check the names. If you have a gaming laptop, it probably has NVIDIA and Intel graphics cards. Look for the name of the NVIDIA GPU.
RECOMMENDED: Click here to fix Windows errors and get the most out of your system performance