
Remove the Homegroup icon from the desktop in Windows 10: If you restart your computer and suddenly the Homegroup icon appears on your desktop out of nowhere, what would you do? Obviously, you will try to delete the icon since you have no use for the Homegroup that has suddenly appeared on your desktop. But even when you try to delete the icon when you restart your computer, you will find the icon again on your desktop, so deleting the icon in the first place is not very useful.
![]()
The main cause of this is that when sharing is ON, the homegroup icon will be placed on the desktop by default, if you turn off the sharing option, the icon will disappear. But there is more than one method to clear Homegroup icon from desktop in Windows 10 that we will discuss today in the troubleshooting tutorial listed below.
Professional advice: Right click on the desktop and select Update, this may fix your problem, otherwise continue with the tutorial below.
Remove the Homegroup icon from the desktop in Windows 10
Make sure to create a restore point in case something goes wrong.
Method 1: disable the sharing wizard
1.Open File Explorer by pressing Windows key + E.
2.Now click Sight subsequently click Options.
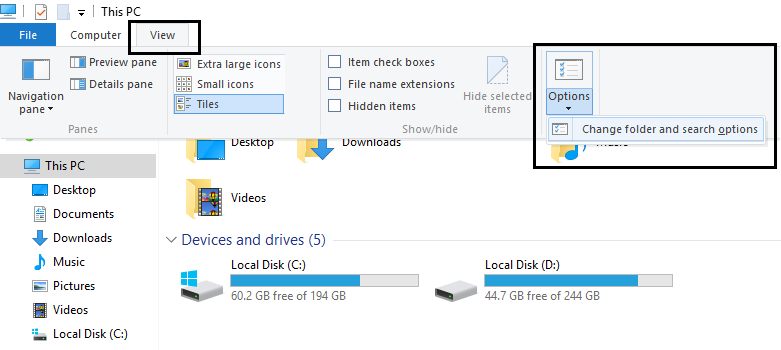
3.In the Folder options window changes to See tab.
4.Scroll down until you find «Use the Sharing Wizard (recommended)And uncheck this option.
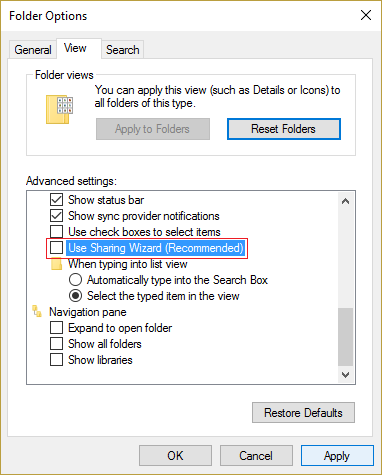
5. Click Apply followed by OK. Restart your computer to store the changes.
6.Go back to Folder Options and check the option again.
Method 2: uncheck Network in desktop icon settings
1.Right-click an empty area of the desktop and select Personalize.

2.Now from the left side menu select Topics and then click Desktop icon settings.
![]()
3.In the Desktop Icon Settings window uncheck Network.
(*10*)
4. Click Apply followed by OK. This definitely delete the Homegroup icon from the desktop but if you still see the icon, continue to the next method.
Method 3: Turn off network discovery
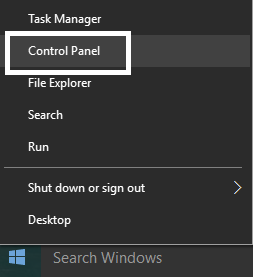
1.Press Windows Key + X and then select Control Panel.
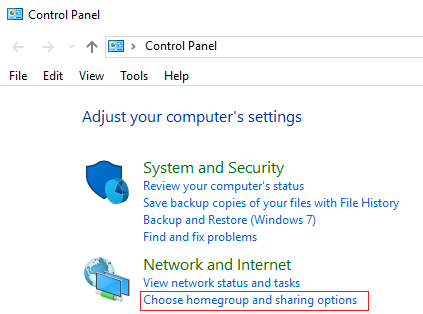
2.Now click Choose home group and sharing options in Network and Internet.
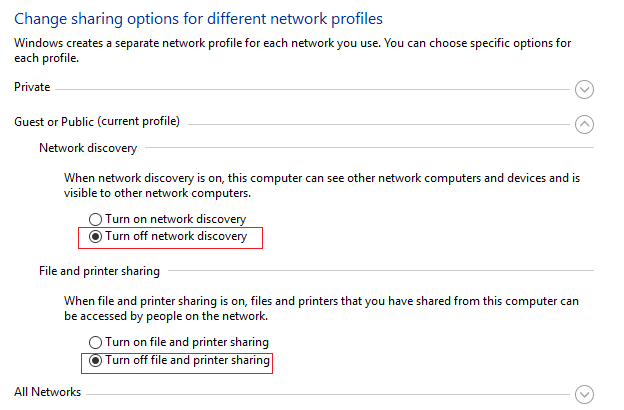
3.In Share with other home computers, click Change advanced sharing settings.
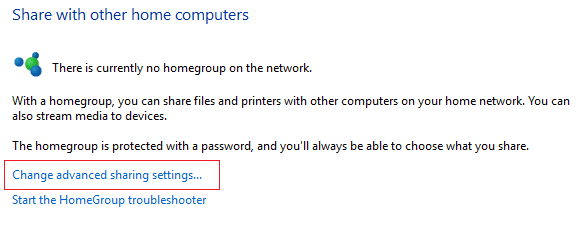
4.Then check Diversion network discovery and click Save Changes.
This can help you Remove the Homegroup icon from desk but if not, continue.
Method 4: Leave the group at home
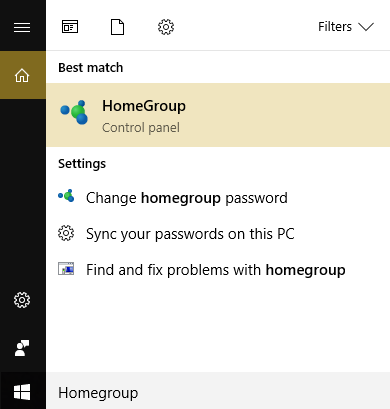
1.Type Home group in the Windows search bar and click Home group setup.
2.Then click «Leave the group at homeAnd then click Save Changes.
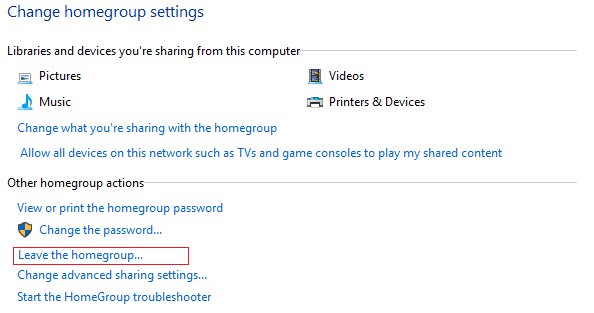
3. Next, it will ask you for confirmation, so click again on Leave the group at home.
![]()
3. Restart your computer to save the changes.
Method 5: clear the Homegroup desktop icon through registry
1.Press Windows Key + R and then type regedit and click Get Access to open Registry Editor.
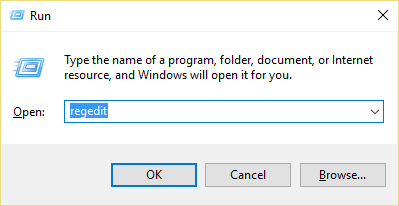
2.Go to the next registry key:
HKEY_CURRENT_USER SOFTWARE Microsoft Windows CurrentVersion Explorer HideDesktopIcons NewStartPanel
3.Find the key {B4FB3F98-C1EA-428d-A78A-D1F5659CBA93} in the right window pane.
![]()
4.If you can't find the above Dword, you need to create this key.
5.Right-click an empty area of the registry and select New> DWORD value (32 bits).
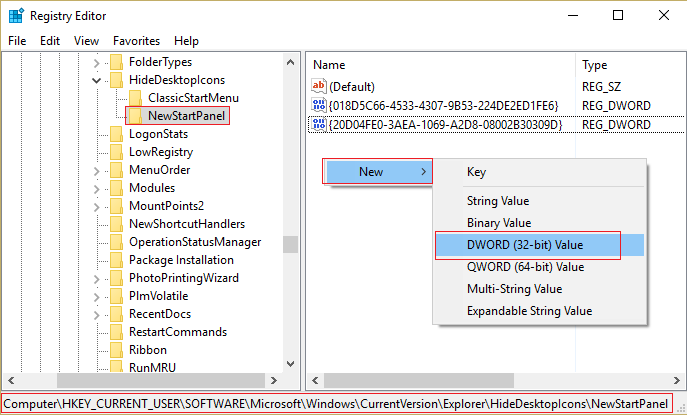
6.Name this key as {B4FB3F98-C1EA-428d-A78A-D1F5659CBA93}.
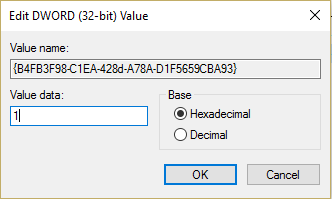
7.Double click on it and change its value to 1 if you want to delete the HomeGroup icon from the desktop.
Method 6: disable homegroup
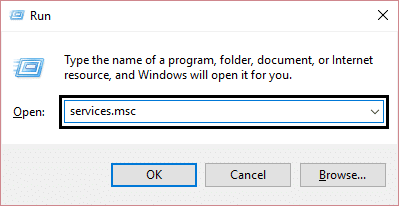
1.Press Windows Key + R and then type services.msc and press Enter.
2.Scroll until you find HomeGroup listener and Group home provider.
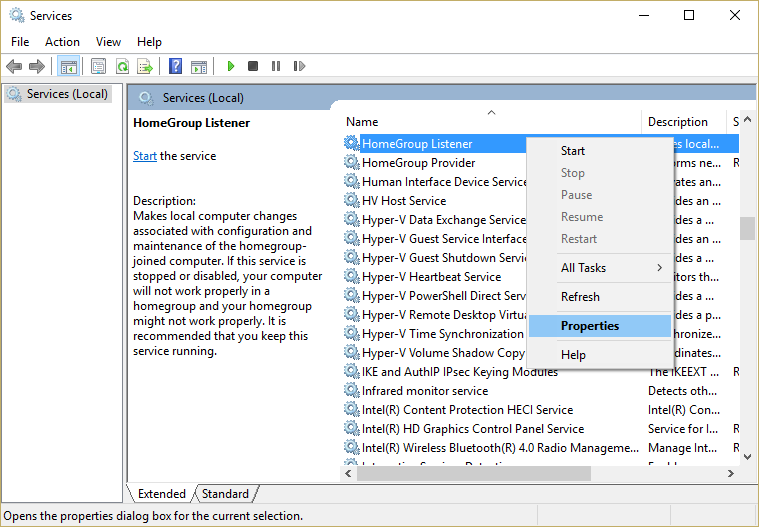
3.Right click on them and select Properties.
4. Make sure to configure your startup type to disabled and if the services are running, click Stop.
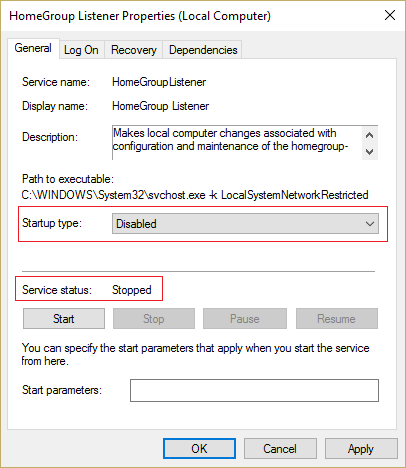
5.Restart your computer to store the changes and check if you were able to delete the Homegroup icon from the desktop in Windows 10
Method 7: clear the HomeGroup registry key
1.Press Windows Key + R and then type regedit and click Get Access to open Registry Editor.
2.Naviagte to the next registry key:
HKEY_LOCAL_MACHINE SOFTWARE Microsoft Windows CurrentVersion Explorer Desktop NameSpace
3. In NameSpace, find the key «{B4FB3F98-C1EA-428d-A78A-D1F5659CBA93}”, Right click on it and select Put off.
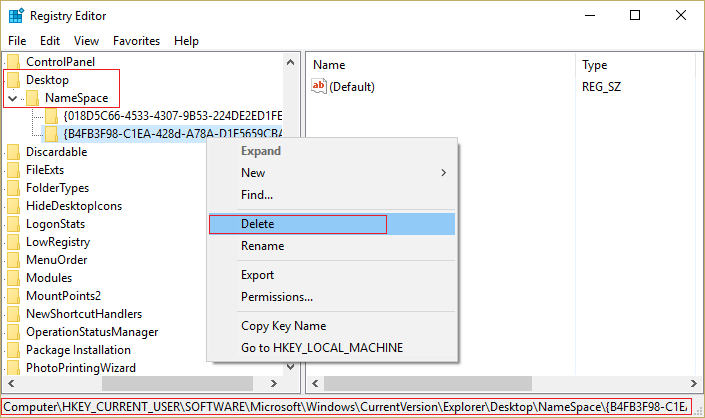
4.Close Registry Editor and restart your computer.
Method 8: Run DISM (Deployment Image Servicing and Management)
It is possible that the Windows files are corrupt and you cannot disable the group at home, then run DISM and try the above steps again.
1.Press Windows Key + X and then select Command Prompt (Administrator).
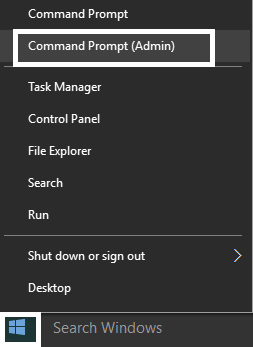
2.Enter the following command in cmd and hit enter:
DISM.exe / Online / Cleanup-Image / RestoreHealth

2.Press enter to run the above command and wait for the procedure to complete, usually it takes 15-20 minutes.
NOTE: If the above command doesn't work then try on the below: Dism / Image: C: offline / Cleanup-Image / RestoreHealth / Source: c: testmountwindows Dism / Online / Cleanup-Image / RestoreHealth / Source: c: testmountwindows / LimitAccess
Note: Replace C: RepairSource Windows with the location of your repair source (Windows Install or Recovery Disc).
3.After the DISM procedure if completed, type the following in the cmd and hit Enter: sfc / scannow
4.Let the System File Checker run, and once it is complete, restart your computer.
.
That's all you have with success Remove the Homegroup icon from the desktop in Windows 10 If you still have any questions regarding this post, feel free to ask them in the comment section.


