Step 1: Complete alt tags.
Step 2: …?
There's more to image SEO than writing a few alt tags ... much more.
Some may even argue that with Google's recent advancements in machine learning, alt tags no longer matter. For example, this is what happens when you upload a photo of a cat to the api Google Cloud Vision, your machine learning image identification tool:
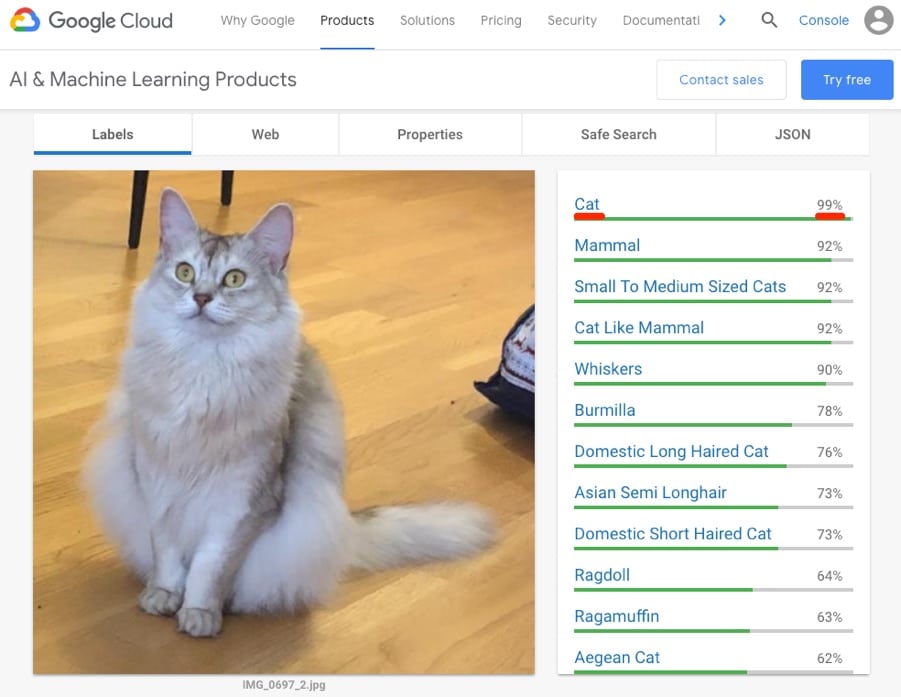
Google can tell that this is a photo of a cat with near perfect accuracy. That's awesome. I made sure to remove all metadata from this image. You can also see that the file name is a rather undescriptive IMG_0696_2 .jpg.
So what is the point of adding alt tags if Google understands the content of the images? Is the SEO image dead? No way.
In this post, I'll be looking at image optimization tips to get more organic traffic.
Name your images appropriately
This is what google says about image file names:
[…] The name of the file can give Google clues about the subject of the image. For example, my-new-black-kitten.jpg is better than IMG00023. JPG .
This is basic SEO. Most people do this.
That's likely because Google has been giving this same advice for years.

Proof that Google's advice on this has remained constant since 2013, via The Wayback Machine.
But once again, given Google's recent advancements in machine learning and its newfound ability to recognize images, how important is this? Really ?
Good question. I am aware that the cat example was quite impressive. So, let's try another image.
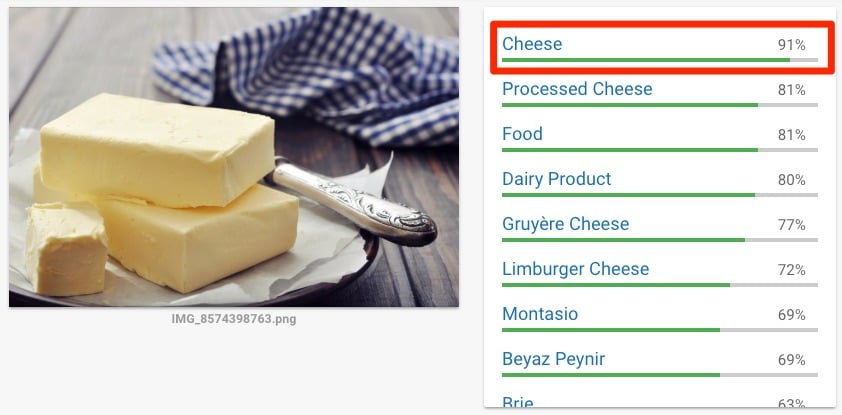
Google is 91% sure this is cheese. Google is wrong.It's lard / butter
Now, I'll be the first to admit that butter looks like cheese in this image, but the point is the same: Google isn't perfect - you should do everything in your power to help them understand your images.
That does not mean keyword stuffing so why yes (keyword stuffing). Keep your file names descriptive and straightforward.
Okay: dog.jpg
Bad: dog-puppy-pup-pups-puppies.jpg
Renaming images does not require much effort to make them more descriptive. Then it is worth doing.
Use the "alt" field and subtitles
Alternative text (alt) describes an image. Browsers also display alt text if there is a problem rendering images.
Here is the HTML syntax:

That example comes directly from the official guidelines from Google . Used to show what a well-written alternate tag looks like. Here are his general tips for writing these:
Google uses alt text in conjunction with computer vision algorithms and page content to understand the subject of the image. […] When choosing alternative text, focus on creating useful, information-rich content that uses keywords appropriately and is in the context of the content on the page. Avoid filling alt attributes with keywords (keyword stuffing) as it results in negative user experience and can make your site look like spam.
Matt Cutts gives some equally good tips for alt text in this old but relevant video:
However, here is a shortcut that almost always works perfectly: finish this sentence:
»This is an image / screenshot / photograph / drawing of __________».
Remove any conjunction or connection (for example, a / an) from the resulting sentence and use the last part as alternative text. Here are some examples:
»This is a photograph of a chocolate cheesecake «.
»This is a drawing of my cat, Mark, playing with his toys «.
You may want to deviate slightly from this formula when writing alt text for product images. For these, it may be helpful to add the product or serial number, like this:

Google knows what product we are looking for based on a search of the product number only. So incorporating this into your alt text can help Google understand that it is, in fact, an image of a product.
Oh, and don't forget about the subtitles. Those are important too.
This is what Google says:
Google extracts information about the subject of the image from the content of the page, including Subtitle and the titles of the images. Whenever possible, be sure to place images close to relevant text and on pages that are relevant to the subject of the image.3. Choose the best file type
Most images on the web are one of three file types: JPEG, PNG, and GIF.
Each of them uses a different compression method. That means the file sizes between the three file types can vary dramatically. That is important. Here is why :
Images are often the biggest contributor to overall page size, which can make pages slow and expensive to load..
Page load time is crucial for SEO. Google has confirmed that it is a ranking factor in both desktop computers like in mobile devices . Your task is to choose the most appropriate file type for each image, that is, the one that offers the best compression with the least quality reduction.
With that in mind, here is the same image as a JPEG, PNG, and GIF:

You can see that the JPEG image is a clear winner. It has the smallest file size, and there is little or no noticeable difference in image quality between that and the other two images. So is JPEG always the right choice? No way.
I think this illustration says it all:
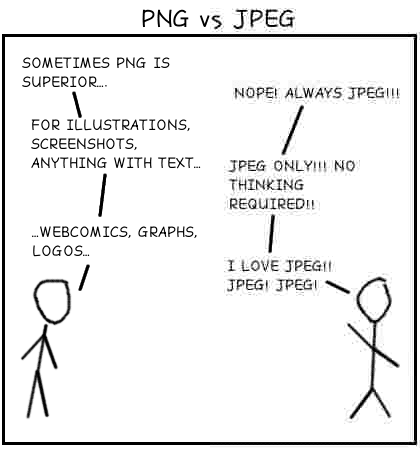
Generally speaking, JPEGs are the best format for photos, while PNGs are best for line art, text, etc. GIFs are best for moving images.
Most professional image editing applications (for example Photoshop) will give you the option to save as JPEG, PNG, or GIF. You can also use them to convert an image from one file format to another. Don't have professional image editing software? Proof this free tool .
For screenshots, here are some applications that allow you to export in multiple formats:
- Skitch (Mac)
- Monosnap (Mac, Windows)
- Light shot (Mac, Windows)
There is also a new image format on the scene: WebP. This promises superior compression to both JPEG and PNG. I decided to remove it from the article for now though, as it currently only supports Chrome and Opera. You can get more information about WebP here .
Adapt the dimensions of the images
Most of the time, we post images that are not adapted to the size they are actually displayed in.
We can use this tool to resize your images in bulk.
It is only the width that matters, so upload your images in bulk and then use the "max width" option to adjust only the width.

We bulk upload our JPEG and PNG files in two separate batches. Otherwise, the tool will convert all images to one consistent image file type. You can select between JPEG and PNG in the tool itself. Use the appropriate option for the batch of images you are optimizing.
Here are two reasons why this tool is great:
- Max width resizing Let's say the maximum width of your website is 700px. You have a ton of images that need to be resized. Some are wider than 700px, and some are narrower than 700px. You don't want to resize the narrow ones to 700px because that will lower the overall quality of the image. This tool keeps those images the size they are. Only resize the ones that are too wide.
- Keeps file names intact - You've spent years naming your images for SEO. Resize them and download the resized versions. Open the .zip file to find image1.png, image2.png. (You'll understand this frustration if you've ever downloaded images from Google Docs!) This tool keeps file names intact, so you won't have to rename after resizing.
Compress the file size of your images
Take a look at these two images:
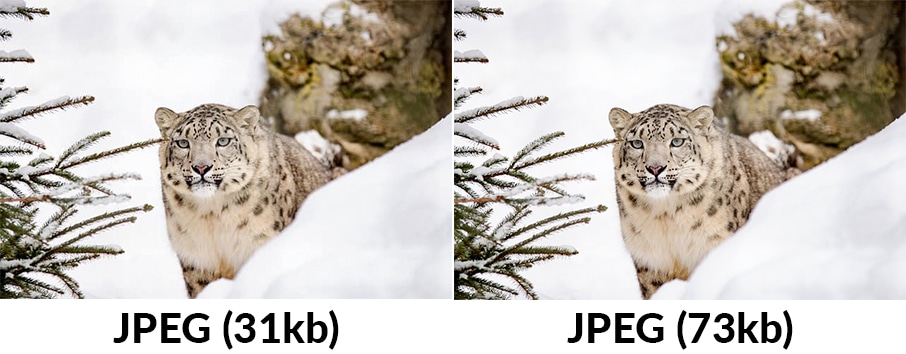
Both are JPEGS. There is little noticeable difference in quality between the two, however the first image is 58% smaller than the first (31 kb vs 73 kb).
Google has very extensive documentation on optimizing images for the web.
The key to the file size is as follows:
For best results, experiment with various quality settings for your images and don't be afraid to downgrade - The visual results are often very good and the file size savings can be quite large.
Google recommends three open source tools to help with this: Guetzli , MozJPEG (by Mozilla) and pngquant . You can read their guidelines for using these tools here . However, keep in mind that these are command line tools. If you are not comfortable using such tools, Google's recommendation is to use ImageOptim, a free tool for Mac. (Find Linux and Windows alternatives here ).
Just drop your images and they will be compressed.

You can change the compression level in the settings and even enable lossy compression.
As well remove the data EXIF default. That helps reduce the file size even further, although it doesn't usually a lot of. We can use this free web-based tool (officially recommended by Google) to remove EXIF data if you don't plan on using ImageOptim.
Google has declared that EXIF data can be a "ranking factor" in Google Images.
For that reason, it may be something we want to keep. Removal of EXIF data can be disabled in ImageOptim settings.
Also, if you are doing Local SEO , that may be another good reason to keep the EXIF data intact. Google has never explicitly said that they analyze EXIF data such as GPS coordinates to influence local rankings, but many SEO professionals believe it does.
Our verdict? The potential positives of leaving EXIF data intact, when doing local SEO, probably outweigh the negatives.
How good are the results of this tool? I decided to do a little experiment. I took a small sample of 15 images, some JPEG, some PNG. I threw them all into this tool in default settings. I did the same for some other alternatives.
Here's how they fared in terms of average file size reduction:
- Imageoptim : 69% (JPEG). 40% (PNG)
- Short pixel : 42% (JPEG). 59% (PNG)
- Kraken.io : 13% (JPEG). 63% (PNG).
- TinyPNG : 27% (JPEG). 65% (PNG).
- Optimizilla : 27% (JPEG). 60% (PNG)
- Imagify.io : 6% (JPEG). 1% (PNG)
- Compressor.io : 42% (JPEG). 58% (PNG)
Imageoptim (Google's recommended tool) was by far the best for JPEG. But it was one of the worst for PNG. However, a caveat is worth noting: ImageOptim defaults to a PNG-quality 70%. You can get to 40%.
Still, if you stick to the results of the default settings above, Shortpixel seems to be the best all-round image compressor.
That's especially good news for WordPress users because there is a WordPress ShortPixel plugin . It's free up to 100 images per month.
6. Create an image sitemap
This is what google say about image sitemaps:
Images are an important source of information about the content on your site. You can provide Google with additional details about your images and provide the URL for images that we might not otherwise discover by adding information to an image sitemap.
These These are the tags you can use in image sitemaps:
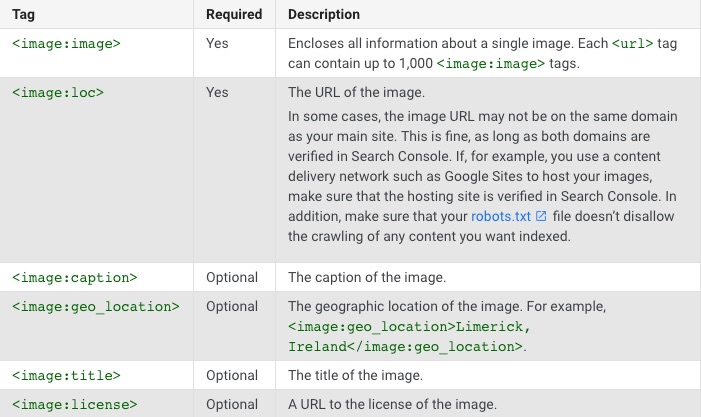
If you are using WordPress and Yoast SEO, the images are added to your sitemap automatically. This is even true for sites that have the "media" pages set to noindex. ( Note: that's now the default setting in the latest version of Yoast). However, Yoast only includes the requirements
Google's documentation for image sitemaps is pretty sparse. Nowhere do they specify the desired syntax for the
Google also claims that:
Image sitemaps can contain URLs from other domains, unlike regular sitemaps, which impose cross-domain restrictions. This allows webmasters to use CDNs (content delivery networks) to host images. We recommend that you verify the CDN domain name in Search Console so that we can report any crawl errors we may find.
It is useful to know if you use a CDN to host your images. We will talk about that later.
Use vector images where appropriate
This is what google says about vector graphics:
Vector graphics use lines, points, and polygons to represent an image. [They are] ideal for images consisting of simple geometric shapes (eg logos, text, icons, etc.) and offer sharp results at every resolution and zoom setting, making them an ideal format for high resolution displays and assets that must be displayed in different sizes.
Many sites use vector graphics for their logos and other simple elements on the site.
SVGs (Scalable Vector Graphics) are perhaps the most popular vector format on the web. They were developed by the World Wide Web Consortium (W3C) and are based on XML. As such, all modern web browsers support them.
No matter what browser, device or screen resolution you have, SVGs will look sharp because they are not pixelated. It could display an SVG on a screen the size of a planet; I wouldn't lose an ounce of quality.
These are Google's suggestions for optimizing SVG:
- SVG files should be minimized to reduce their size.
- SVG files must be compressed with GZIP.
Uses this web application or this Mac app to do the size reduction. Both offer a simple drag and drop interface to minimize such files. I prefer the web application.
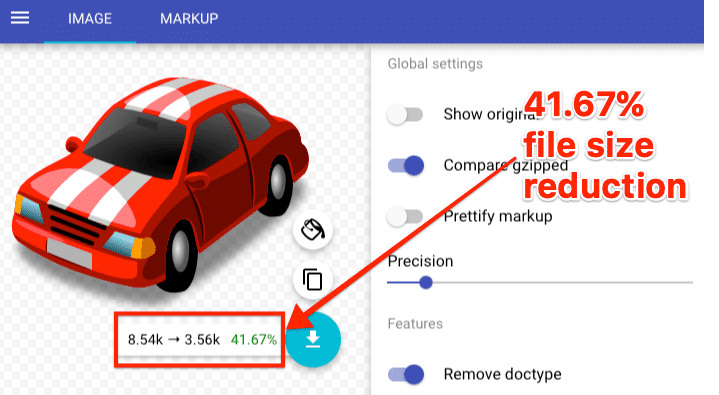
That screenshot sums up everything you need to know about SVG. We can see that the original size of the SVG was 8.54kb. That's it incredibly little. The minified (and compressed) version is even smaller at just 3.56kb, a savings of 41.67%.
Gzip compression is something that is enabled at the server level. In other words, the SVG above will only use 3.56kb of bandwidth if the server allows it; otherwise it will use 8.54k.
Use this tool to check if gzip compression is enabled on your server.
Serve responsive images
Let's say we upload a 720px wide image to your site.
If someone visits on a mobile device with a much smaller screen, say 320px wide, then the browser still has to load the 720px image. That image will look perfectly fine. But so would a 320 px wide image.
Do you see the problem? Loading the 720px image is a waste of bandwidth and only serves to slow down the page loading speed. That is not good for SEO.
The solution is to use srcset.
This is a piece magic of HTML code that tells the browser to load different versions of an image for different screen resolutions.
Here is the syntax, followed by an explanation:

WordPress takes care of automatically (a from WordPress 4.4 , which everyone should be using now). For each image you upload, WordPress creates these versions default:
- Miniature : A square crop (150 px by 150 px).
- Means, medium - Resized so that the longest side is 300 pixels wide or tall.
- Medium Large . Resized to 768 pixels wide.
- Big - Resized so longest side is 1024 pixels wide or tall.
- Full : original image.
Furthermore, WordPress also adds srcset automatically.
To reiterate: that code is completely generated by WordPress. We do not upload multiple versions of that image.
Use schema markup (for recipes, products, and videos)
Outline markup is probably something you are most familiar with in the context of Google web search. It looks something like this in regular search results:

But did you know that schema markup can also be relevant for image SEO?
This is because Google displays relevant badges in thumbnails in mobile image search results. This is what they look like:
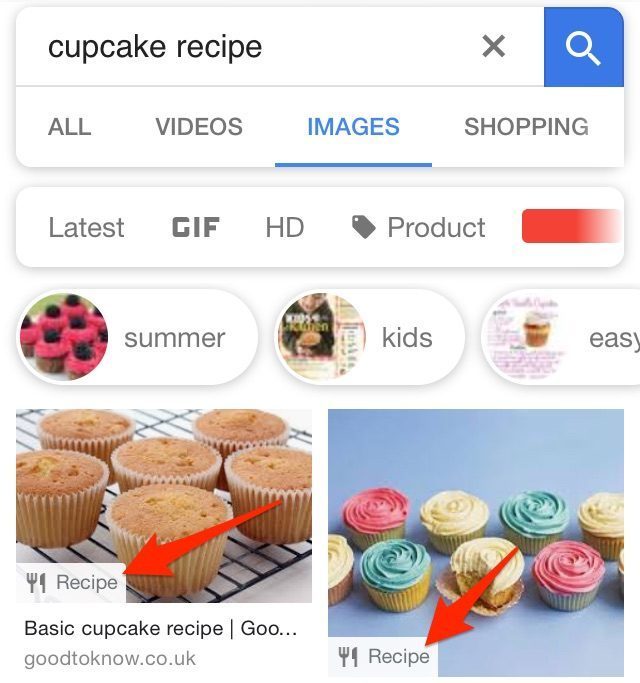
Google says this about these badges:
If you have images on your site, you can help users identify the type of content associated with the image by using appropriate structured data on your pages. This helps users find relevant content quickly and sends better targeted traffic to your site.
Currently, Google supports four types of brands: products, recipes, videos, and GIFs.
Making sure your images show these badges in Google Image Search is easy. You just need to add the appropriate outline markup to the page.
Add the recipe of marks on the recipe pages.
Add product marked on product pages.
Add markup from video to pages with videos.
Let's keep in mind that GIFs don't require any additional markup - Google already knows they're gifs.
Google likely supports badges for these four types of content because they have recognized that their users often search for such content on Google Images.
Lazy Loading
Lazy loading occurs when the browser defer loading images (or any other object, video, etc.) until they need to be displayed on the screen. Other images are uploaded when they need to be uploaded, that is, as you scroll.
This is what google say about lazy loading:
Lazy loading can significantly speed up loading on long pages that include many images below the fold by loading them as needed or when the main content has finished loading and rendering.
There has been a lot of debate in the past as to whether lazy-uploaded images are good or bad for SEO. Google has also sent mixed messages . However, perhaps the best indication that Google recommends lazy loading in 2018 is this:

That is a recommendation of the tool PageSpeed Insights of Google .
There are a few different methods, but they all involve Javascript. If you are unfamiliar or uncomfortable with such things, it may be worth hiring a specialist to help you.
If you are using WordPress, as we are, then there are some lazy loading plugins.
Take advantage of browser caching
Browser caching is where images (and other files) are stored in your visitors' browsers. The result is that things load faster if they visit your website in the future.
For example, when you landed on this post from our blog, you had to download all the images from the article and display them in your browser. Now, without browser caching, this process should be repeated in its entirety if you want to reread this page tomorrow.
However, with browser caching, what happens is that your browser is left with some of these images. So when you see this page again, or a similar page, you don't need to download them all again. Many are already on your pc or mobile device and will therefore load much faster.
This is what google says About browser caching:
HTTP caching can speed up page load time on repeat visits.
When a browser requests a resource, the server providing the resource can tell the browser how long to temporarily store or "cache" the resource. For any subsequent request for that resource, the browser uses its local copy, rather than going to the network to obtain it.
You can even see this warning in Google PageSpeed Insights If your website could benefit from browser caching:

So how do you enable browser caching for your images?
In WordPress, it's pretty straightforward. Let's just install a plugin like W3 Total Cache . That will enable browser caching by default and add the necessary modifications to your .htaccess file.
For non-WordPress users, you will need to add this code to your .htaccess file manually:
ExpiresActive On
 # Images
 ExpiresByType image / jpg "access 1 year"
 ExpiresByType image / jpeg "access 1 year"
 ExpiresByType image / gif "access 1 year"
 ExpiresByType image / png "access 1 year"
You can change the part from "1 year" to "1 month", "1 week", "1 day", "1 hour", and so on. However, this setting should work fine for most sites. These are also the values that W3 Total Cache uses by default.
Use a CDN
Most websites serve all of their files (including images) from a single server in one location.
If we assume that your web server is in Brazil, then your images will not have to travel very far when someone from Brazil visits your website. However, it is a different story for your visitors from other places. Images have to travel much further to reach them. That slows down the speed at which your website loads.
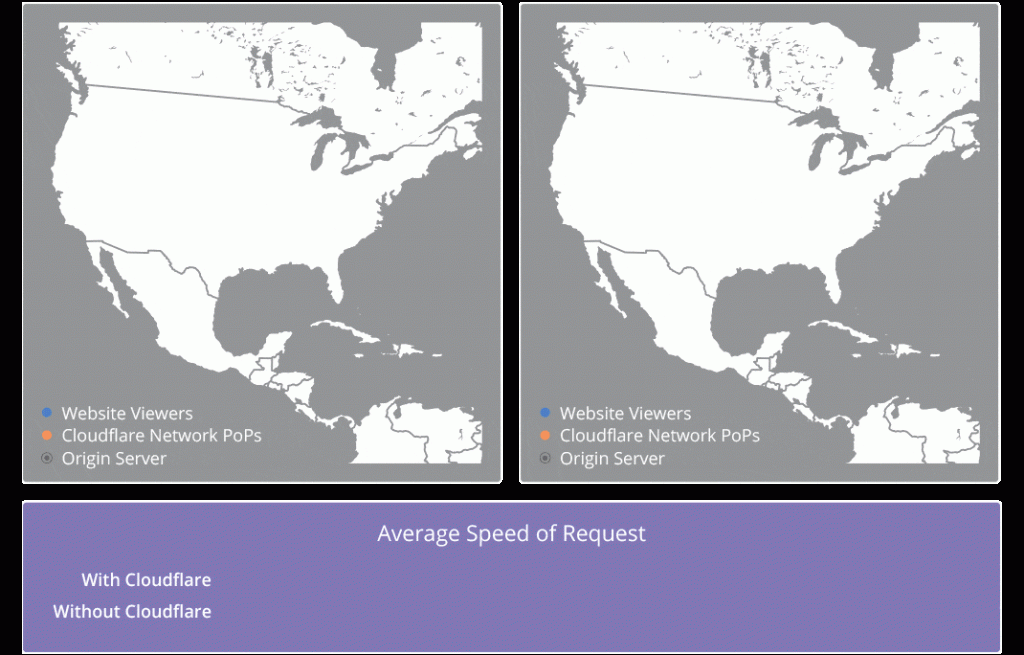
Content Delivery Networks (CDNs) solve this problem by caching your files on a global network of servers. Now when someone visits your website, the images will be uploaded from the nearest server.
Here's a cool GIF of CloudFlare which represents this process perfectly:
There are many CDNs out there. These are only some of them:
- Cloudflare (free tier available);
- KeyCDN ;
- Amazon CloudFront (free tier available);
- Google Cloud CDN (free trial available)
If you are using WordPress, setting up a CDN is easy. Register to get the chosen CDN, follow the instructions and then install a plugin like W3 Total Cache , CDN Enabler or WP Rocket to enable the CDN on your site. It's that easy.
The cool thing about image CDNs is that they help automate the image optimization process. This is something that Google recommends and honestly, if you have a large website, it is a good idea.
Final thoughts
Image SEO is a complex subject. Google has tons of documentation on this.
For that reason, it's important to note that we haven't covered absolutely everything in this article. That would be impossible. They can read the Google documentation. This article deliberately focuses on the 'big' elements that I think will have the most substantial positive SEO impact.
Keep in mind that you should also make an effort to ensure that your images are of high quality and contribute to a great user experience.

