RECOMMENDED: Click here to fix Windows errors and get the most out of your system performance
By combining the power of a console in a portable format reminiscent of 3DS, the Nintendo Switch has quickly become a favorite of millions of people, including many of the world's leading game content creators. This has only increased its popularity. However, all devices have shortcomings. And when it comes to the Switch, the UI is described as clunky and sometimes confusing. But what can you do to fix any issues you may have with the interface?

Wireless switch controllers are largely responsible for the versatility of the system. But you don't want to find yourself in a situation where your controllers run out of power in the middle of a final Fortnite or Super Smash Bros. session. Your controllers should last around 20 hours when fully charged, but that time can pass. quickly, especially if you leave your games idle for long periods of time.
So if you're a new switch owner or want to know what to expect before buying, this guide will show you how to prevent your Joy-Con or Pro controllers from losing power.
How to know if Nintendo Switch is charging or not?
Luckily, Nintendo has made it extremely easy to find out whether or not your system is charging. Regardless of the charging method you use, you will notice a small battery icon appear in the upper left corner of the screen. In turn, a flash will appear next to it. When you see these special symbols, you can be sure that the switch is charging.
Note that some users may be confused if other LEDs are lit during, before, or after the switch is charging. In general, a green LED in the upper right corner of the screen can blink or stay on permanently; this has nothing to do with the switch battery. Rather, it indicates whether the switch is outputting its video signal correctly or not.
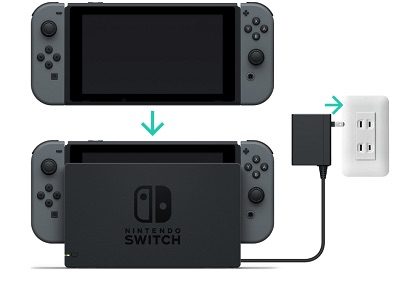
How to charge the Nintendo Switch console
Directly with the Nintendo Switch AC adapter:
- Insert the USB plug of the Nintendo Switch AC adapter (HAC-002) into the USB port on the bottom of the system, then connect the AC adapter directly to a power outlet.
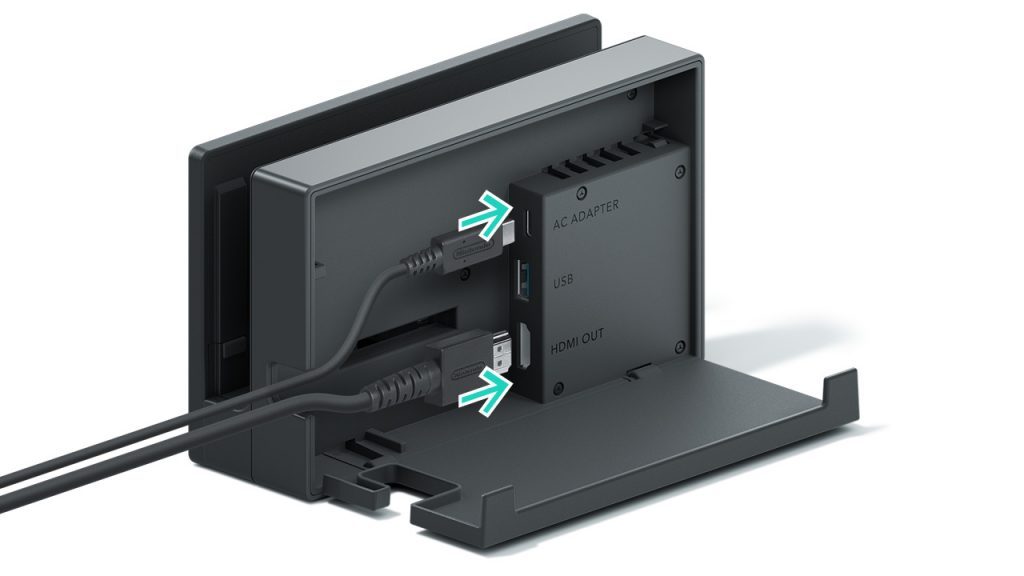
Using the Nintendo Switch dock
- Connect the Nintendo Switch Power Supply (HAC-002) to the Nintendo Switch Dock (HAC-007).
- Open the rear cover of the base.
- Insert the USB plug of the AC adapter into the top connector on the base labeled "AC Adapter" and close the lid.
- Insert the Nintendo Switch console into the dock and make sure the LCD screen is facing the same direction as the front of the dock. Next, plug the Nintendo Switch adapter into a power outlet.
conclusion
After all, the switch battery is a fickle beast and must be handled with care. Don't overload the console or JoyCons if you can help it. If you have any tips for extending battery life or alleviating some of the difficulties you've encountered with the dock or chargers as a switch user, please let us know in the "Feedback" section below.
https://en-americas-support.nintendo.com/app/answers/detail/a_id/22395/~/console-cannot-be-charged
RECOMMENDED: Click here to fix Windows errors and get the most out of your system performance