In this step-by-step tutorial, I'll show you the simple process of creating landing pages with Elementor, while creating a live example of a stylishly designed landing page.
Note! Some features mentioned in this tutorial, such as the Forms widget, are only available in Elementor Pro. If you haven't already, we highly recommend updating to Pro.
You will learn why professional designers choose Elementor as their preferred solution for creating complete landing pages and websites.
What do you need before you start?
- An active WordPress installation
- Install Elementor
- Install Elementor Pro
Setting up your landing page
- First, in the WordPress dashboard, click on Pages> Add New
- Click Edit with Elementor

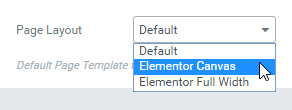
- Go to the lower left gear icon
- Change page layout to Elementor Canvas Print, to work on a blank landing page
Add your landing page elements
1. Click the folder icon to add a template 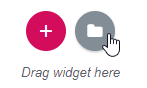
2. Click the Blocks tab.
3. Using the selection drop-down menu, start adding the different blocks that will make up your landing page. One possible landing page structure you can follow is:
Header - For landing pages, we usually minimize the header. In this example, we will only display the site logo, centered in the middle.

Hero - This is, without a doubt, the most important part of your landing page. It is sometimes called the 'Above the fold' section, as it is the first thing your visitor sees before scrolling down the page. Therefore, we will place the most important elements here. Title, subtitle and subscription form.
Services - Here, we go into more details, describing the main services or characteristics that our company provides.
Testimonial - The testimonials section shows social proof that your current clientele is satisfied with the service they received from you.
briefcase - Show the visitor examples of your work, so they know if it matches what they are looking for.
Footer - Because your visitors have already scrolled down the page, you want to offer them another call to action to encourage them to do what you want them to do.
Closing the page, we end with the footer, which generally includes your Privacy Policy and Terms of Use.
Customization of each block: challenge yourself!
Go through each block and make any necessary changes to customize it.
Here are some example changes:
- Change title content - Try changing the text to fit your own business description
- Change pictures - Try swapping the images in the Portfolio section for yours
- Change colors - Choose 3 colors you want to work with and apply them all over the page
- Change funds - Change the background image in the hero section to your own
Customizing it for mobile devices
All blocks are predesigned as mobile 100%s. Still, you can switch to mobile view and start customizing margins, padding, and other settings for mobile devices and tablets.
Watch this tutorial to learn how.
Preview the result and publish your landing page
Before posting, a good rule of thumb is to preview the result and make sure everything looks in order.
To do so, click on the eye icon in the lower left panel.

Then publish the article. You will notice that the green post button changes to gray Refresh.